Redhat OpenShift Installation
Installation prerequisites
- An OpenShift 4.2+ deployment
- Either a Google Cloud storage, Azure Blob storage, or S3 compatible storage account where Cortex Certifai scan results will be
stored
- You can use the object store included in the OpenShift Container Storage (e.g. noobaa, ceph) as an S3 compatible storage account
- Create the storage account and capture the associated credentials
- For S3 compatible storage, capture the endpoint, access key, secret key, and storage path
- For Google Cloud Storage, capture the JSON content of the application credentials file for a service account obtained from GCP
- For Azure blob storage, capture the account key, account name, and SAS token
- A namespace/OpenShift project where you will install Cortex Certifai
- In the "OpenShift Console" go to "Projects" and "Create Project"
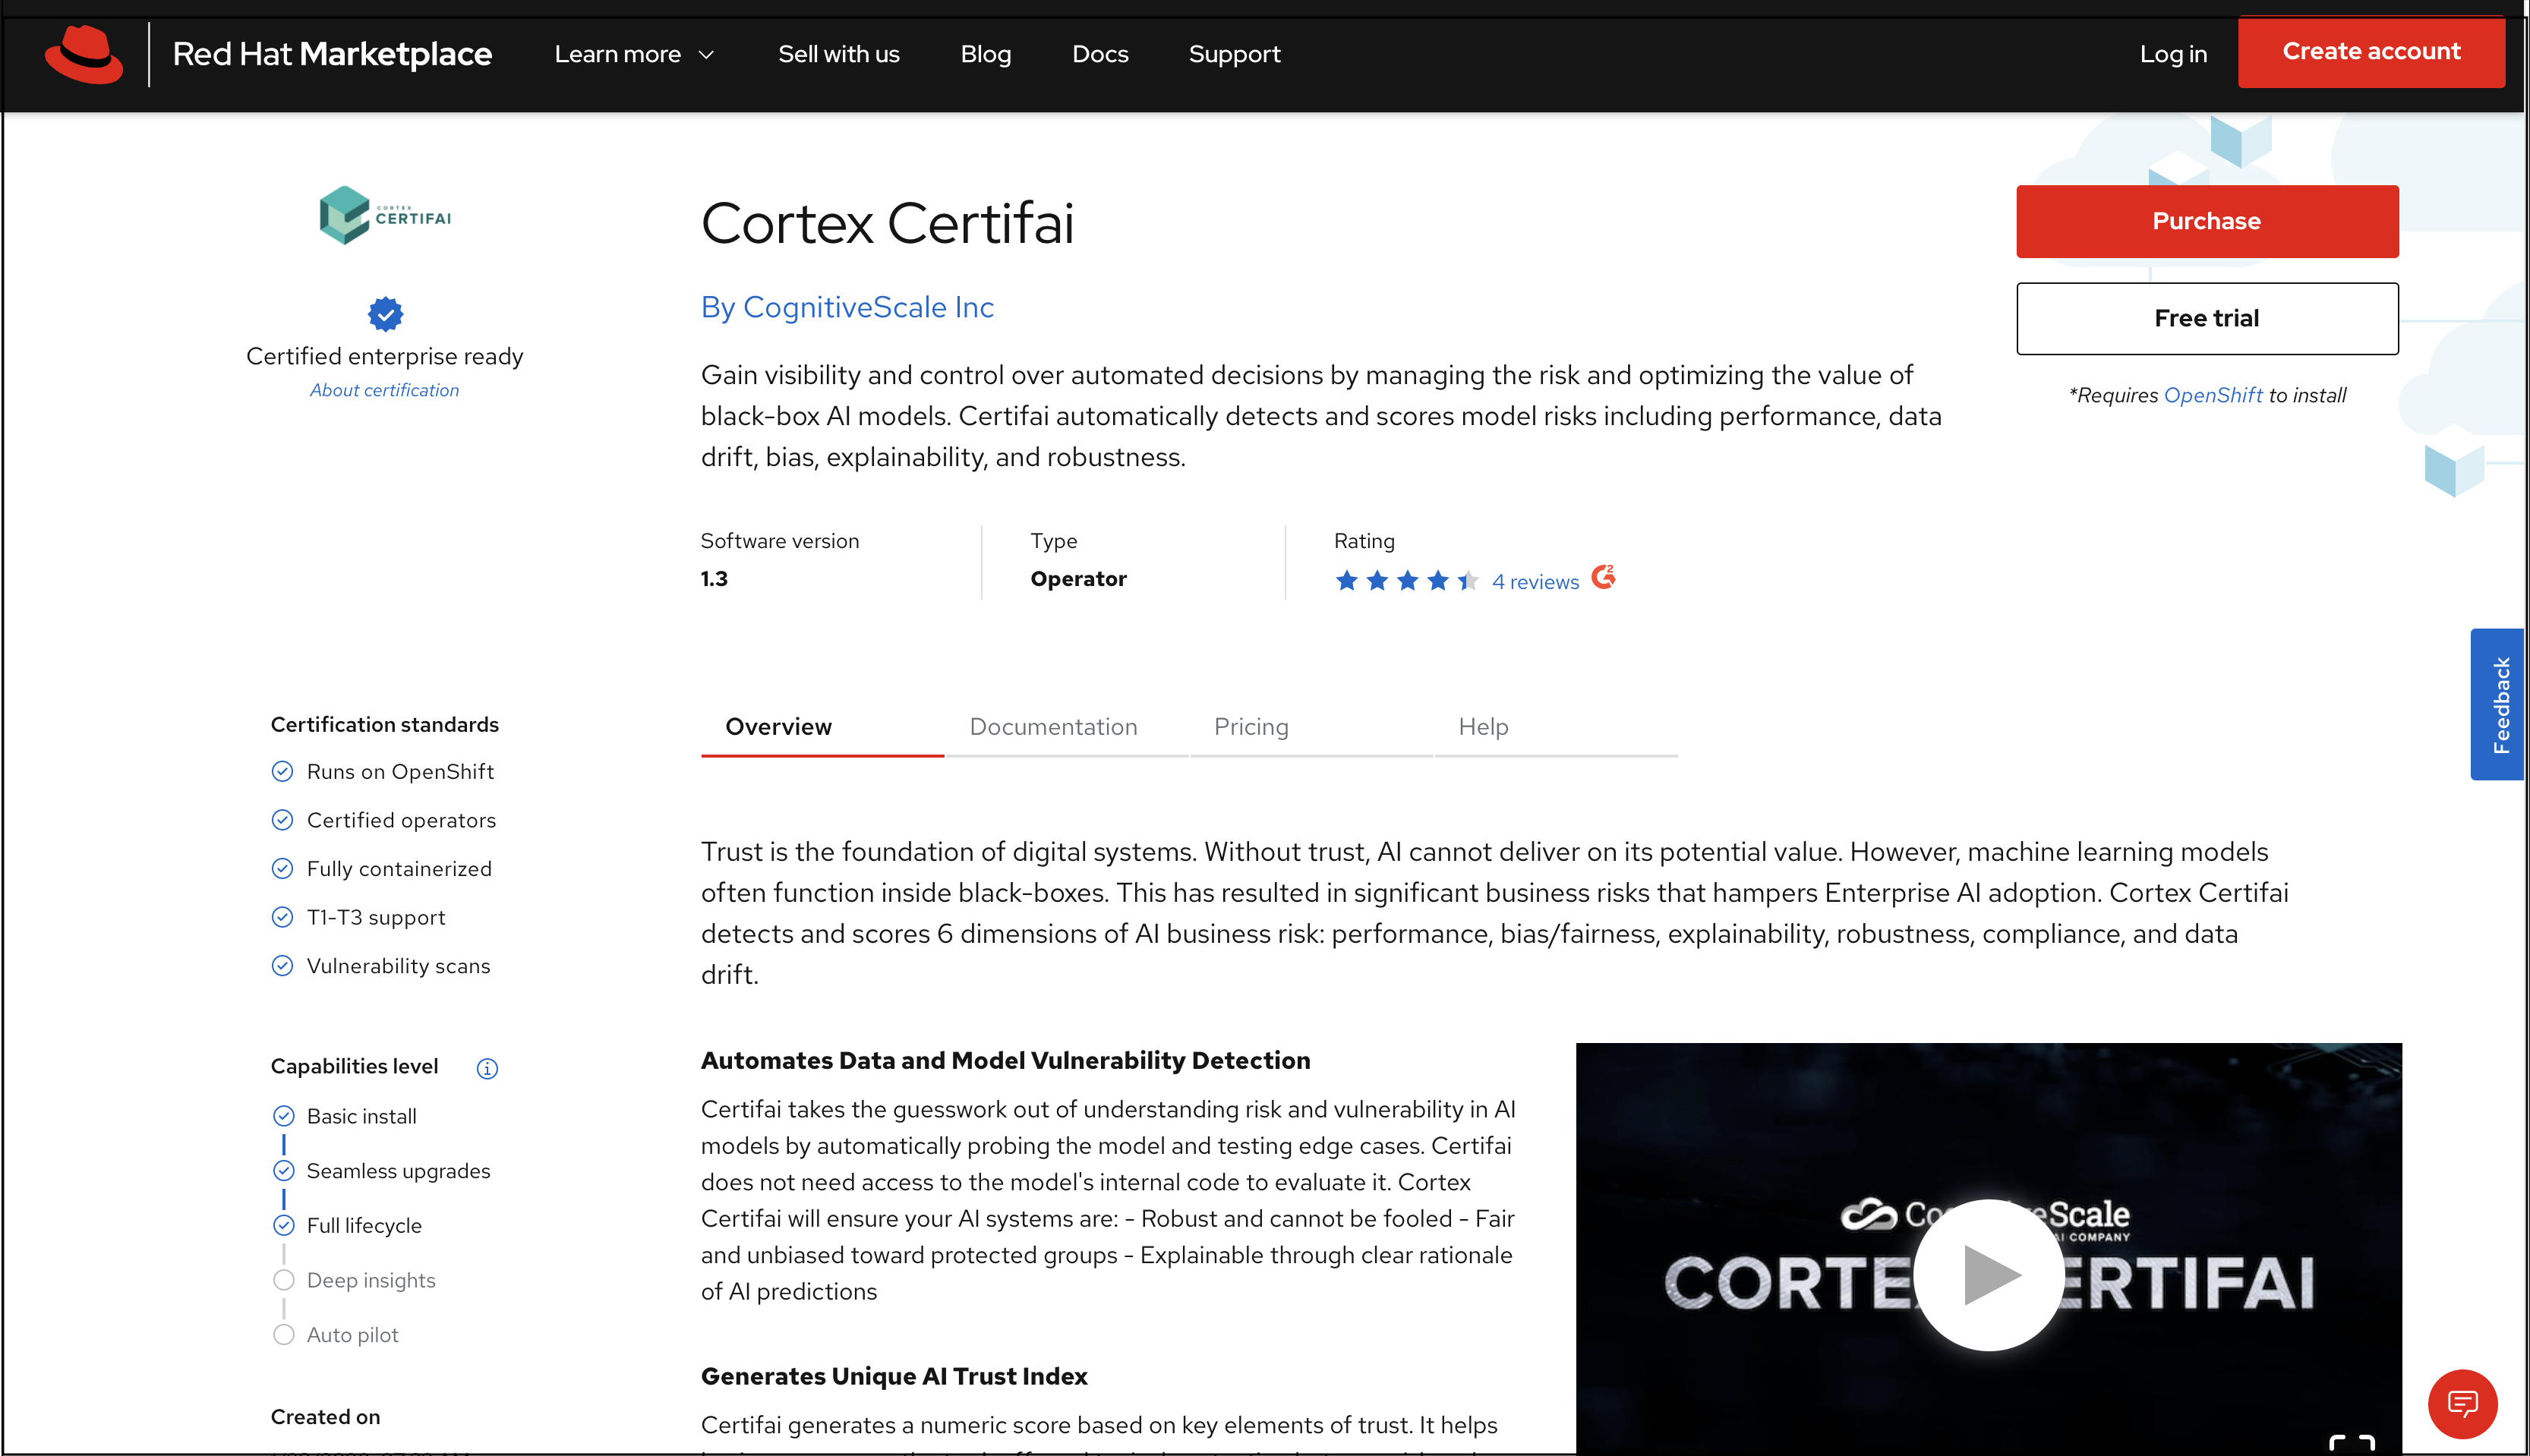
Install Certifai from the RedHat Marketplace
In the RedHat Marketplace, either purchase or enroll for the free trial of the Cortex Certifai Operator.
After purchasing the trial/plan of the Cortex Certifai Operator, navigate to the operator page under My Software in the Workspace dropdown menu. You should see the following four tabs on the page:
- Overview
- Operators
- Documentation
- Support
Click Install Operator, under the Operators tab to begin.
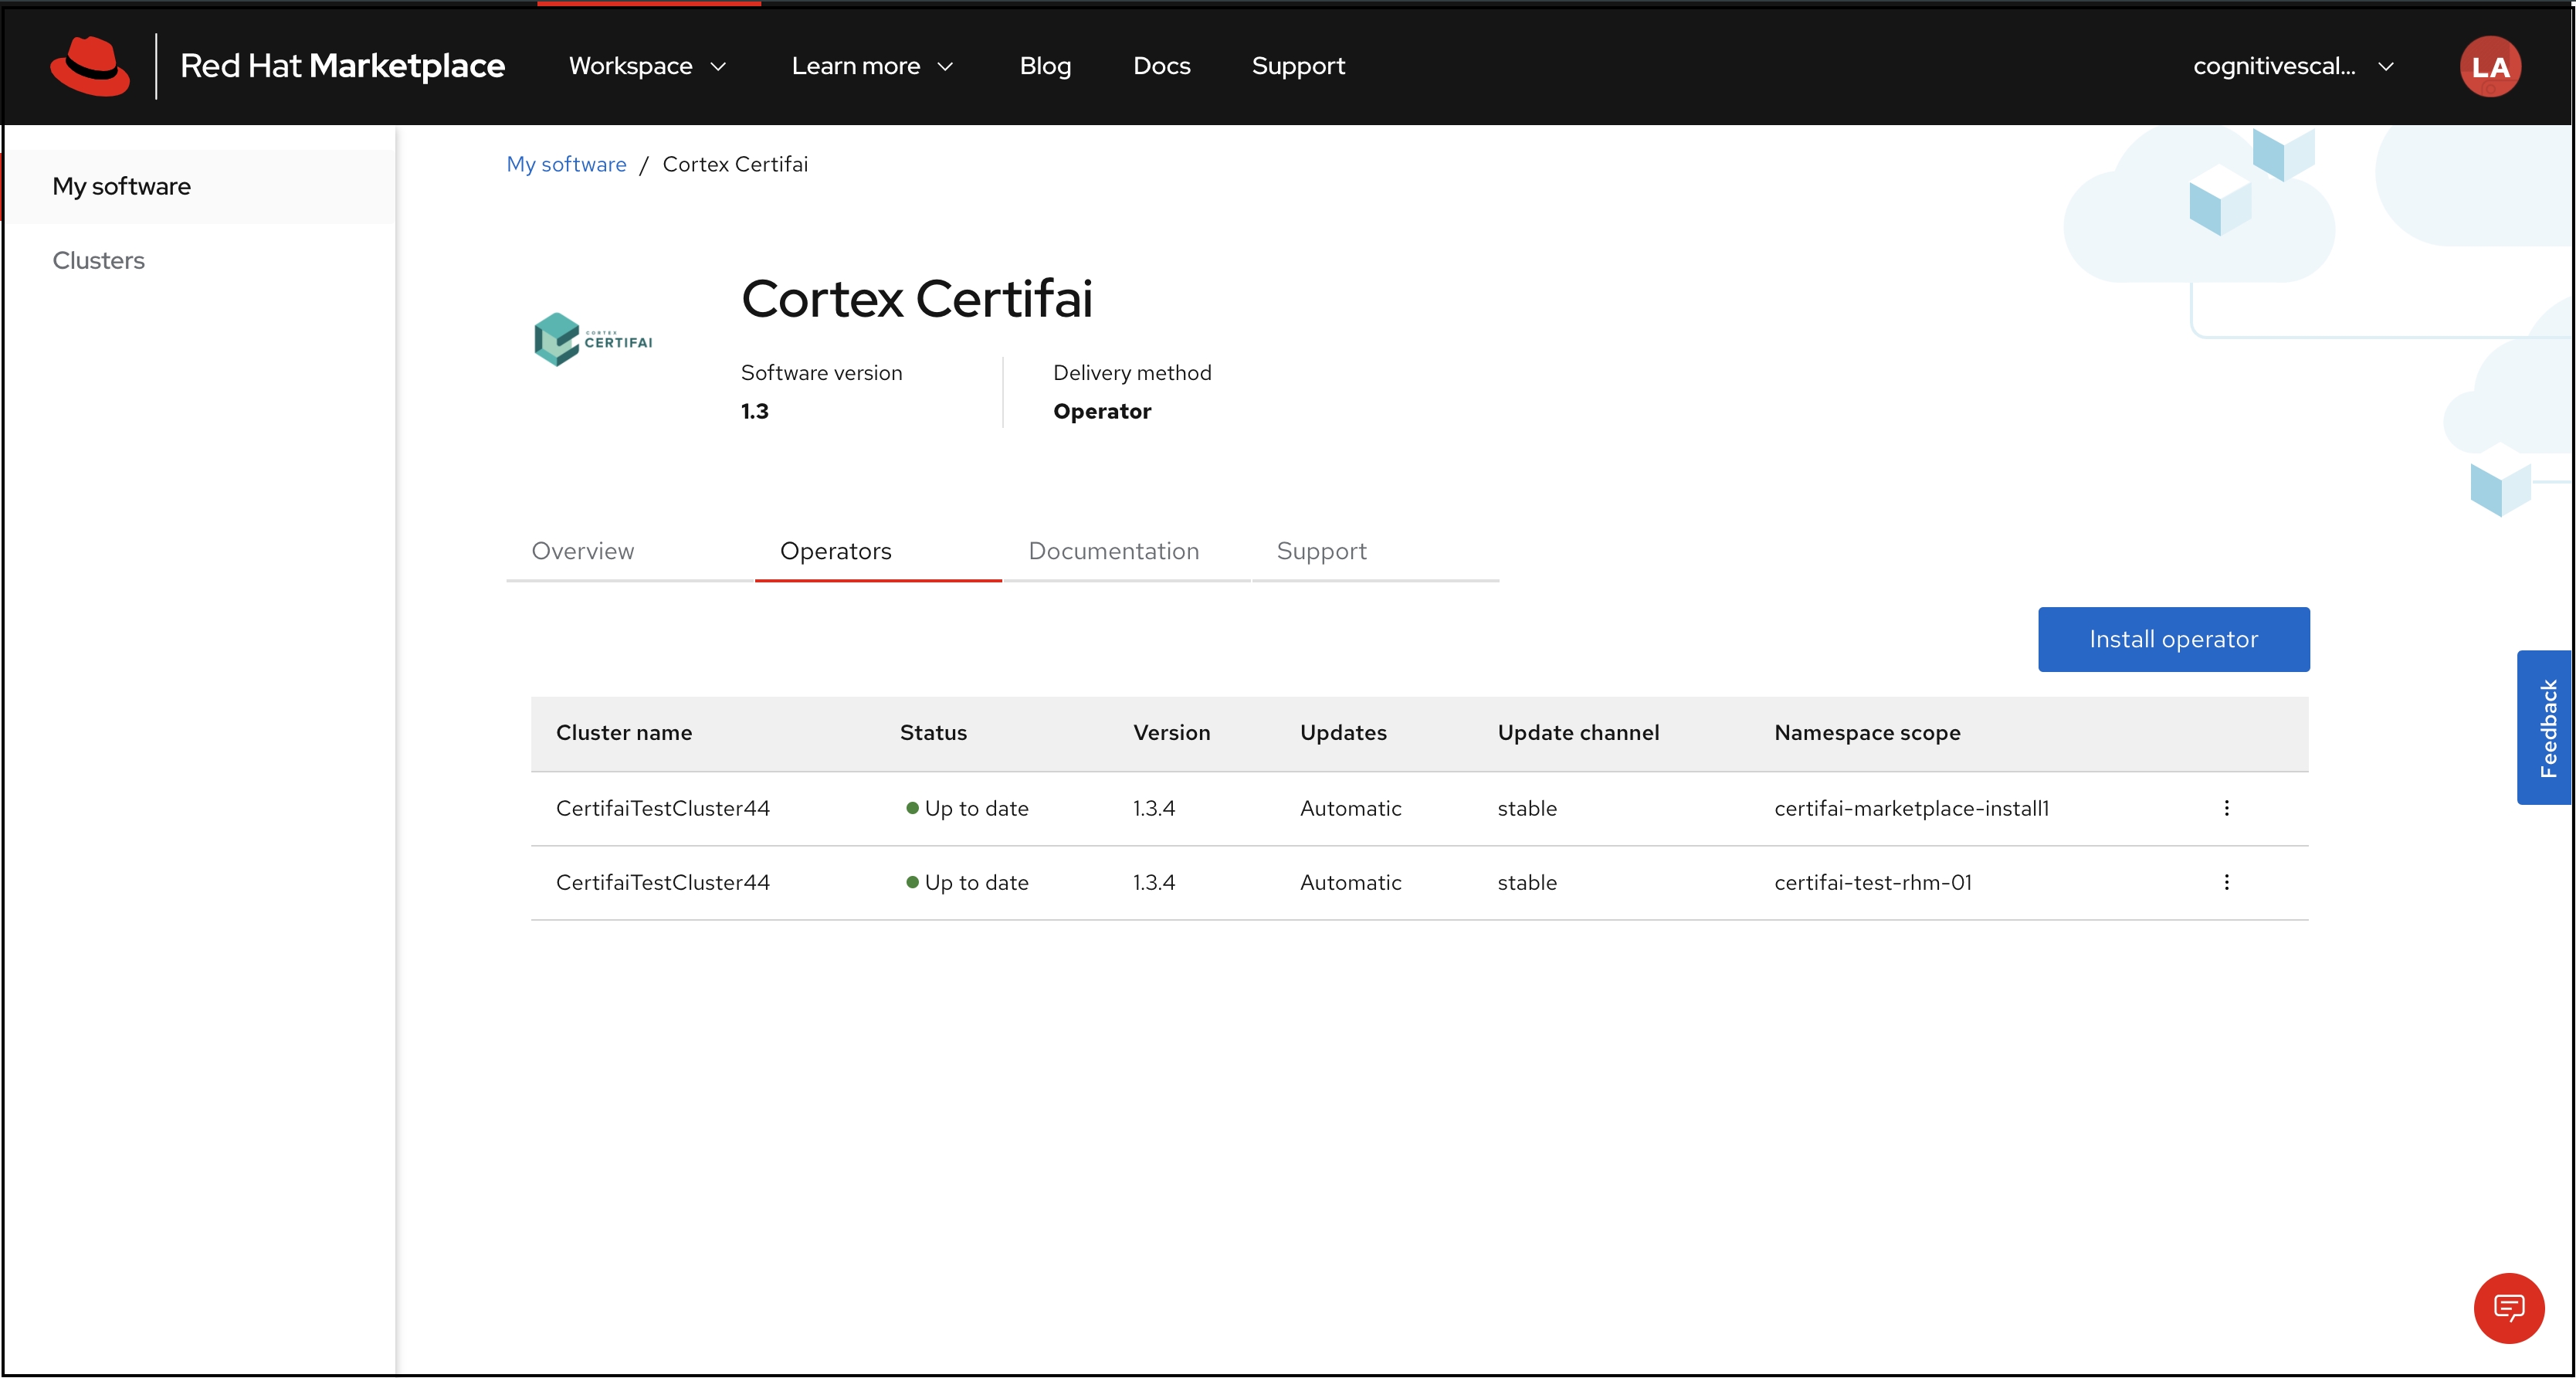
On the Install Operator page select the namespace for this installation from the dropdown. (Namespaces are created by system admins as a prerequisite step.) The other options are set to defaults as follows:
- Update Channel = "stable"
- Approval Strategy = "automatic"

Click Install.
Info
The installation process may take a couple of minutes to provision the Certifai software onto the cluster.
After the installation is complete, you should see that the status of the your cluster is Up to date. Next, navigate to the cluster console. You can reach the console, by clicking the menu icon at the far right of the row with Namespace Scope you selected in Step 2.

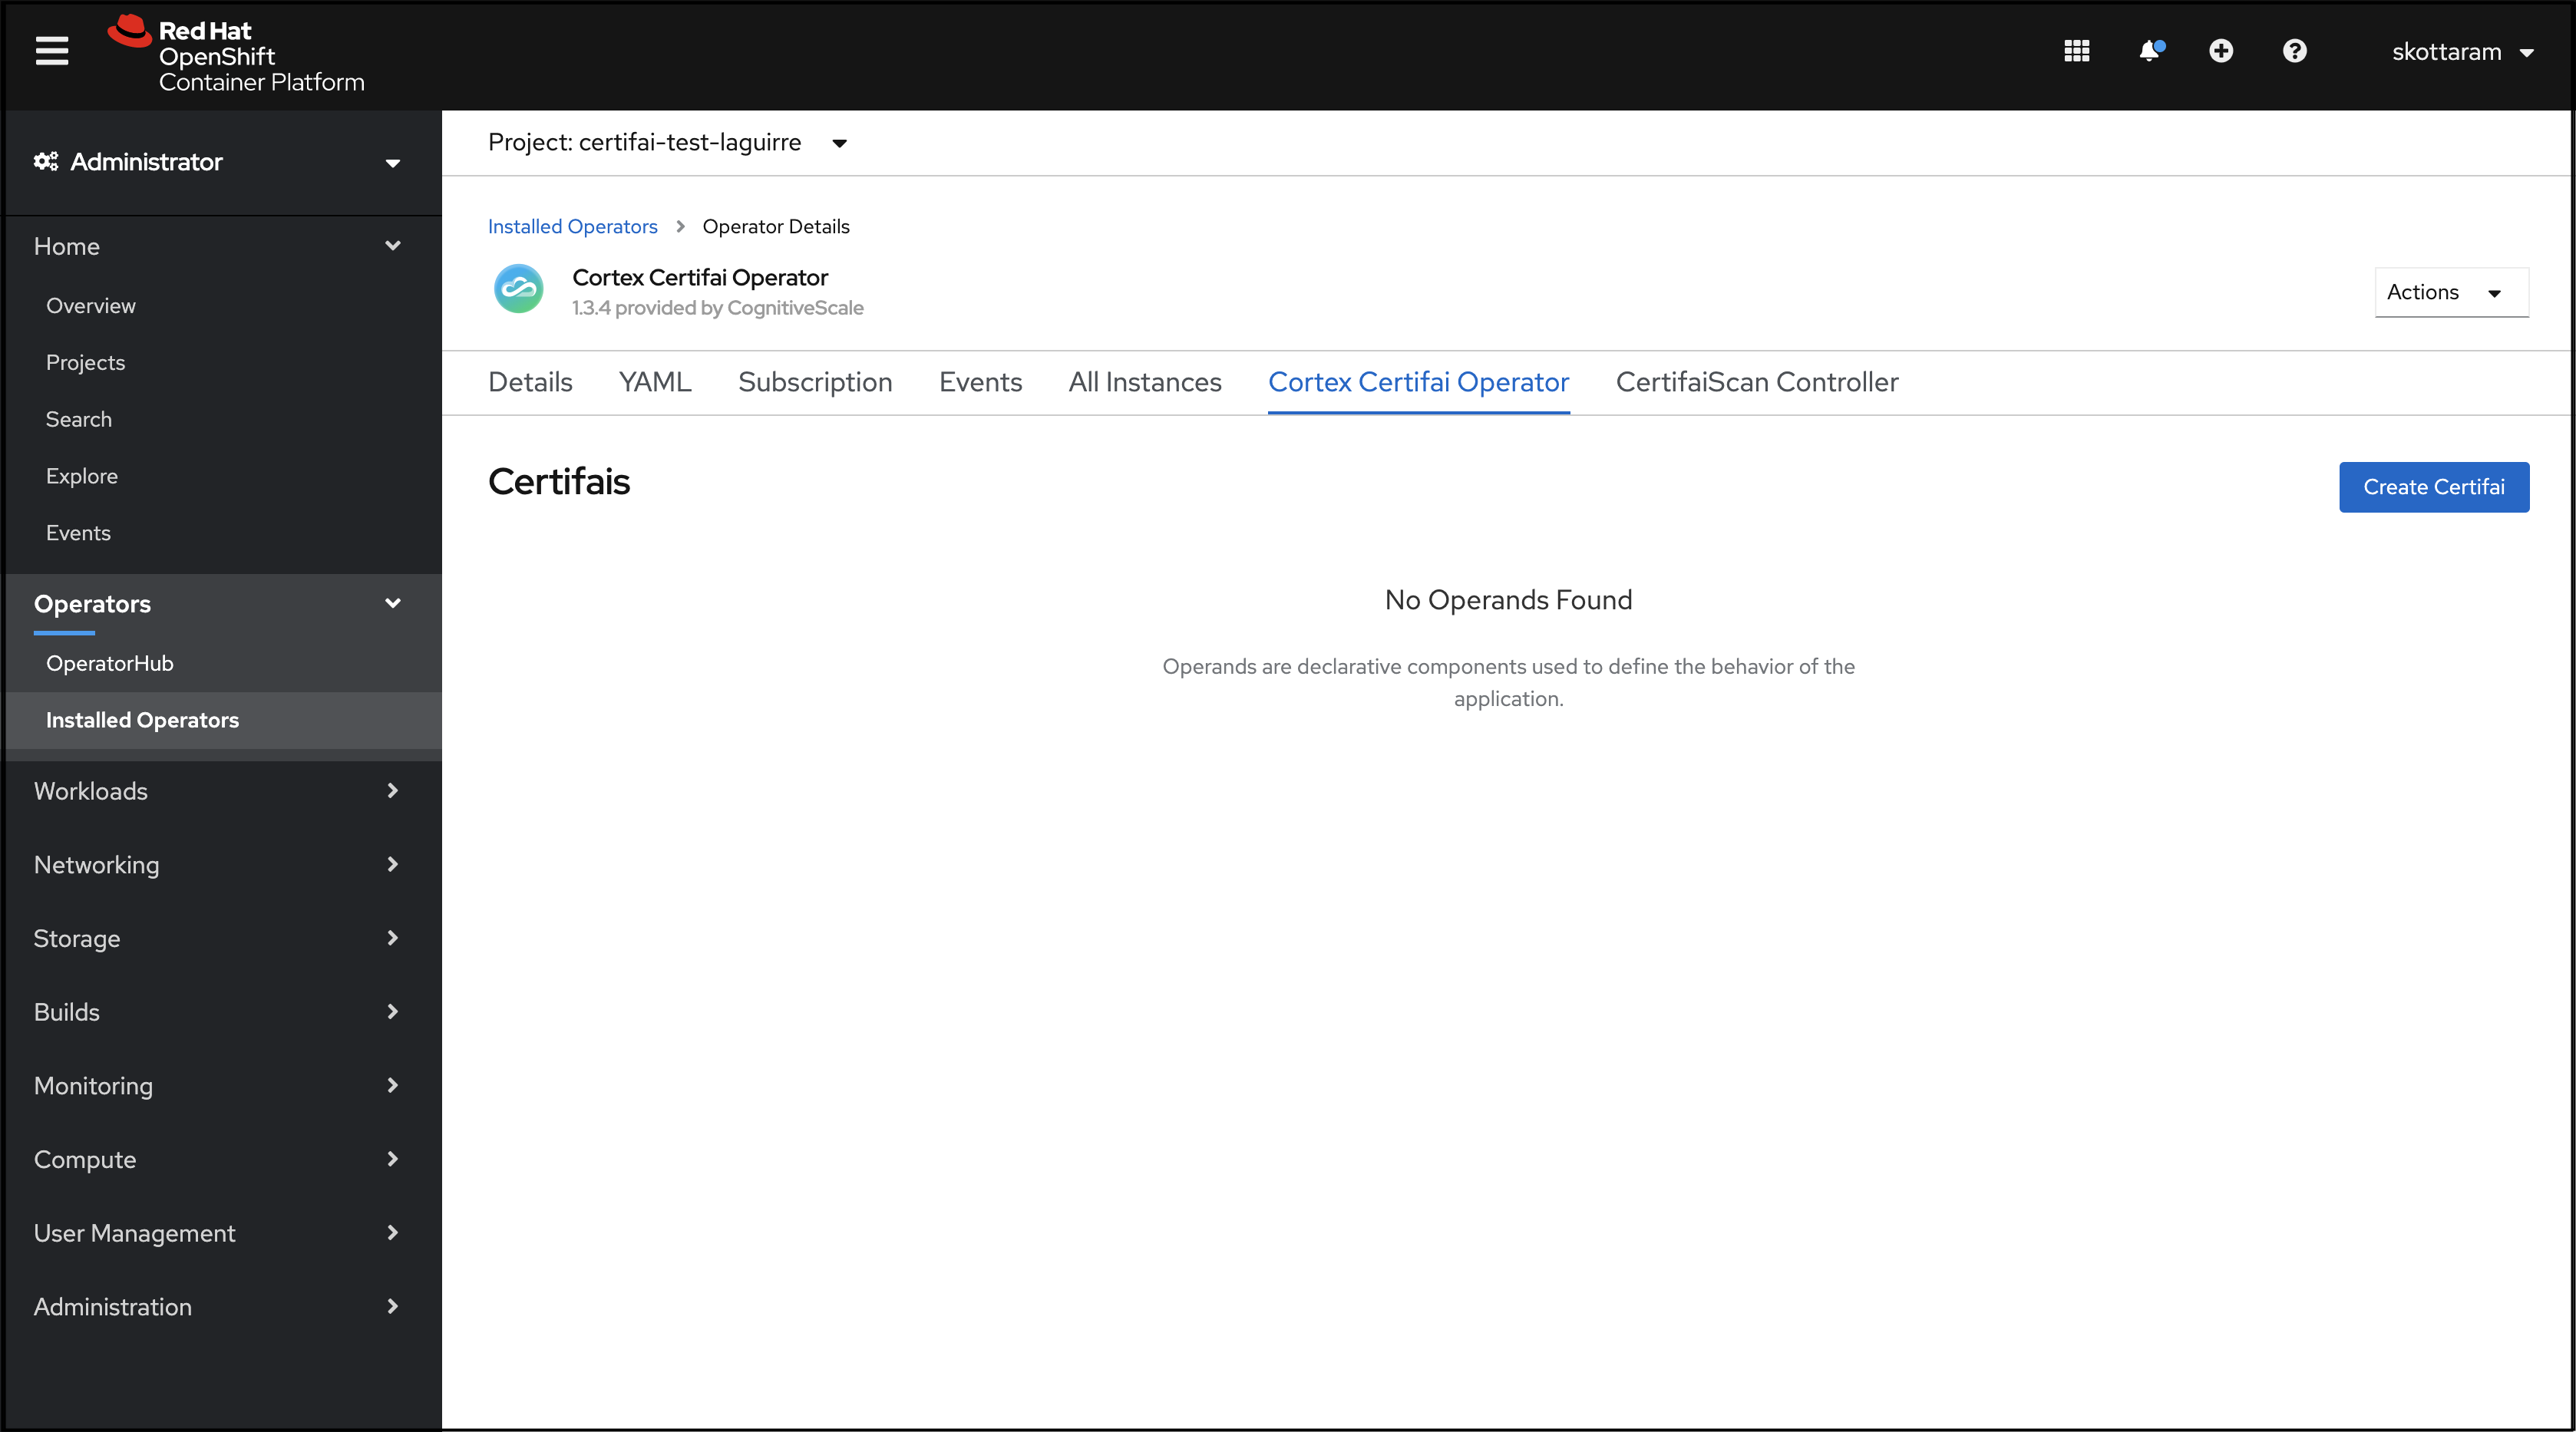
Navigate to the Installed Operators page, under the Operators tab on the left navigation panel. The page will display a list view of operators you've installed. Click the name of the operator you just added.
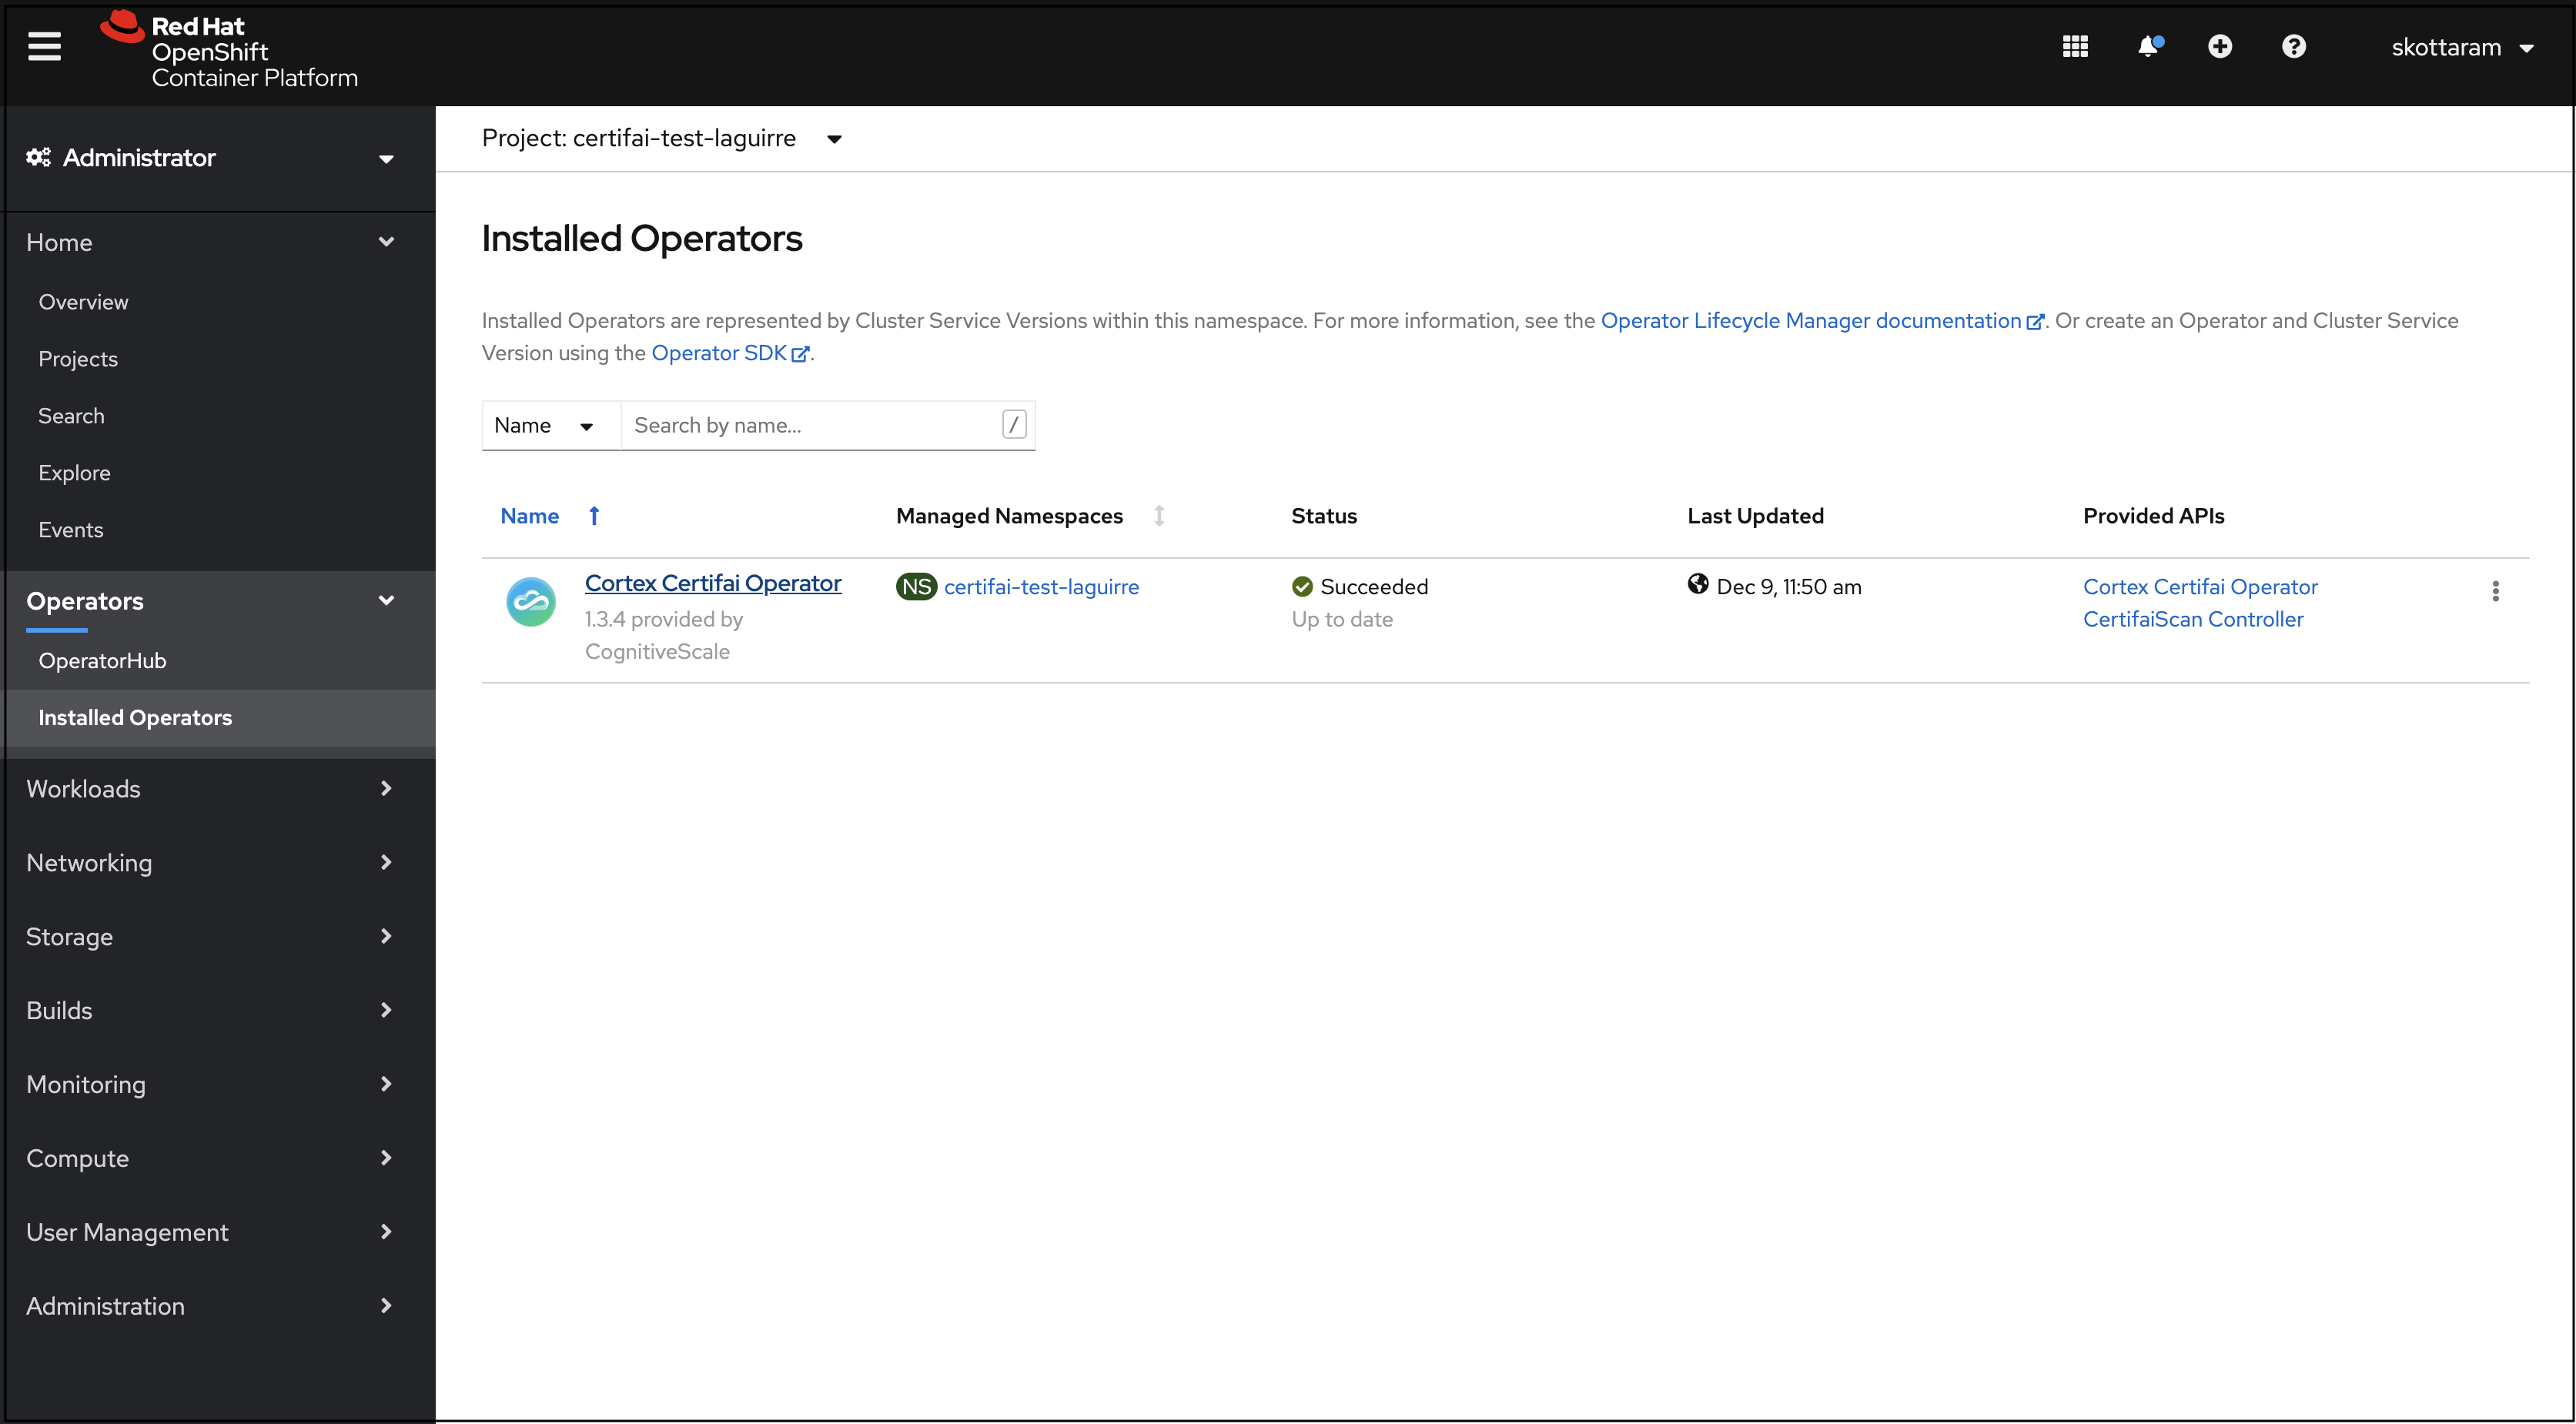
A page opens that displays an overview of your operator and six other tabs:
- YAML
- Subscription
- Events
- All Instances
- Cortex Certifai Operator
- CertifaiScan Controller
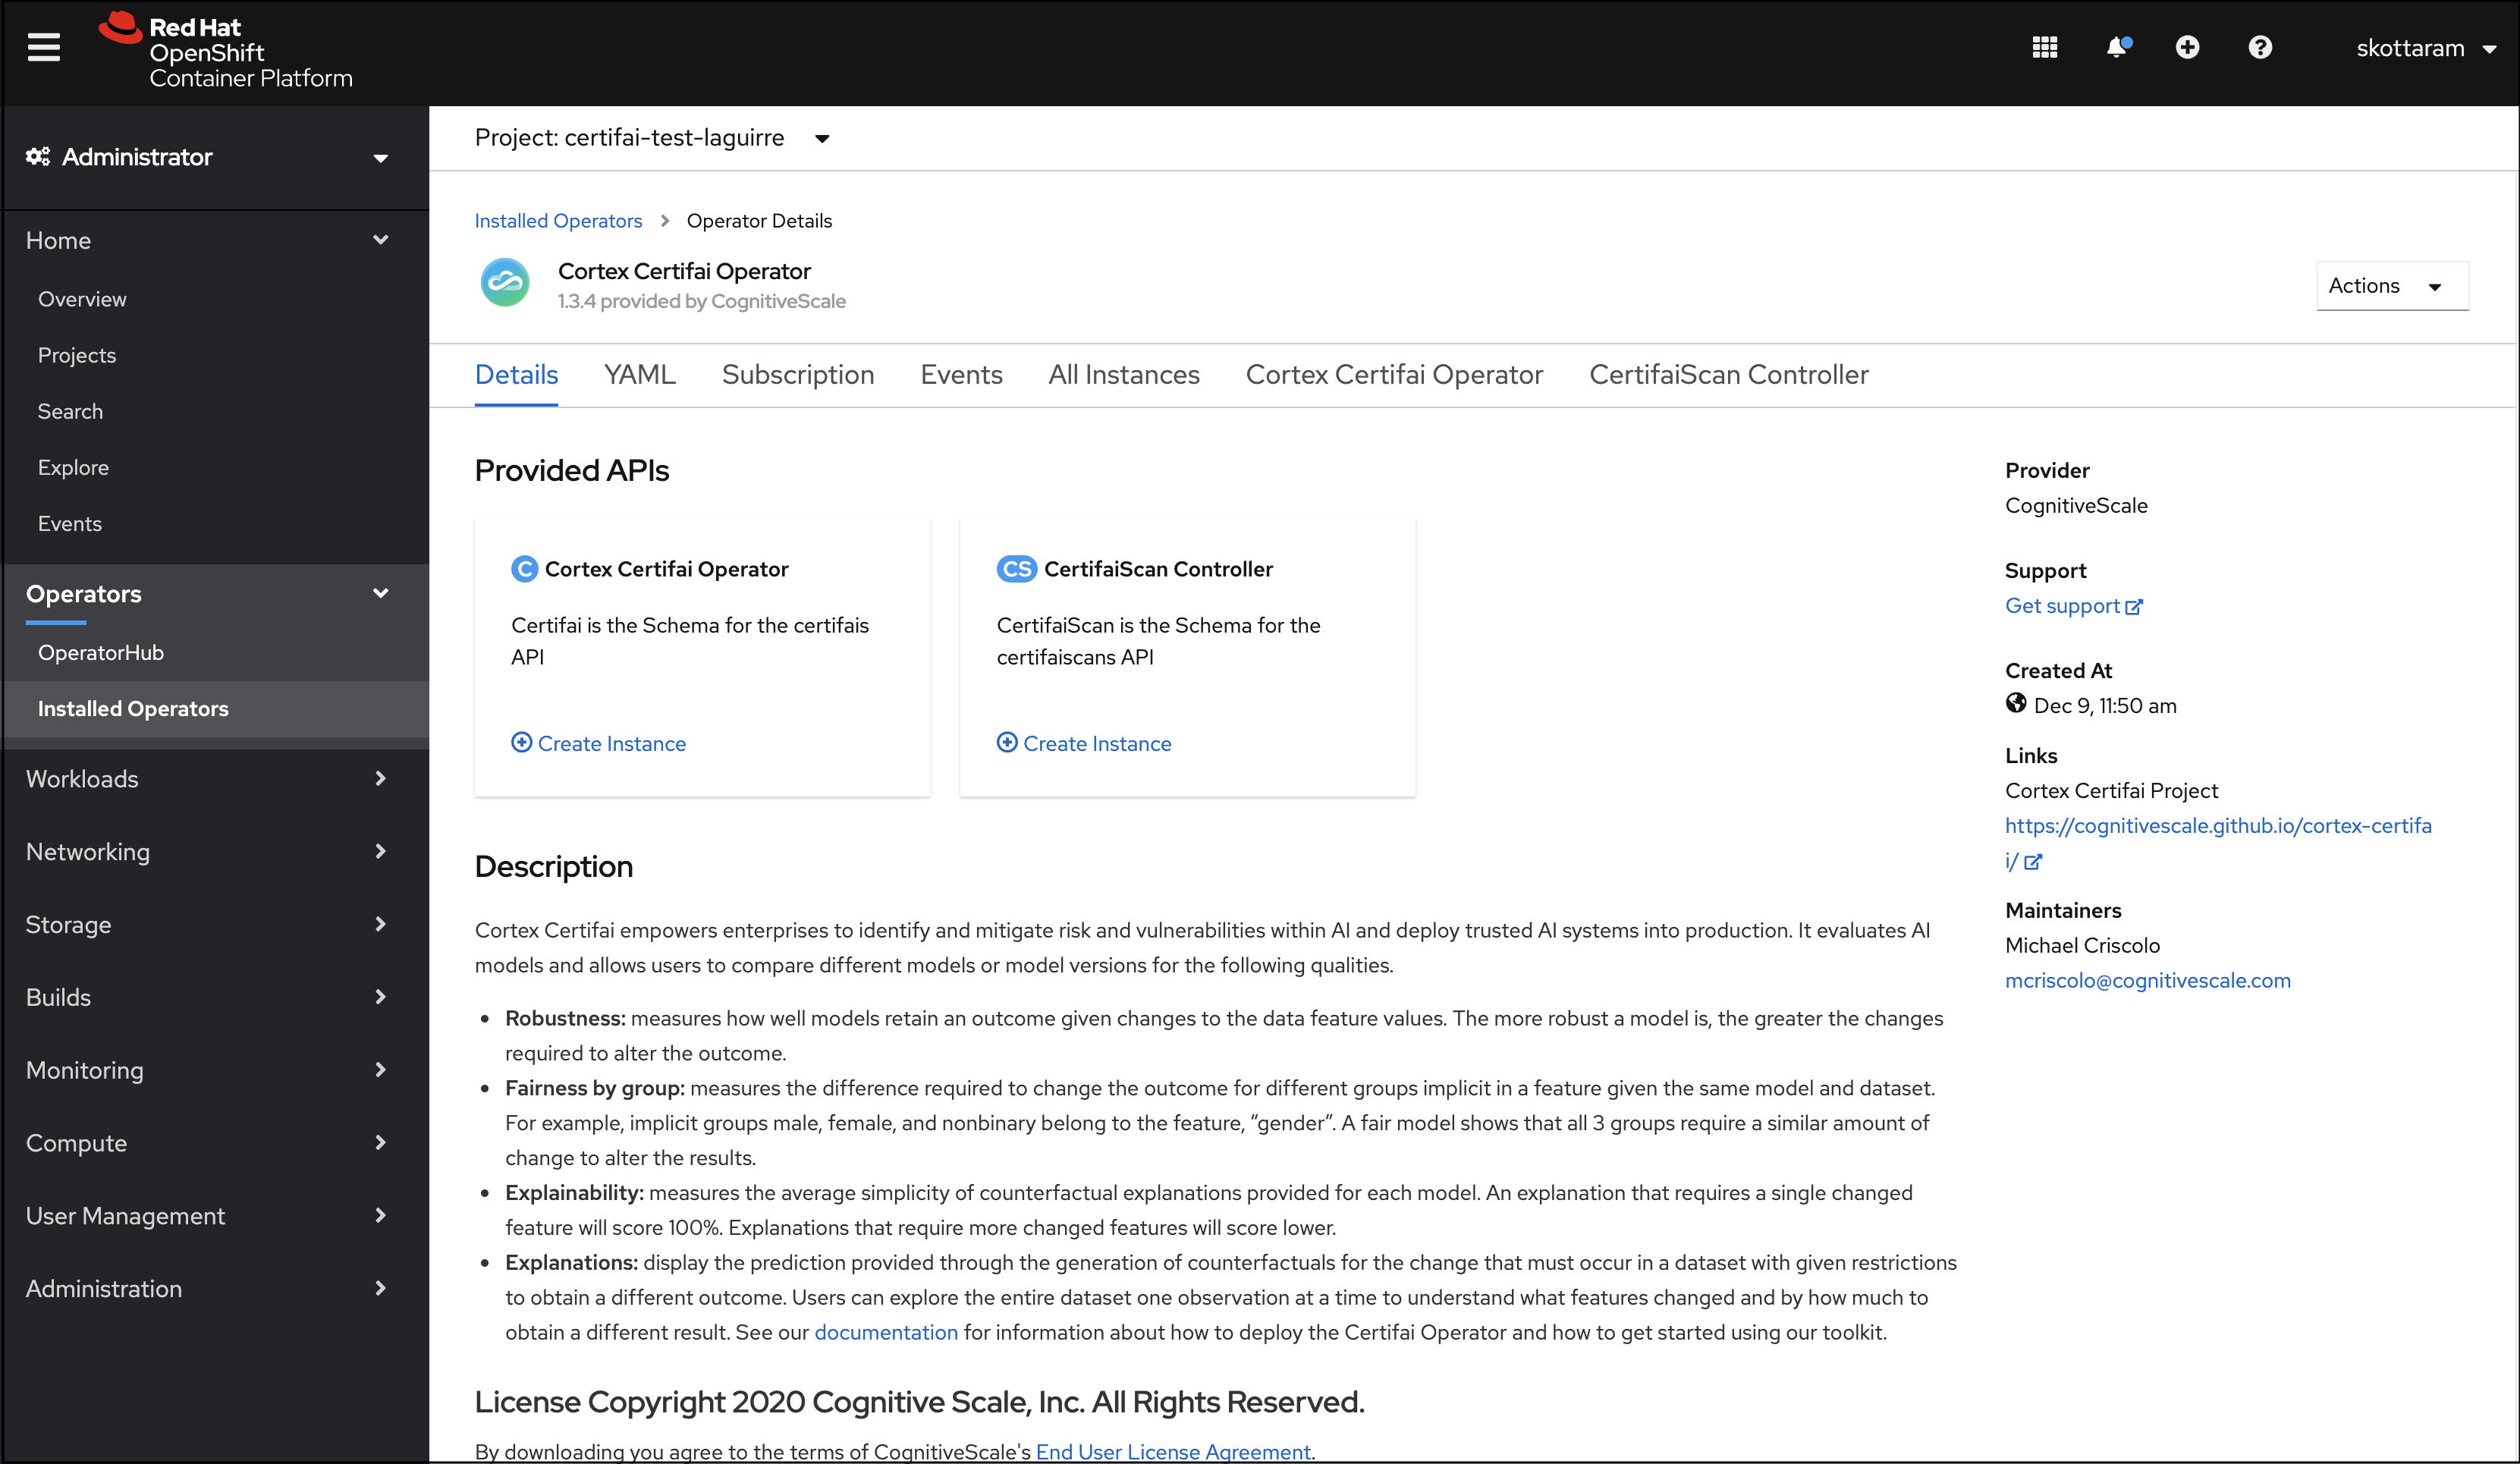
Go to the tab labeled Cortex Certifai Operator, and click Create Certifai.
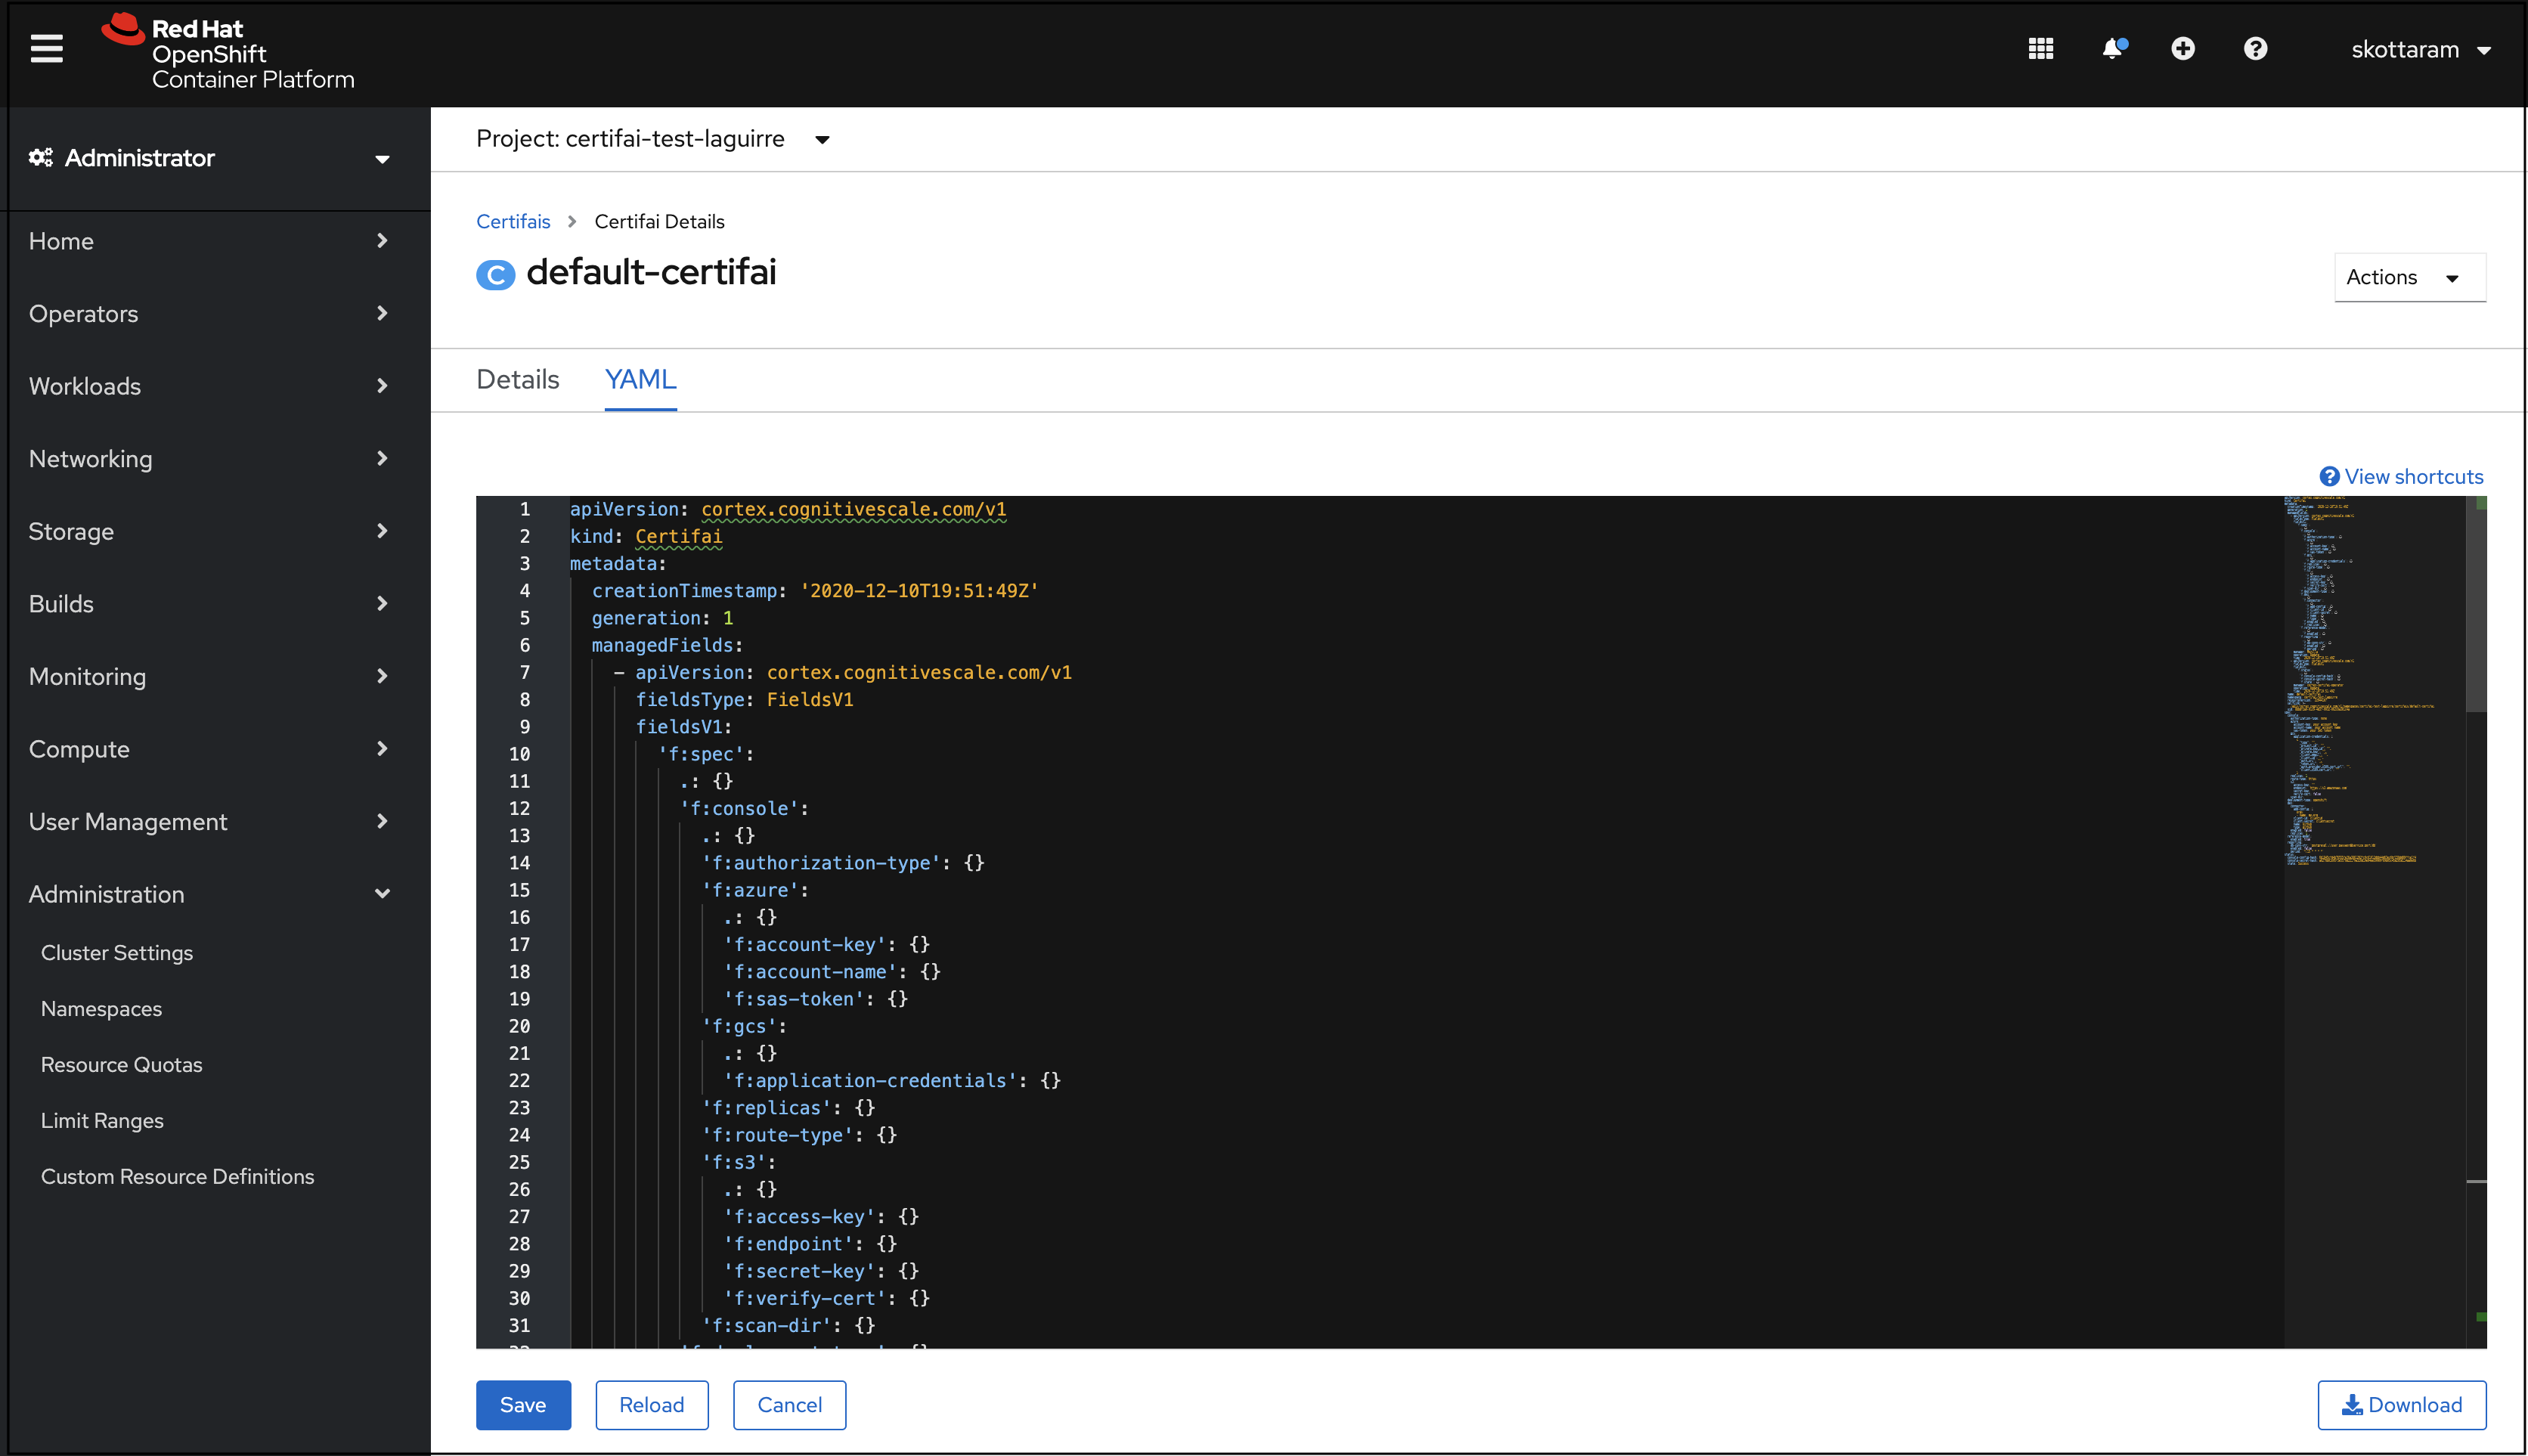
You can configure the Certifai Operator instance by either filling the information under the "Form View" or "YAML View". Select "YAML View" for full control of the object creation.
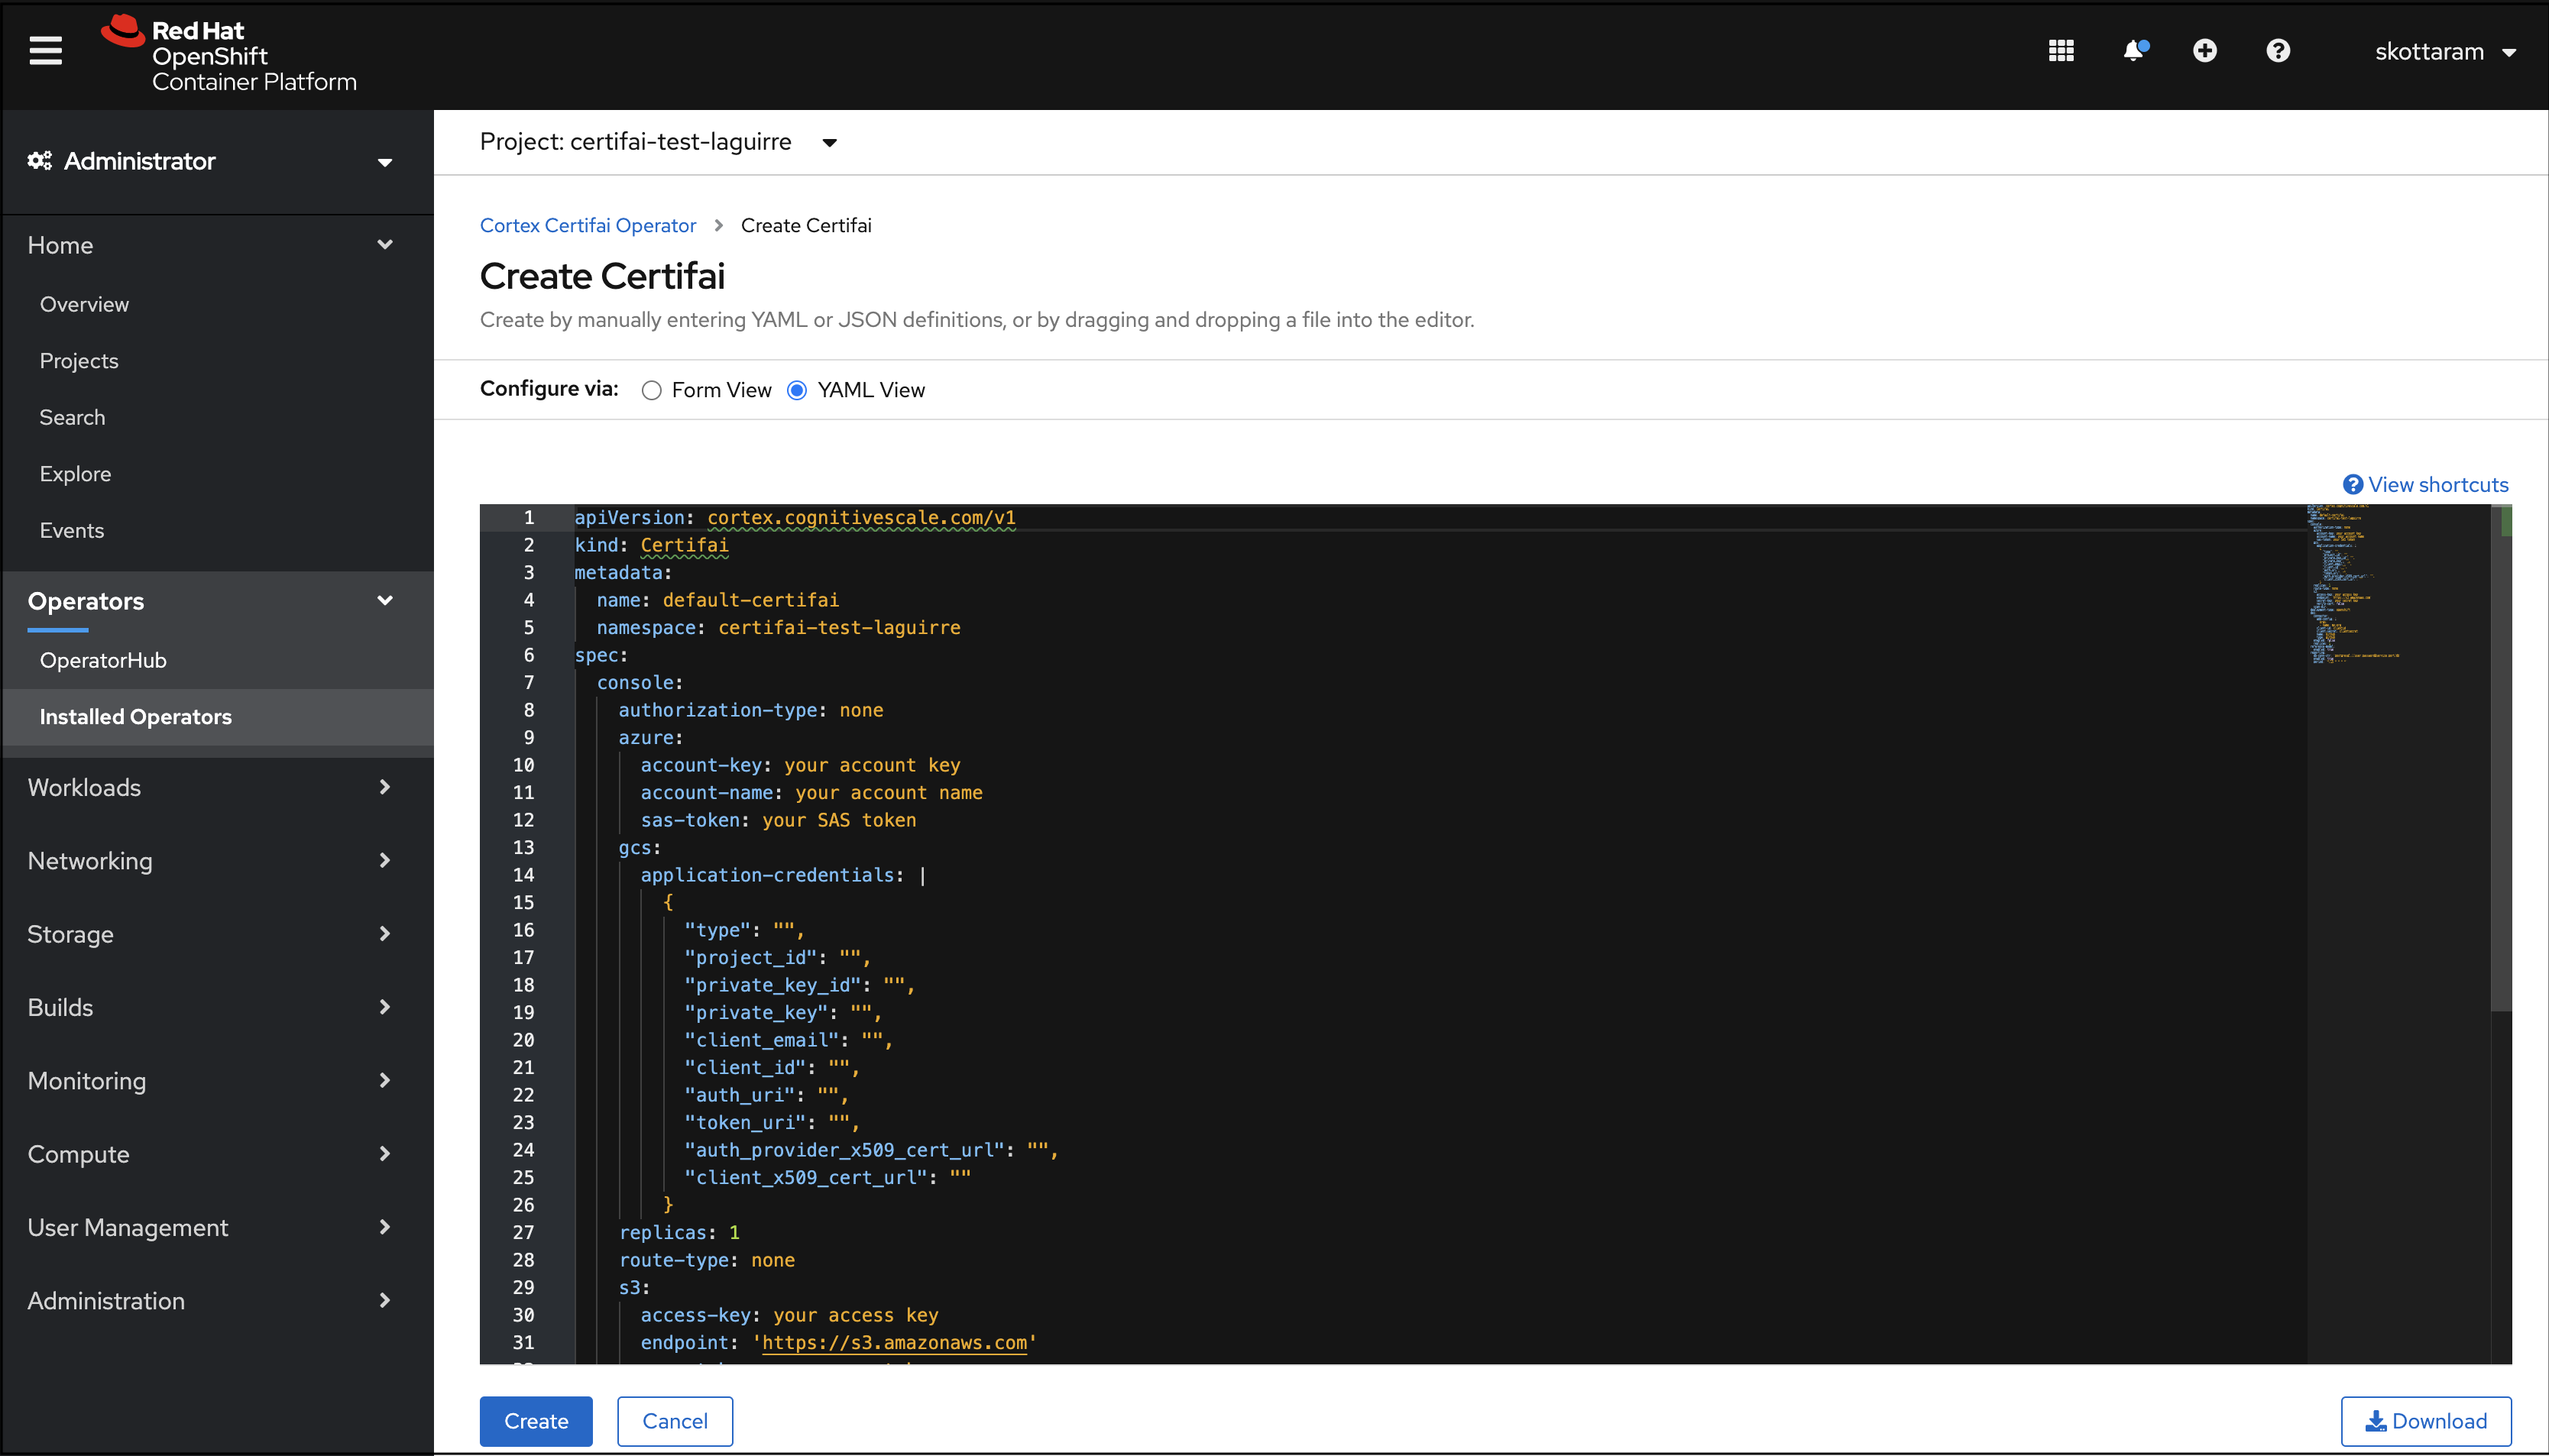
The page will have a window with the following YAML config:
apiVersion: cortex.cognitivescale.com/v1kind: Certifaimetadata:name: default-certifainamespace: certifai-test01spec:console:authorization-type: noneazure:account-key: your account keyaccount-name: your account namesas-token: your SAS tokengcs:application-credentials: |{"type": "","project_id": "","private_key_id": "","private_key": "","client_email": "","client_id": "","auth_uri": "","token_uri": "","auth_provider_x509_cert_url": "","client_x509_cert_url": ""}replicas: 1route-type: nones3:access-key: your access keyendpoint: 'https://s3.amazonaws.com'secret-key: your secret keyverify-cert: falsescan-dir: ''policy:authorization-type: noneazure:account-name: your account nameaccount-key: your account keysas-token: your SAS tokengcs:application-credentials: |{"type": "","project_id": "","private_key_id": "","private_key": "","client_email": "","client_id": "","auth_uri": "","token_uri": "","auth_provider_x509_cert_url": "","client_x509_cert_url": ""}enabled: falsequestionnaire-dir: ""replicas: 1route-type: nones3:access-key: "your access key"secret-key: "your secret key"endpoint: "https://s3.amazonaws.com"verify-cert: falsedeployment-type: openshiftscan-manager:enabled: falsereplicas: 1scan-data-dir: ""ingress-config:proxy-read-timeout: "180"dex:connector:add-config: |orgs:- name: my-orgclient-id: clientidclient-secret: clientsecretname: Githubtype: githubenabled: falsereplicas: 1reference-model:enabled: truereporting:db-conn-str: 'postgresql://user:password@service:port/db'enabled: trueperiod: '*/15 * * * *'Edit the parameters in the YAML configuration.
Required Changes:
spec/console/scan-dirmust be set to a remote storage path. It is only necessary to provide a single set credentials for the remote storage type of the console's scan directory.- If Scan Manager is enabled (
spec/scan-manager/enabledistrue), thenspec/scan-manager/scan-data-dirmust be set to a remote storage path. Note that Scan Manager reads the credentials and other deployment configurations from thespec/consolesection.
- If the
spec/console/scan-dir/spec/scan-manager/scan-data-diris a GCS path, you only need to fill in thespec/console/gcs/application-credentialsfield. - If the
spec/console/scan-dir/spec/scan-manager/scan-data-diris an S3 compatible storage path, you only need to fill in the S3 related credentials:spec/console/s3/access-keyspec/console/s3/secret-keyspec/console/s3/endpoint
- If the
spec/console/scan-dir/spec/scan-manager/scan-data-diris an Azure blob storage path, you only need to fill in the Azure related credentials:spec/policy/azure/account-namespec/policy/azure/account-keyspec/policy/azure/sas-token
If policy is enabled (
spec/policy/enabledistrue) and thespec/policy/questionnaire-diris set to a remote storage path, then it is only necessary to provide a single set credentials for the remote storage type of the questionnaire directory.- If the questionnaire directory is a GCS path, you only need to fill in the
spec/policy/gcs/application-credentialsfield. - If the questionnaire directory is an S3 compatible storage path, you only need to fill in the S3 related credentials:
spec/policy/s3/access-keyspec/policy/s3/secret-keyspec/policy/s3/endpoint
- If the questionnaire directory is an Azure blob storage path, you only need to fill in the Azure related credentials:
spec/policy/azure/account-namespec/policy/azure/account-keyspec/policy/azure/sas-token
- If the questionnaire directory is a GCS path, you only need to fill in the
If reporting is enabled (
spec/reporting/enabledistrue), then a valid Postgres connection string must be provided in thespec/reporting/db-conn-strfield.It is strongly recommended you review the
spec/console/route-typefield, and similarly thespec/policy/route-typefield if policy is enabled, and set it to the appropriate option for your environment.NOTE: In RHOS when
route-typeis set tooauth, authentication is through OpenShift, rather than Dex.For RHOS authorization set the following to "rbac" if the
route-typeis set to "oauth" for both console and policy:spec/console/authorization-typespec/policy/authorization-type
NOTE: If scan manager is enabled, you'll need to re-create a
ConfigMapmanually before applying the Certifai CR. Delete existing Scan Manager ConfigMap as:
kubectl delete cm certifai-scan-manager -n <NAMESPACE>Save the following yaml contents into a file scan-manager-cm.yaml
apiVersion: v1data: config: | scan-config: default: parallel: 1 cpu-req: "1000m" mem-req: "500Mi"kind: ConfigMapmetadata: name: certifai-scan-manager and apply this file into your cluster as:
kubectl apply -f scan-manager-cm.yaml -n <NAMESPACE>
NOTE
Pluggable ingress is not supported for RedHat OpenShift; hence the omission of the create-ingress parameter.
Below is a table with descriptions of each parameter:
| Parameter | Description | Example |
|---|---|---|
apiVersion | APIVersion defines the versioned schema of this representation of an object. Should NOT be changed by users. | cortex.cognitivescale.com/v1 |
kind | Identifies the package type you are installing | (Always) Certifai |
metadata/name | The name of your installation as configured | default-certifai |
metadata/namespace | The namespace you selected in step 2 above | certifai |
spec/deployment-type | Leave it set to openshift. This guide is for OpenShift so this is the only option that works here. | default = openshift |
spec/dex/enabled | Enable Dex as an authentication provider to access the Certifai Console and remote CLI operations. | default = false; set this to true |
spec/dex/connector/type | Dex connector type: Should be one of the options described at https://dexidp.io/docs/connectors/ | github |
spec/dex/connector/name | The name of the Dex connector. Can be set to a sane value of your choice. Required field when Dex is enabled | your-dex-connector-name |
spec/dex/connector/client-id | OAuth app client ID for the Dex connector of your choice. Required field when Dex is enabled | your-oauth-provider-client-id |
spec/dex/connector/client-secret | OAuth app client secret for the Dex connector of your choice. Required field when Dex is enabled | your-oauth-provider-client-secret |
spec/dex/connector/add-config | Additional configuration (yaml) you may want to pass on to Dex, including specific organization, teams etc. Refer to the documentation for connectors. All fields, excluding client ID, client Secret and redirectURI, maybe specified in this section. Optional field when Dex is enabled | orgs: - name: organization-with-certifai-access |
spec/console/replicas | The number of console instances you want your organization to run concurrently | default = 1 |
spec/console/route-type | Console access options are: none (default): no authentication is required to open the Console http: Unsecured for a closed network https: Secured for the internet oauth: Enables login with RHOS credentials or Dex connector credentials | default = none |
spec/console/authorization-type | If route_type is "oauth" and you want to control access to the Certifai Console, set this field to rbac. | default = none |
spec/console/scan-dir | A path-like string prefixed with gs:// for gcs storage, abfs:// for Azure Storage Accounts and s3:// for S3 / Ceph / Noobaa storage accounts | s3://certifai-tes01/reports |
spec/console/gcs/application-credentials | JSON content of the application credentials file for a service account obtained from GCP. This needs to be a JSON key and not P12. | application-credentials |
spec/console/s3/access-key | The s3 (or Ceph) access key you configured during your infrastructure setup | access-key |
spec/console/s3/endpoint | The s3 (or noobaa/Ceph) endpoint you configured during your infrastructure setup | s3.amazonaws.com |
spec/console/s3/secret-key | The s3 (or Ceph) secret-key you configured during your infrastructure setup | s3secret1234 |
spec/console/s3/verify-cert | Whether or not to verify SSL certificates from the S3 client. If false, SSL will still be used, but certificates will not be verified. | default = false |
spec/console/azure/account-name | The name of your Azure Storage Account with Blob containers | account-name |
spec/console/azure/account-key | An account key for a Blob Container present in the account-name referenced above | account-key |
spec/console/azure/sas-token | An SAS token for a Blob Container present in the account-name referenced above | sas-token |
spec/policy/replicas | The number of policy instances you want your organization to run concurrently | default = 2 |
spec/policy/route-type | Policy Access options are: none (default): no authentication is required to open the policyhttp: Unsecured for a closed networkhttps: Secured for the internetoauth: Enables login with RHOS credentials or Dex connector credentials | default=none |
spec/policy/authorization-type | If route_type is "oauth" and you want to control access to the Certifai Policy, set this field to rbac. | default = none |
spec/policy/questionnaire-dir | A path-like string prefixed with gs:// for gcs storage, abfs:// for Azure Storage Accounts and s3:// for S3 / Ceph / Noobaa storage accounts | s3://certifai-tes01/reports |
spec/policy/gcs/application-credentials | JSON content of the application credentials file for a service account obtained from GCP. This needs to be a JSON key and not P12. | application-credentials |
spec/policy/s3/access-key | The s3 (or Ceph) access key you configured during your infrastructure setup | access-key |
spec/policy/s3/endpoint | The s3 (or noobaa/Ceph) endpoint you configured during your infrastructure setup | s3.amazonaws.com |
spec/policy/s3/secret-key | The s3 (or Ceph) secret-key you configured during your infrastructure setup | s3secret1234 |
| spec/policy/s3/verify-cert | Whether or not to verify SSL certificates from the S3 client. If false, SSL will still be used, but certificates will not be verified. | default = false |
spec/policy/azure/account-name | The name of your Azure Storage Account with Blob containers | account-name |
spec/policy/azure/account-key | An account key for a Blob Container present in the account-name referenced above | account-key |
spec/policy/azure/sas-token | An SAS token for a Blob Container present in the account-name referenced above | sas-token |
spec/scan-manager/replicas | The number of scan manager instances you want your organization to run concurrently | default = 1 |
spec/scan-manager/scan-data-dir | A path-like string prefixed with gs:// for gcs storage, abfs:// for Azure Storage Accounts and s3:// for S3 / Ceph / Noobaa storage accounts | s3://certifai-tes01/data |
spec/scan-manager/ingress-config/proxy-read-timeout | Proxy read timeout for connections to the upstream servers (Optional) | "180" (seconds) |
spec/reference-model/enabled | Boolean. Enables or disables the reference model server that is added to your installation. Users may disable the reference model at any time to remove it from the installation to save resources. | default = true |
spec/reporting/enabled | Boolean. Enables or disables the reporting ETL job that is added to your installation. Users may disable the reporting ETL job at any time to remove it from the installation to save resources. | default = true |
spec/reporting/period | Cron time string describing how often the reporting ETL job should run. The default value is 15 minutes. | default = */15 * * * * |
spec/reporting/db-conn-str | PostgreSQL connection string. The location the reporting ETL will load report data to. Required field when reporting is enabled. | default = postgresql://user:password@service:port/db |
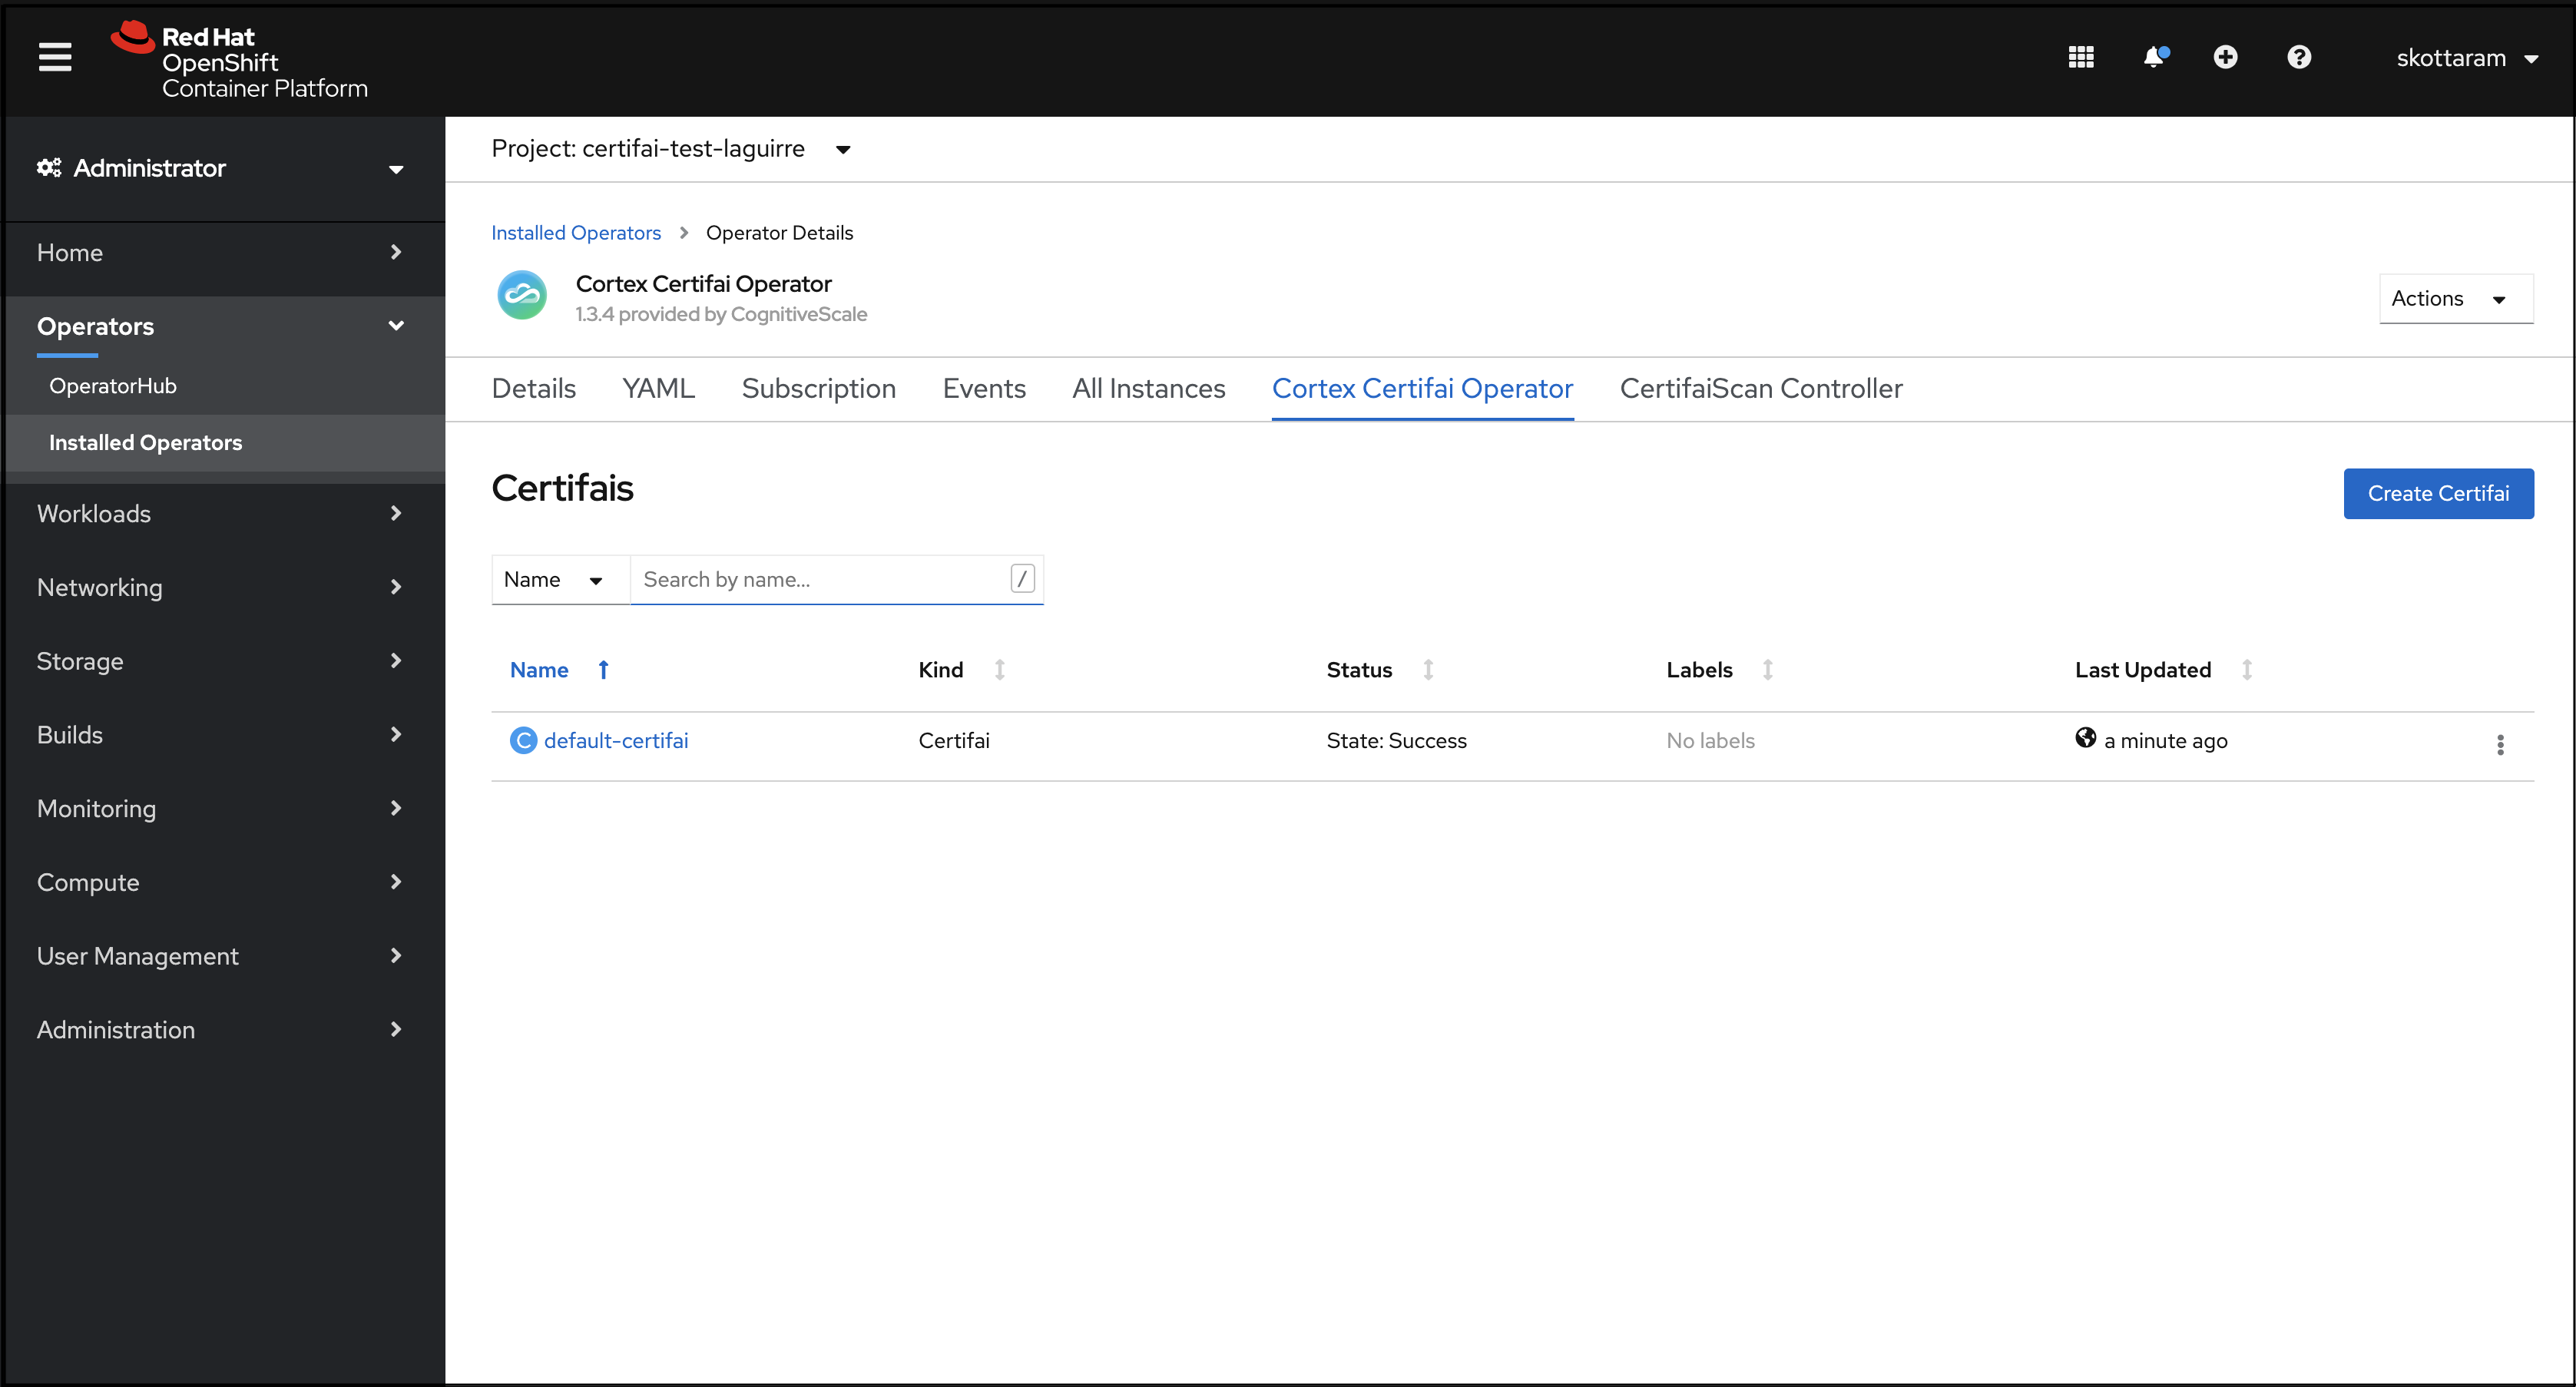
After you finish editing the YAML click Create at the bottom of the page. You will then see a list of created Certifai Operator instances including the instance you just created.
Verify Cortex Certifai Installation
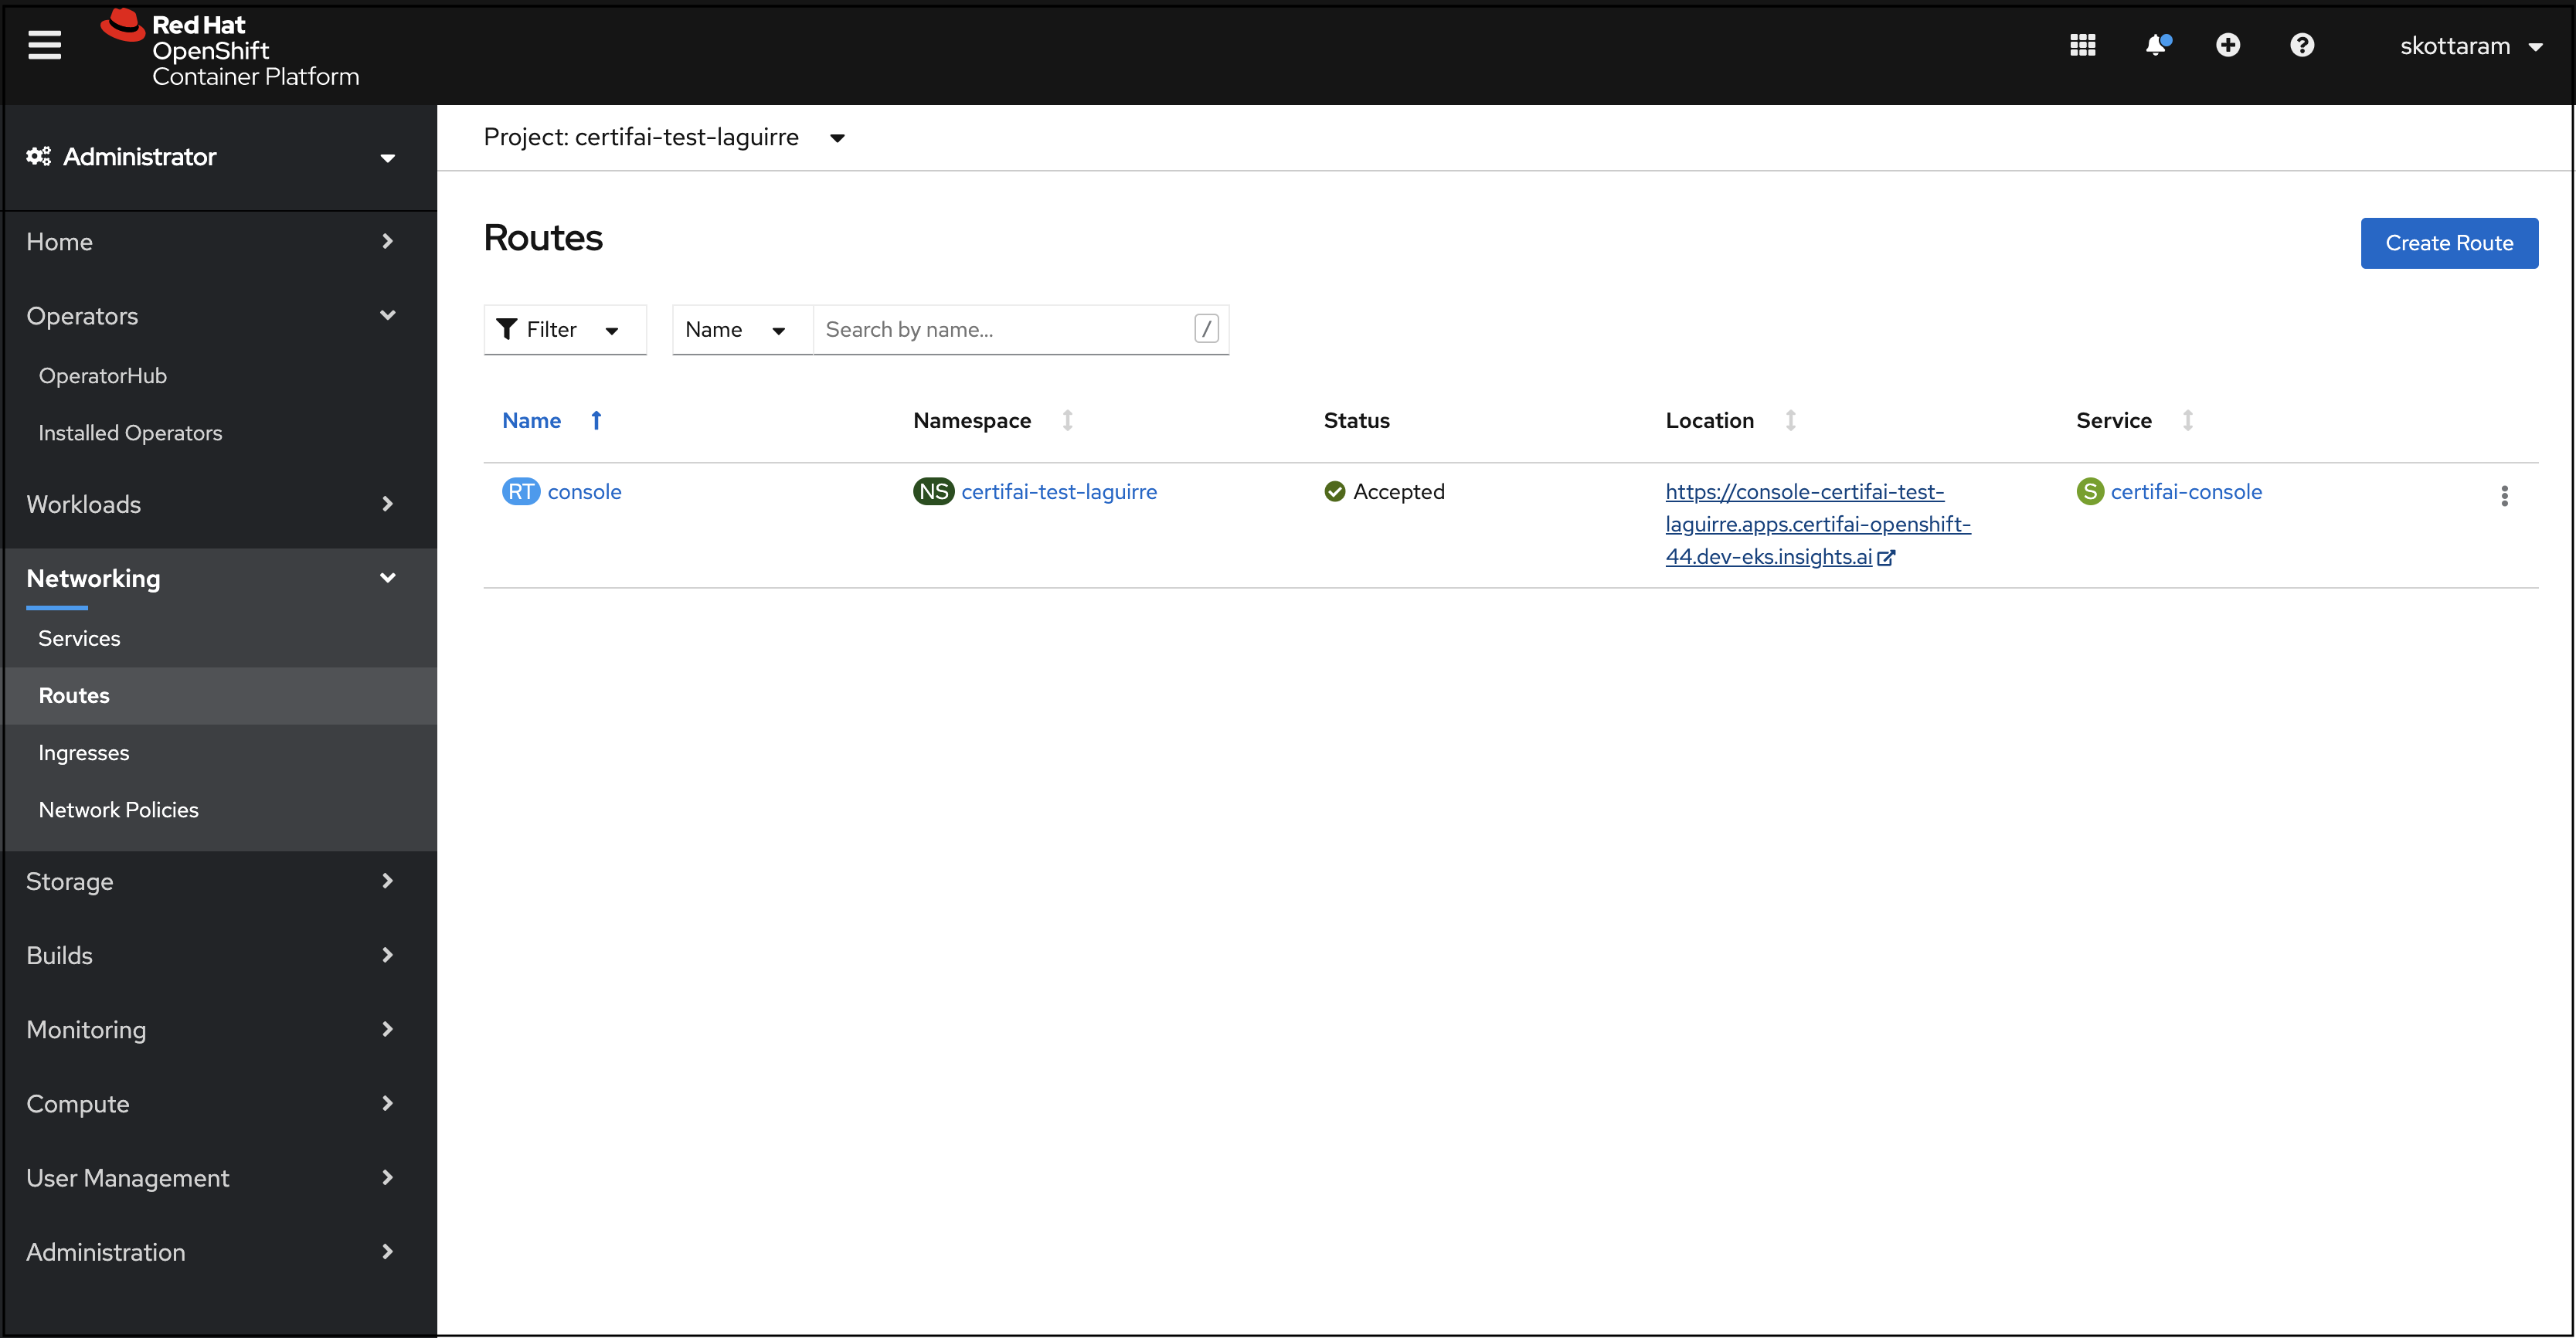
Open the Cortex Certifai Console to verify the remote storage is connected.
To find your Console URL:
If the Route-Type option is
http,httpsoroauth:- Click Networking in the left navigation panel and then Routes. The Certifai Console URL is displayed in the Location column.
- Click the link to open your Console
- If oauth is selected for route-type, accept the OpenShift prompts to grant permission during login.
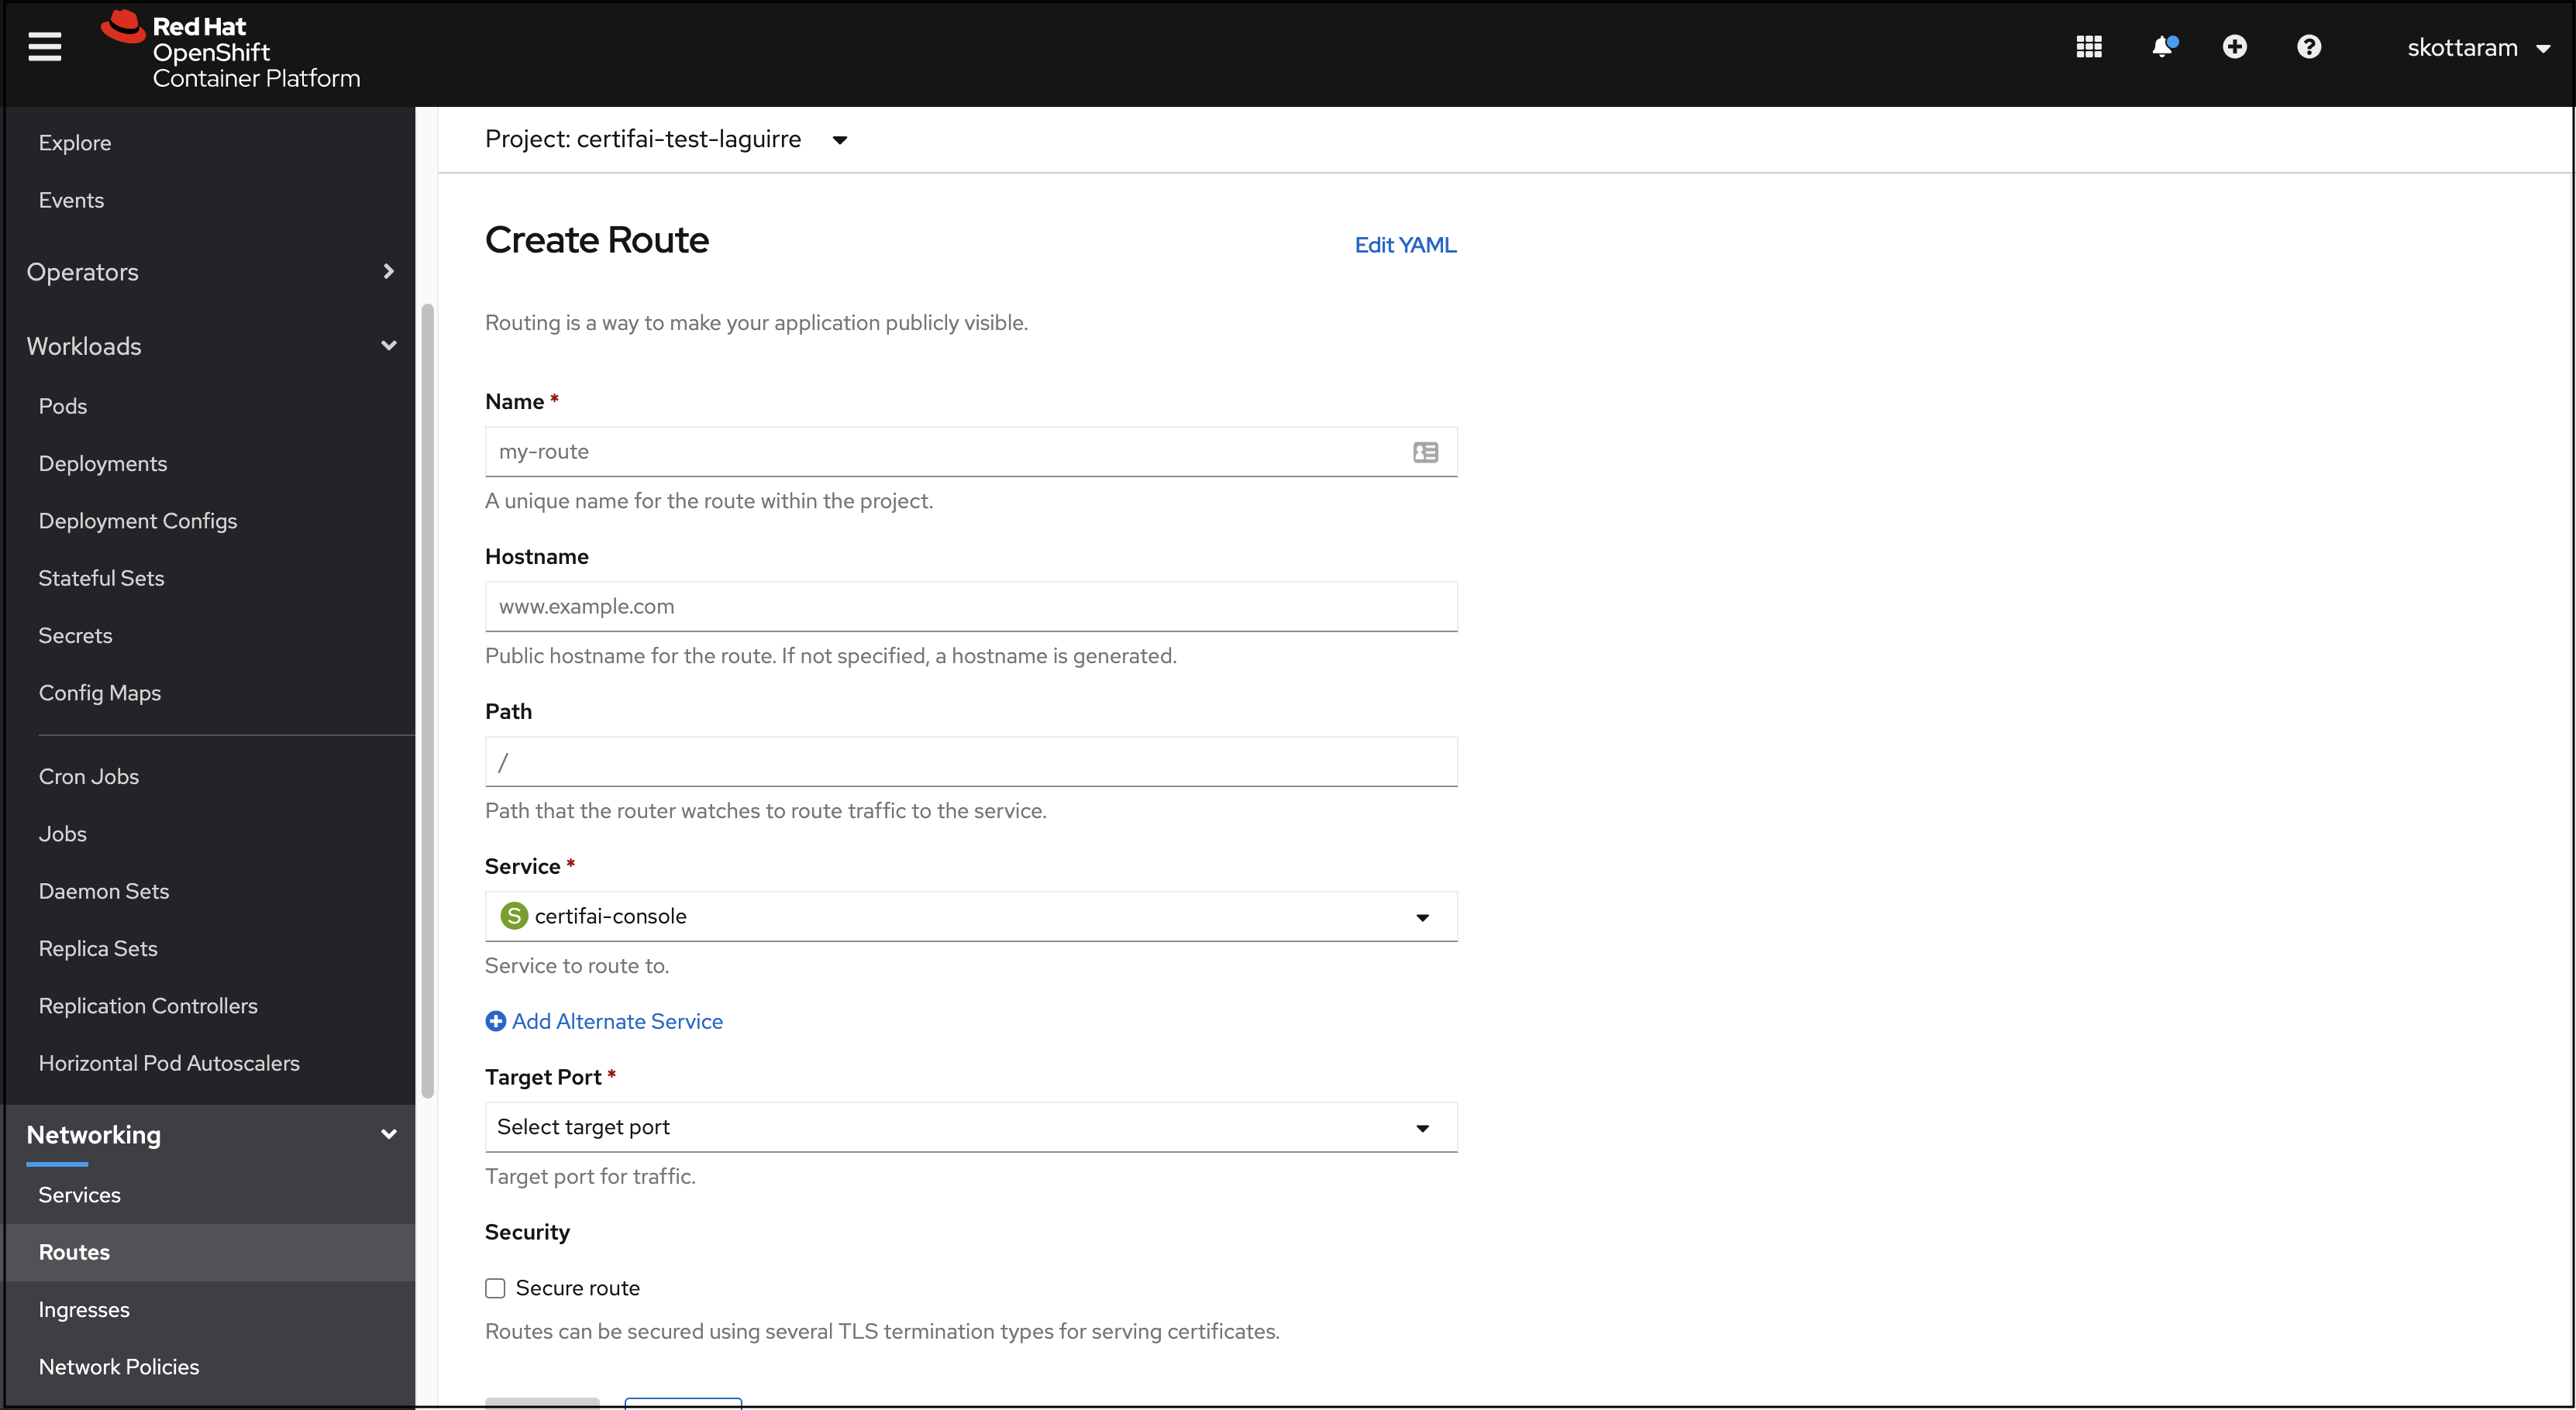
If the Route-Type option is
none:- Click Networking in the left navigation panel and then Routes. Click Create Route, then fill in the prompts to create a route for the service "certifai-console"
- After you create the route, the Certifai Console URL is displayed under Location.
NOTE: If there are no existing Certifai scan reports within your remote storage path you will see an error that no usecases could be found within the scan directory. You can setup example reports, so you may view sample and remote scan report visualizations in the remote Console.
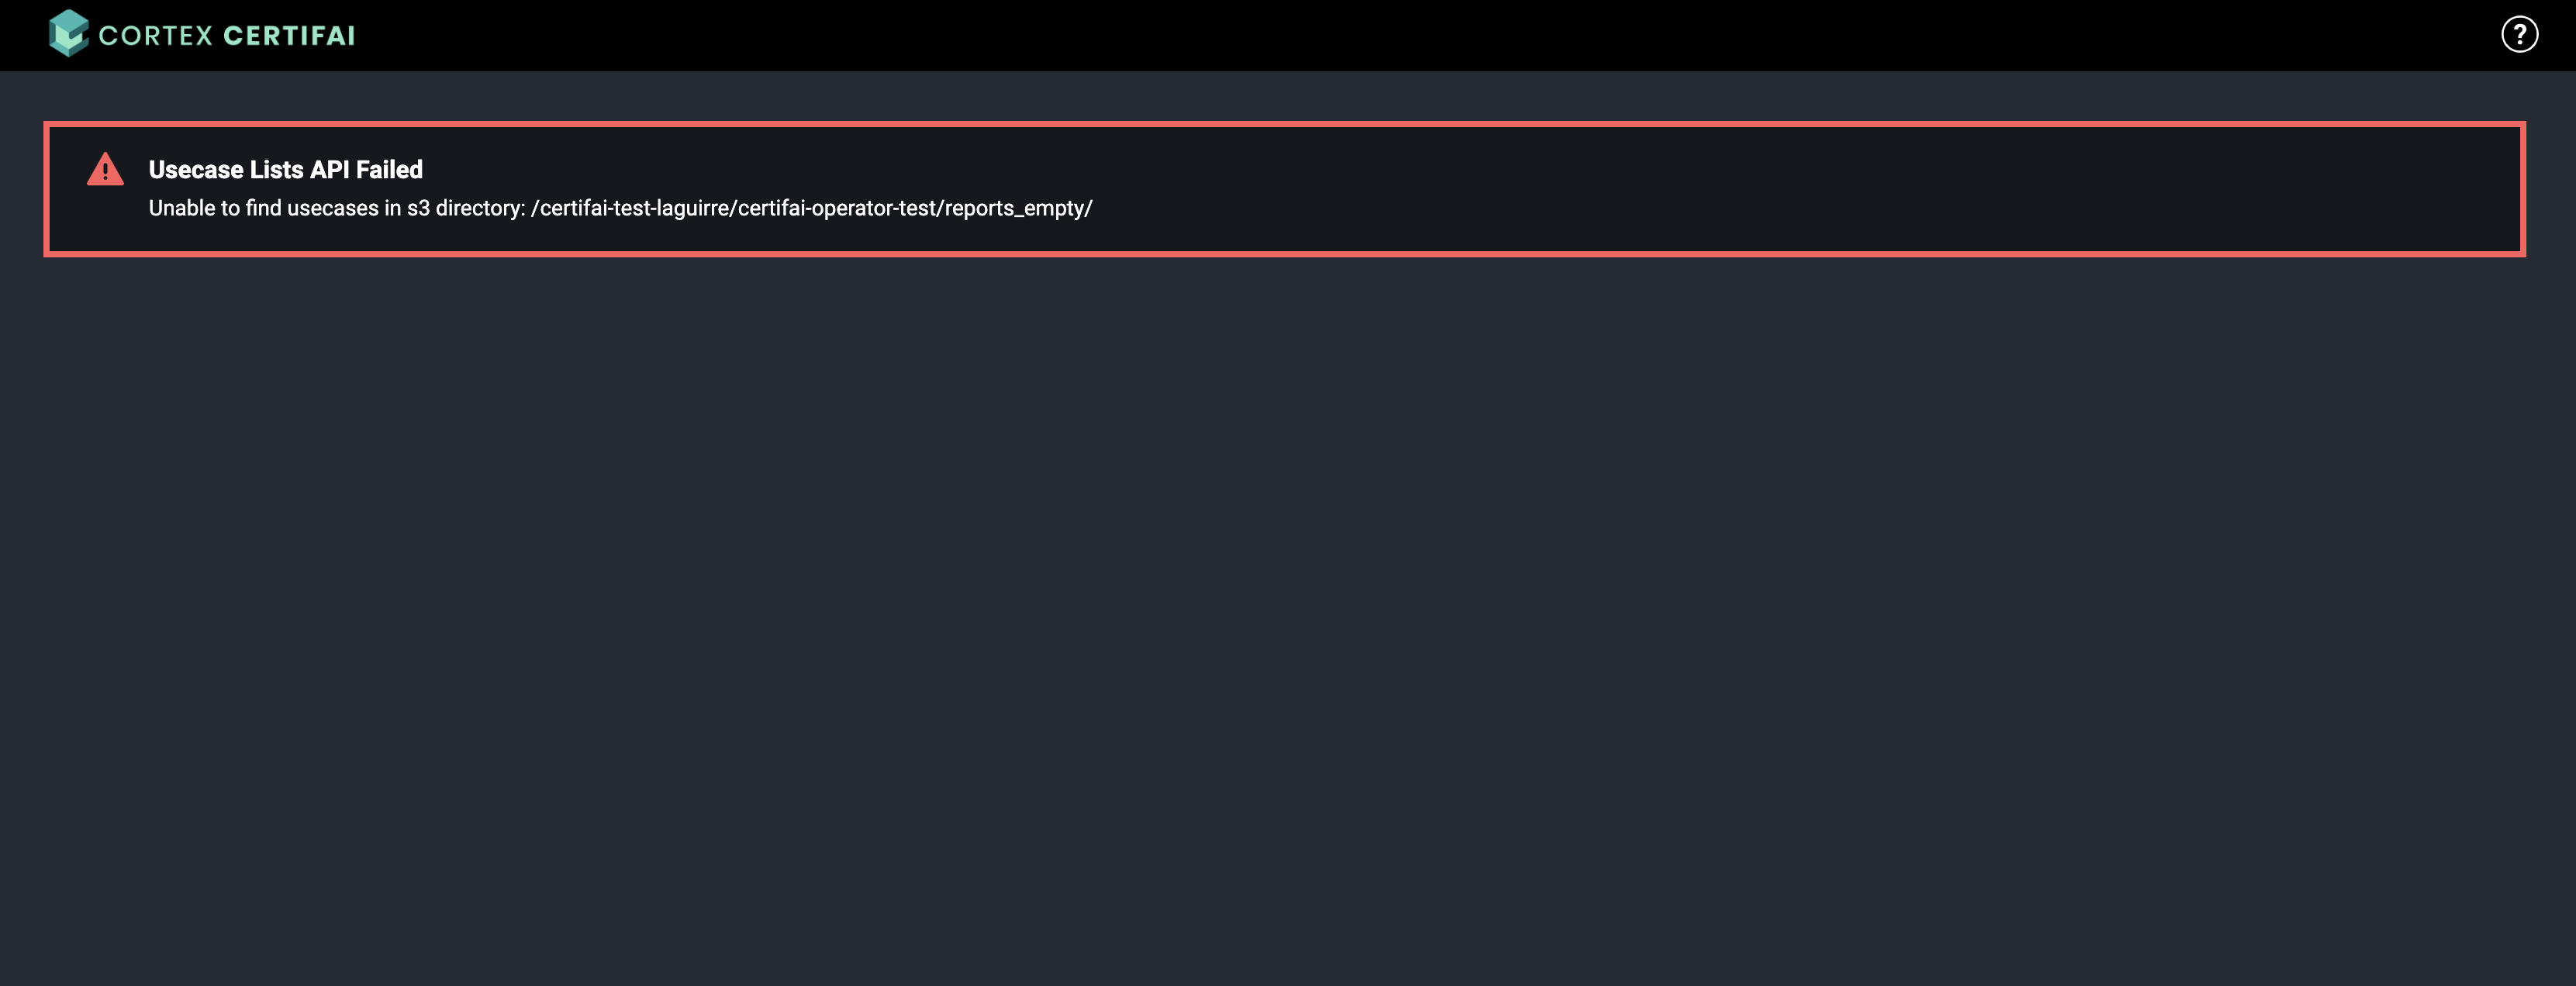
If you see a different error message, then verify that the Certifai Console's scan directory (spec/console/scan-dir)
and corresponding authentication credentials are correct.
NOTE: If Scan Manager is enabled, you will have to set spec/console/console-url to the console URL you find from the step above and re-apply the Certifai CR.
Change Certifai configuration options
To make changes to the Console instance configuration:
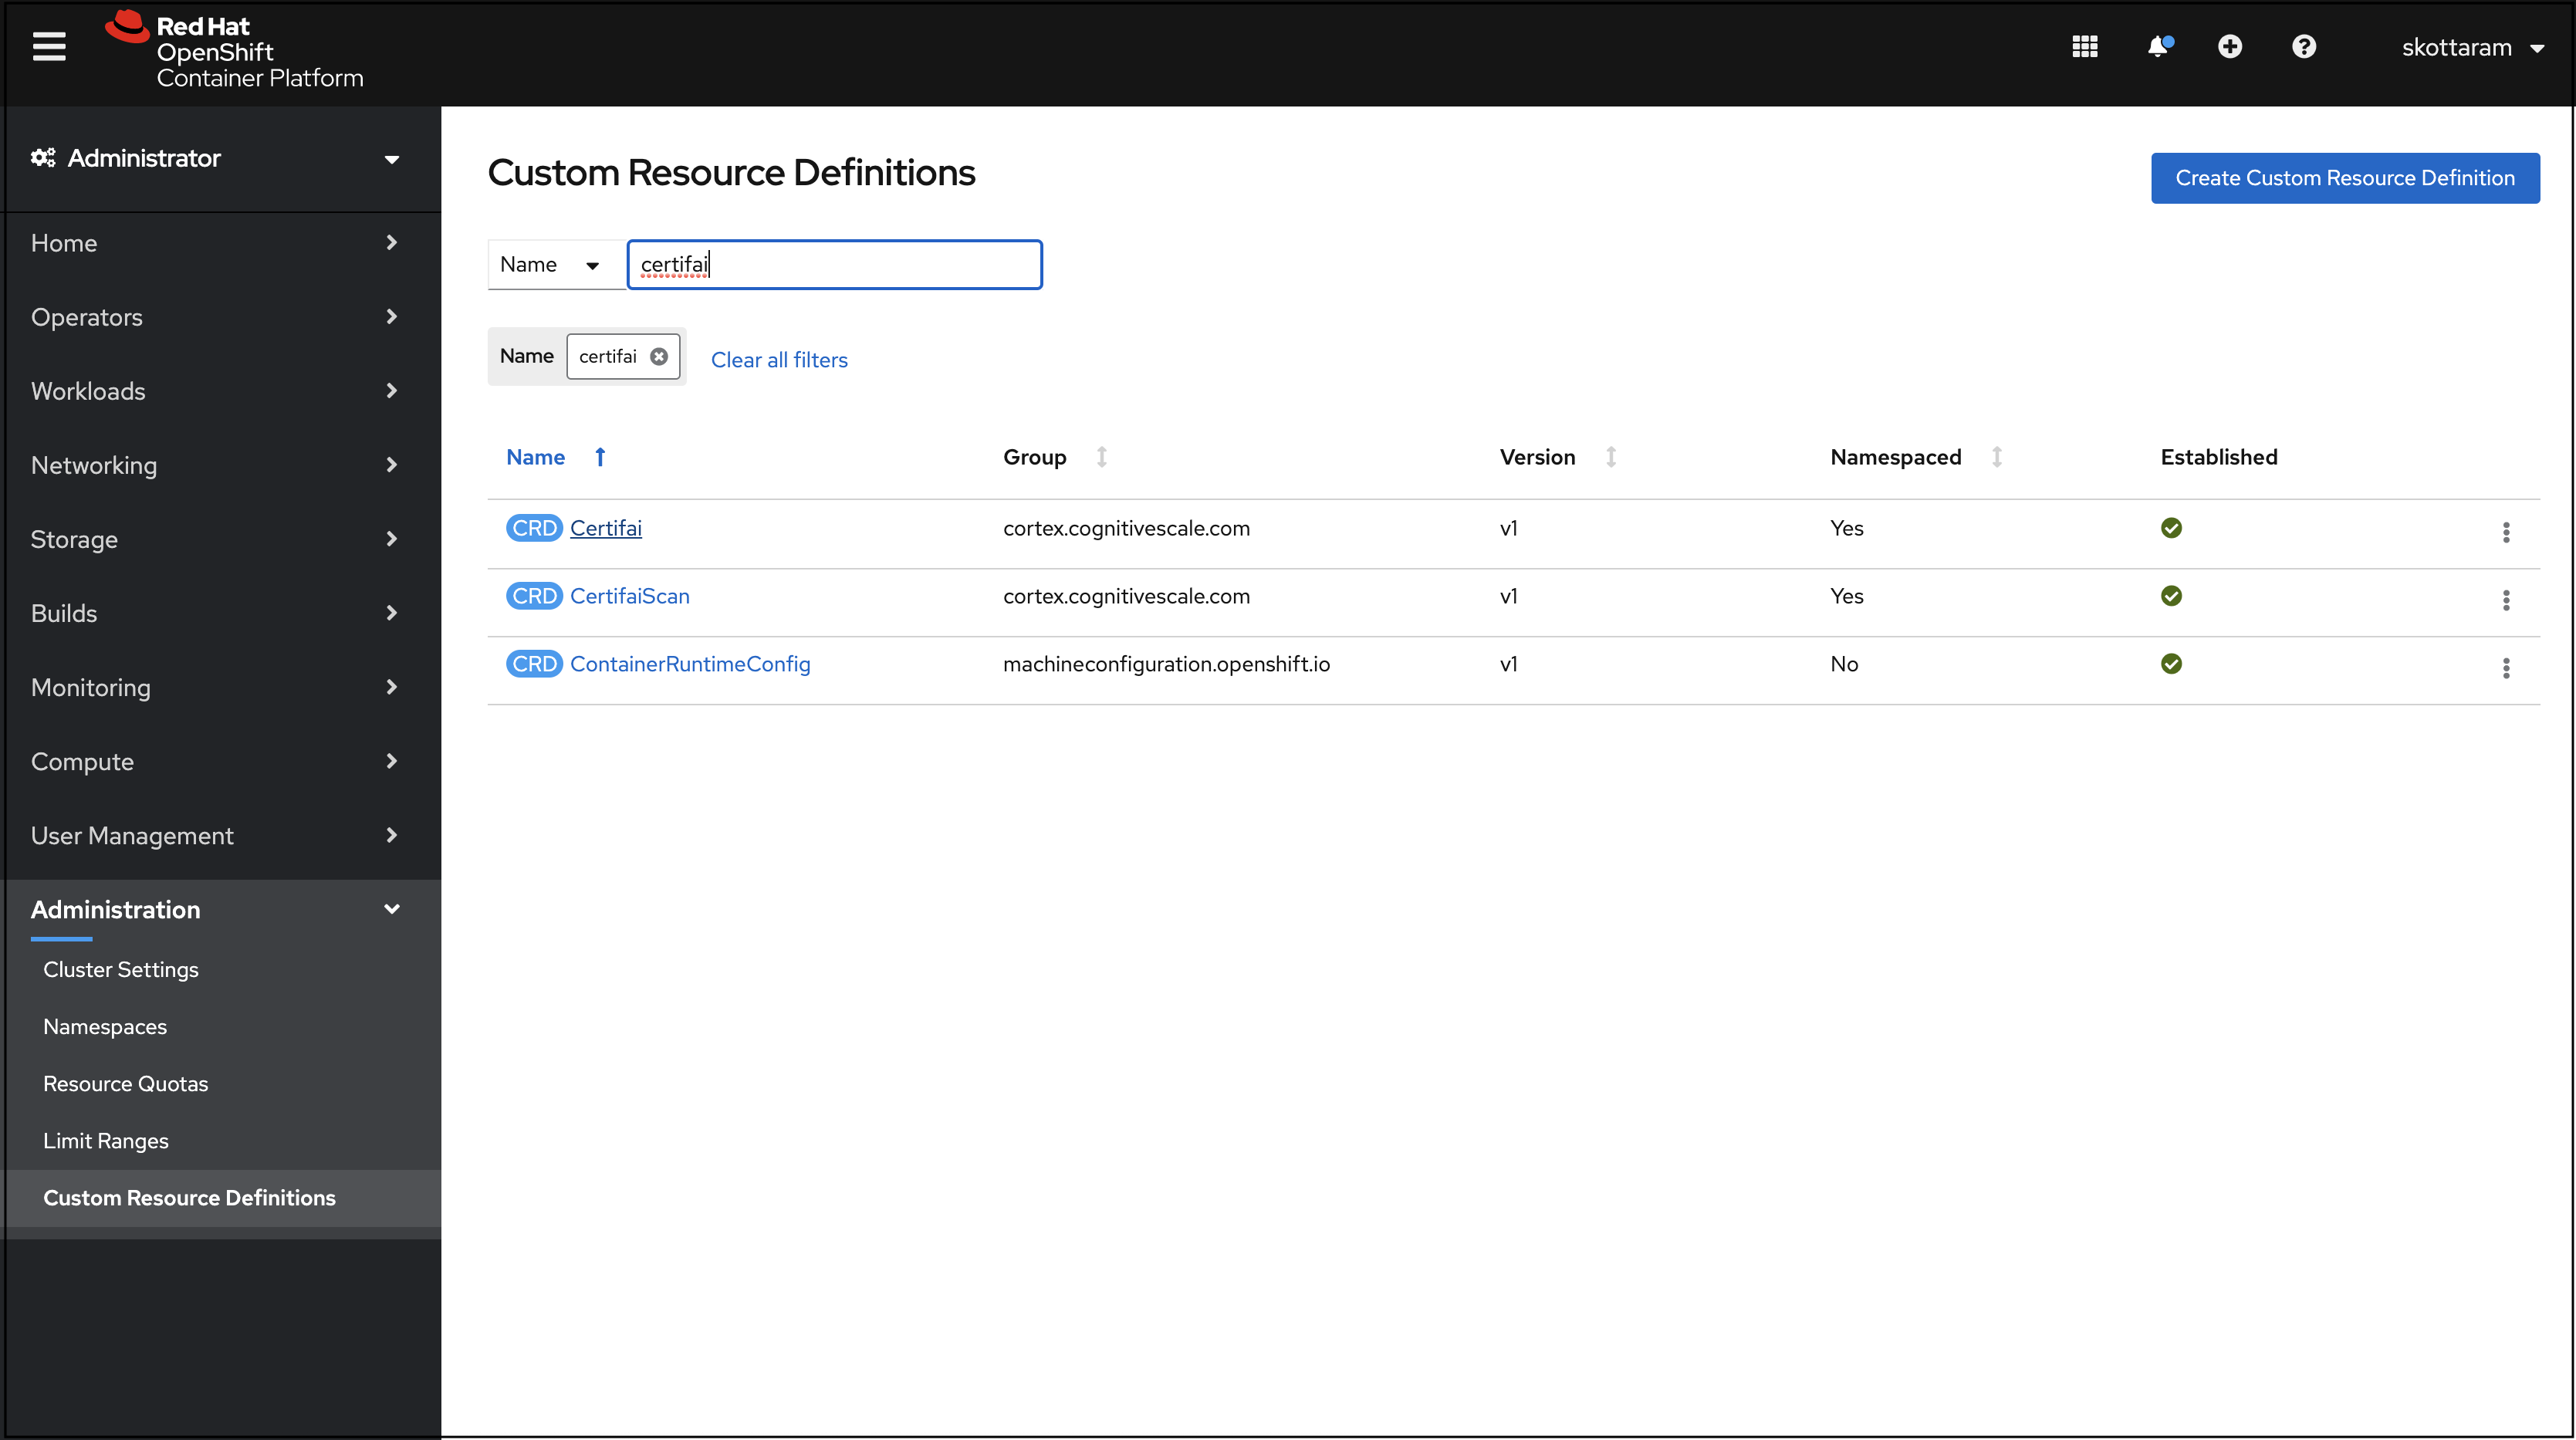
After the installation is completed, click Administration in the left navigation panel.
Click Custom Resource Definition.
Click Certifai in the resource list.
On the Custom Resource Definition Details page open the Instances tab.
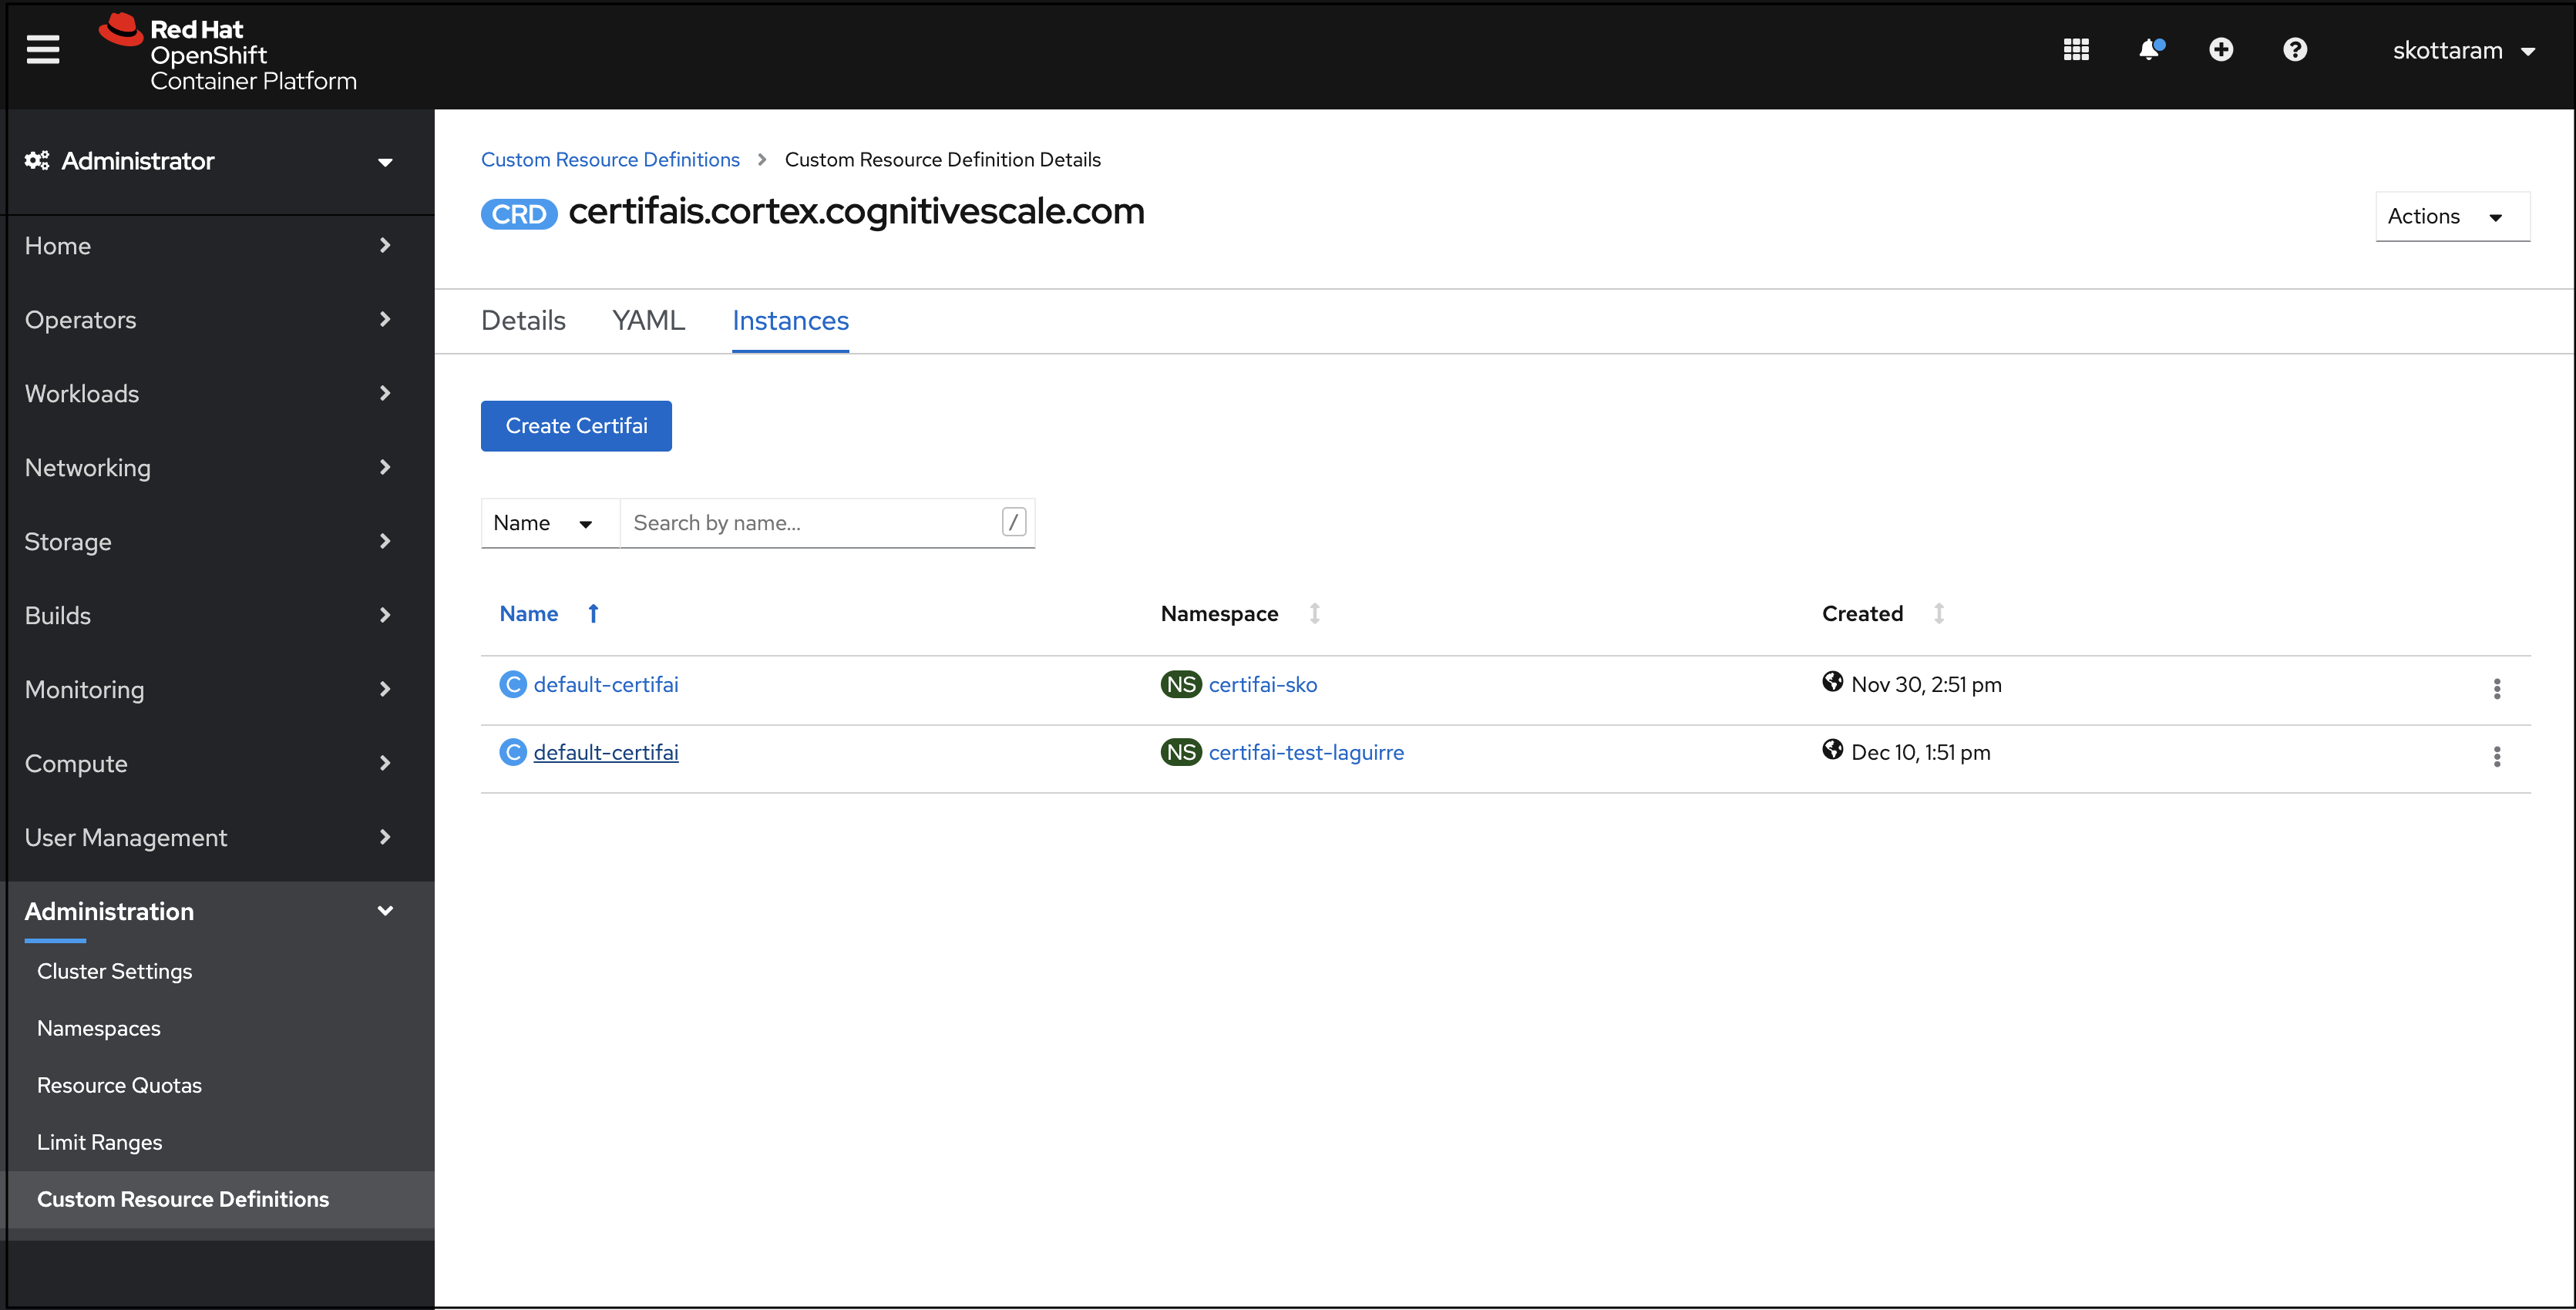
Click the name of the instance that you want to configure.
Open the YAML tab.
Find the configuration parameter you want to change, set it to the desired option, then click Save.
Log in to the OpenShift Kubernetes cluster
Prerequisite: Install the OpenShift CLI
Steps
Log in to your OpenShift Console

Click the User icon at the top right and select "Copy login command".
In the browser window that opens click "Display token".
Copy the code snippet that is displayed under "Login with this token".
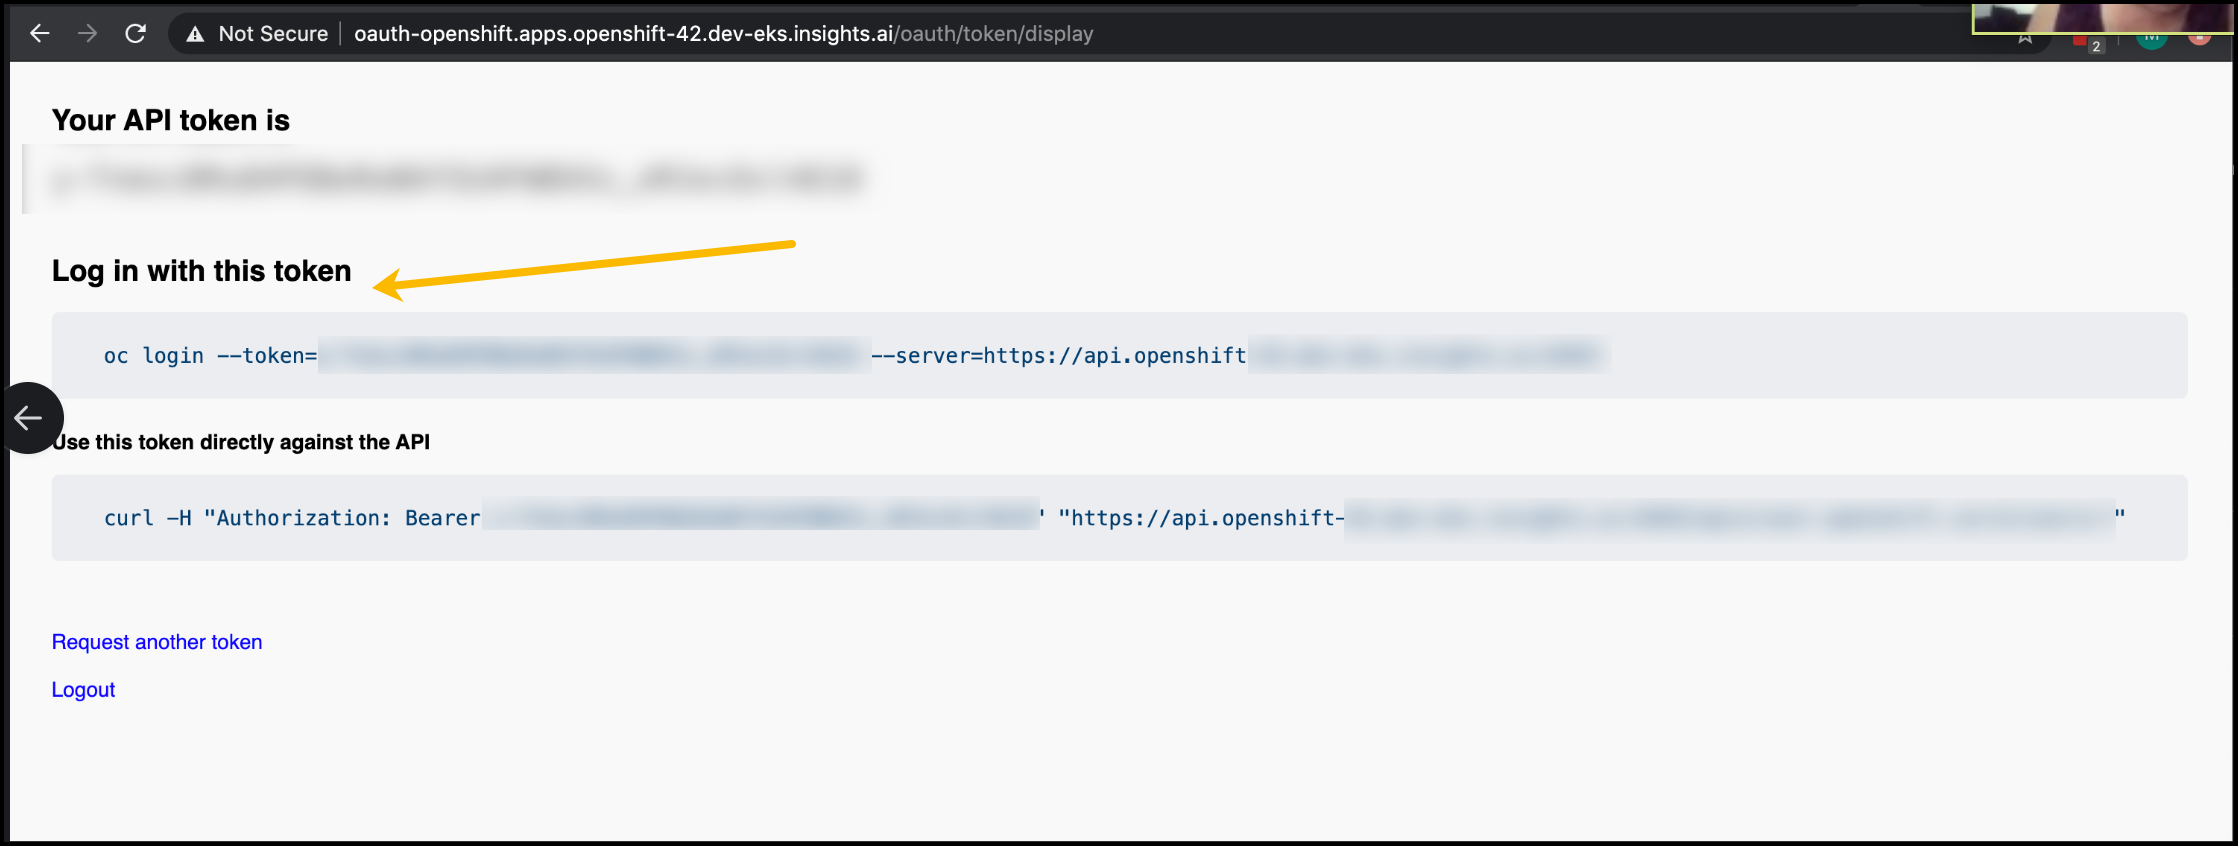
Open a terminal window, paste the command you copied, and run the command.
NOTE: If you are using a self-signed cert enter
ywhen queried to allow an insecure connection.
You are now logged in to your Cortex Certifai cluster.
Next steps
Setup example reports, so you may view sample and remote scan report visualizations in the remote Console.
Run scan jobs in RHOS and view result visualizations in the remote Console.