GCP Setup
Follow this process to install a Google Compute EngineVM with Cortex Certifai Pro running on it. Cortex Certifai Pro is a single-user server version of Certifai, available from the GCP Marketplace.
Prerequisites
GCP Marketplace Setup
Go to the Google Cloud Marketplace and search for Cortex Certifai.
Click the link that takes you to the Cortex Certifai information page.
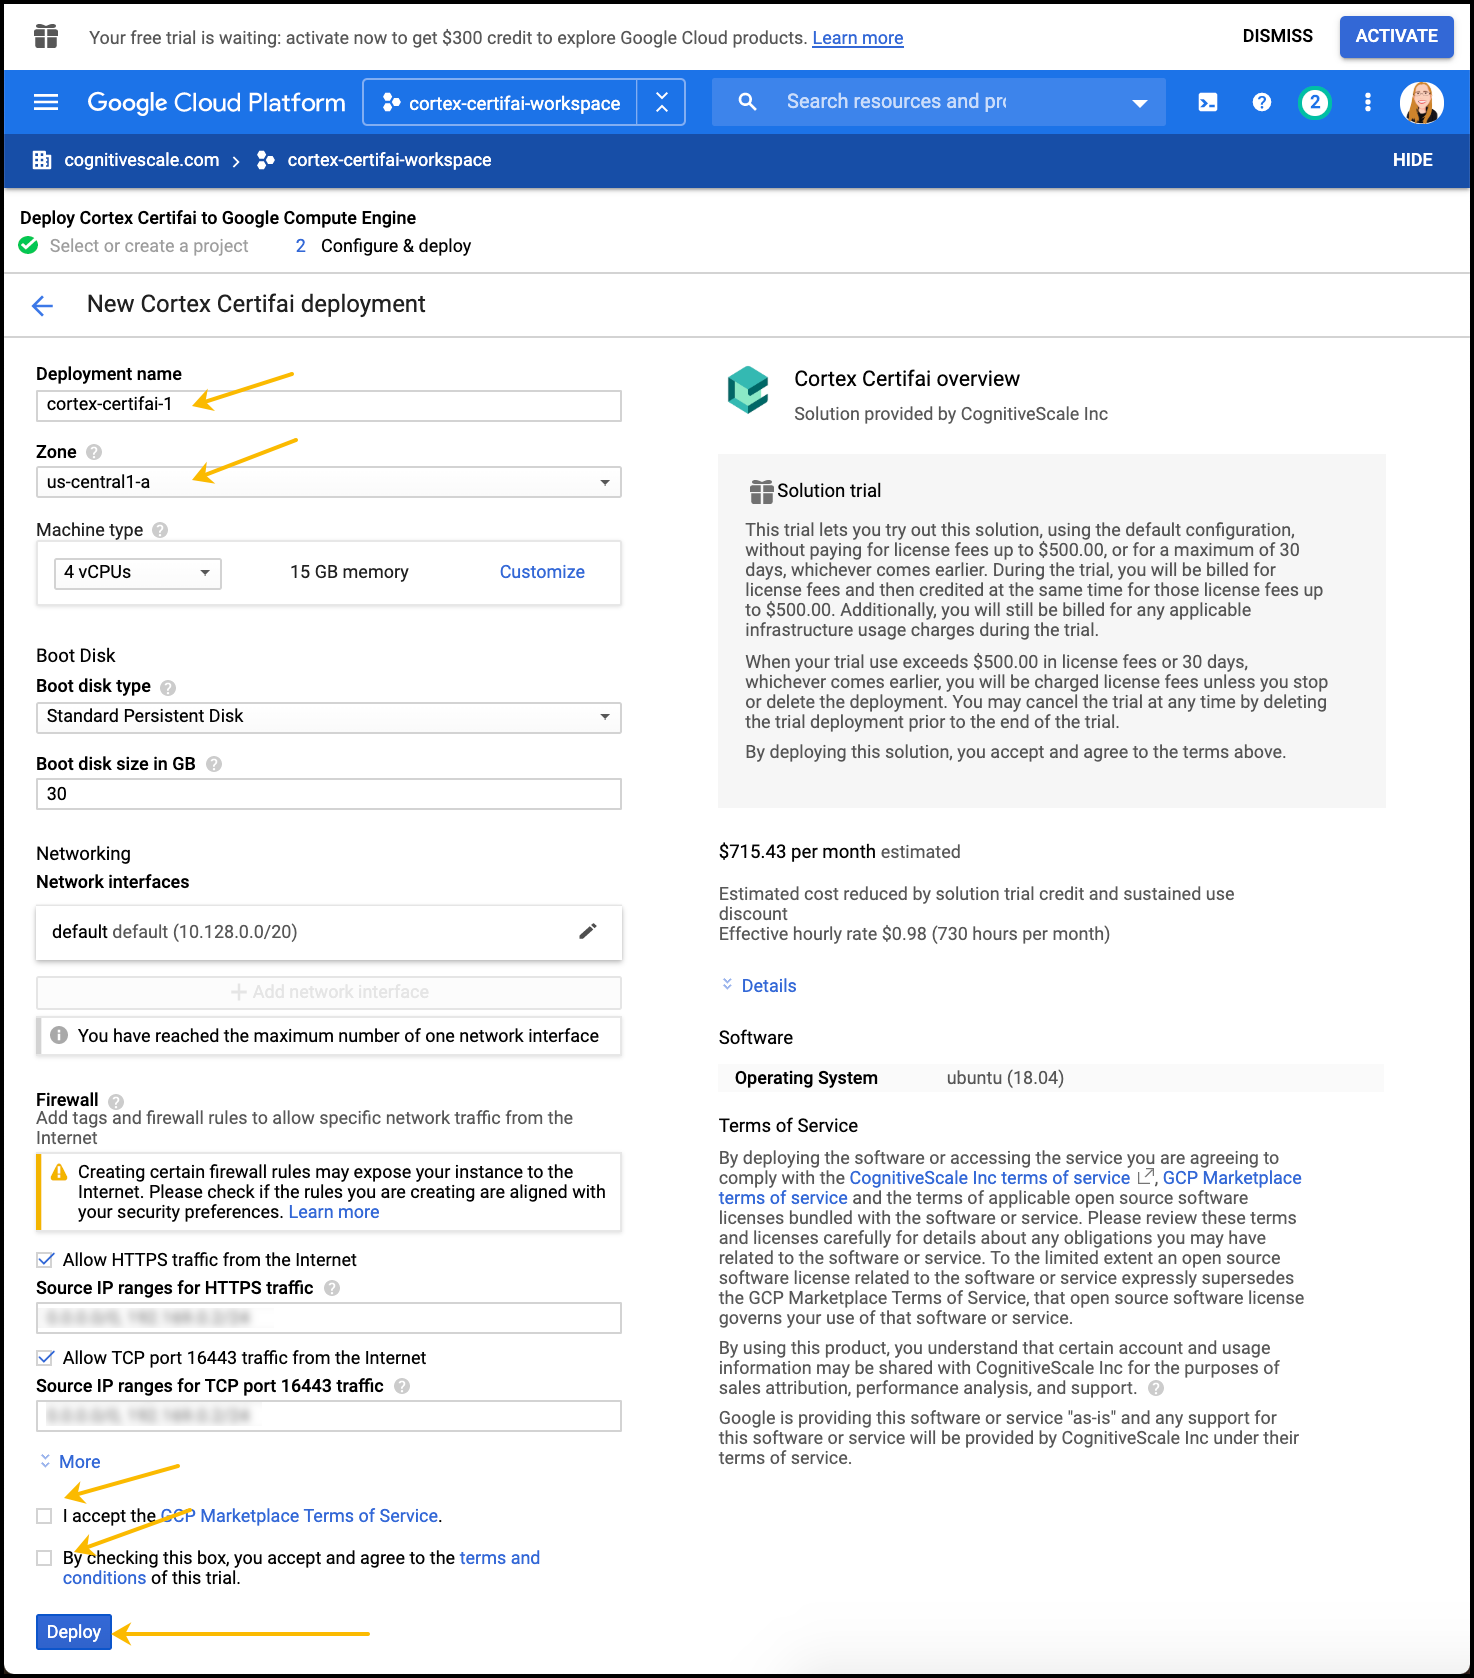
At the top of the page click Launch.
A configuration panel is displayed with the defaults entered. You must specify only the following:
- Deployment Name (Make note of this VM deployment name; you need it to configure storage in the Certifai Console.)
- Zone
- Machine Type (4 vcpus is the lower limit required to run Certifai Pro)
- Firewall (Select Allow HTTPS traffic from the Internet AND Allow TCP port 16443 traffic from the Internet)
Click Deploy.
In the left navigation panel click Console Engine then VM Instances. This deployment is listed as VM in your account.
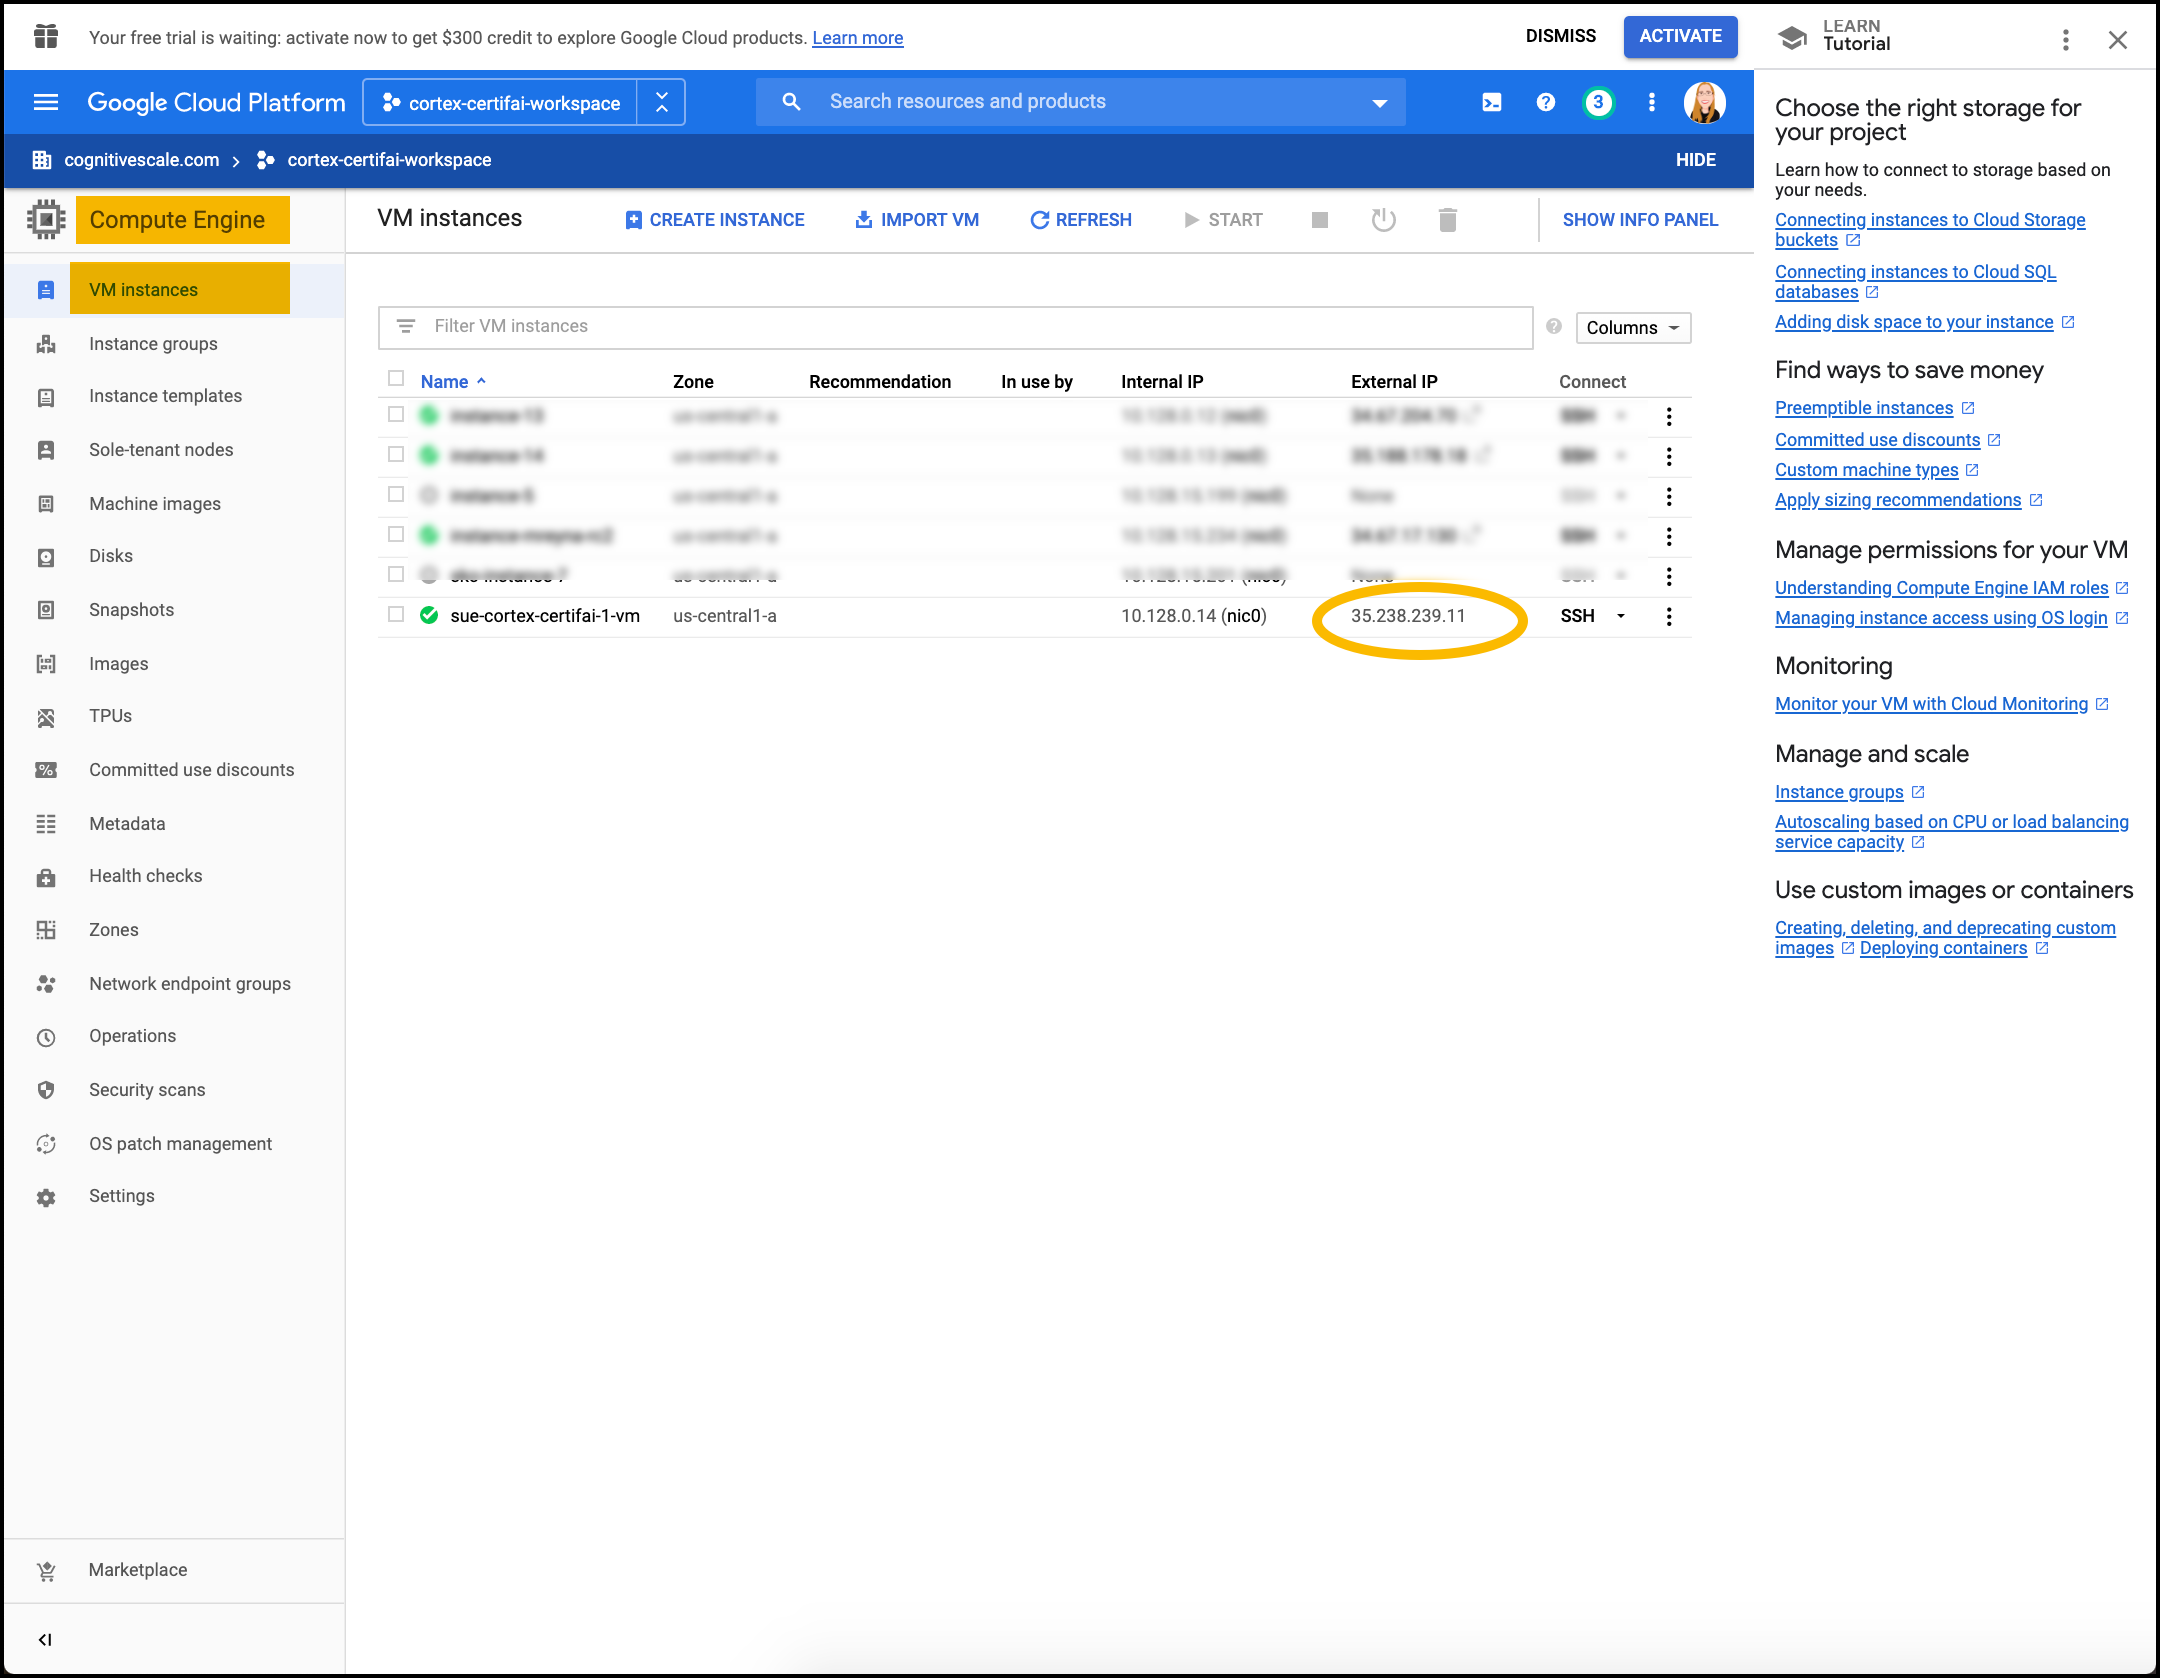
Info
It may take up to 5 minutes to provision your VM. When the deployment is complete an External IP address is displayed in the row of your VM. Make note of the IP address; it is the URL for your remote Certifai Console.
Configure GCP Storage
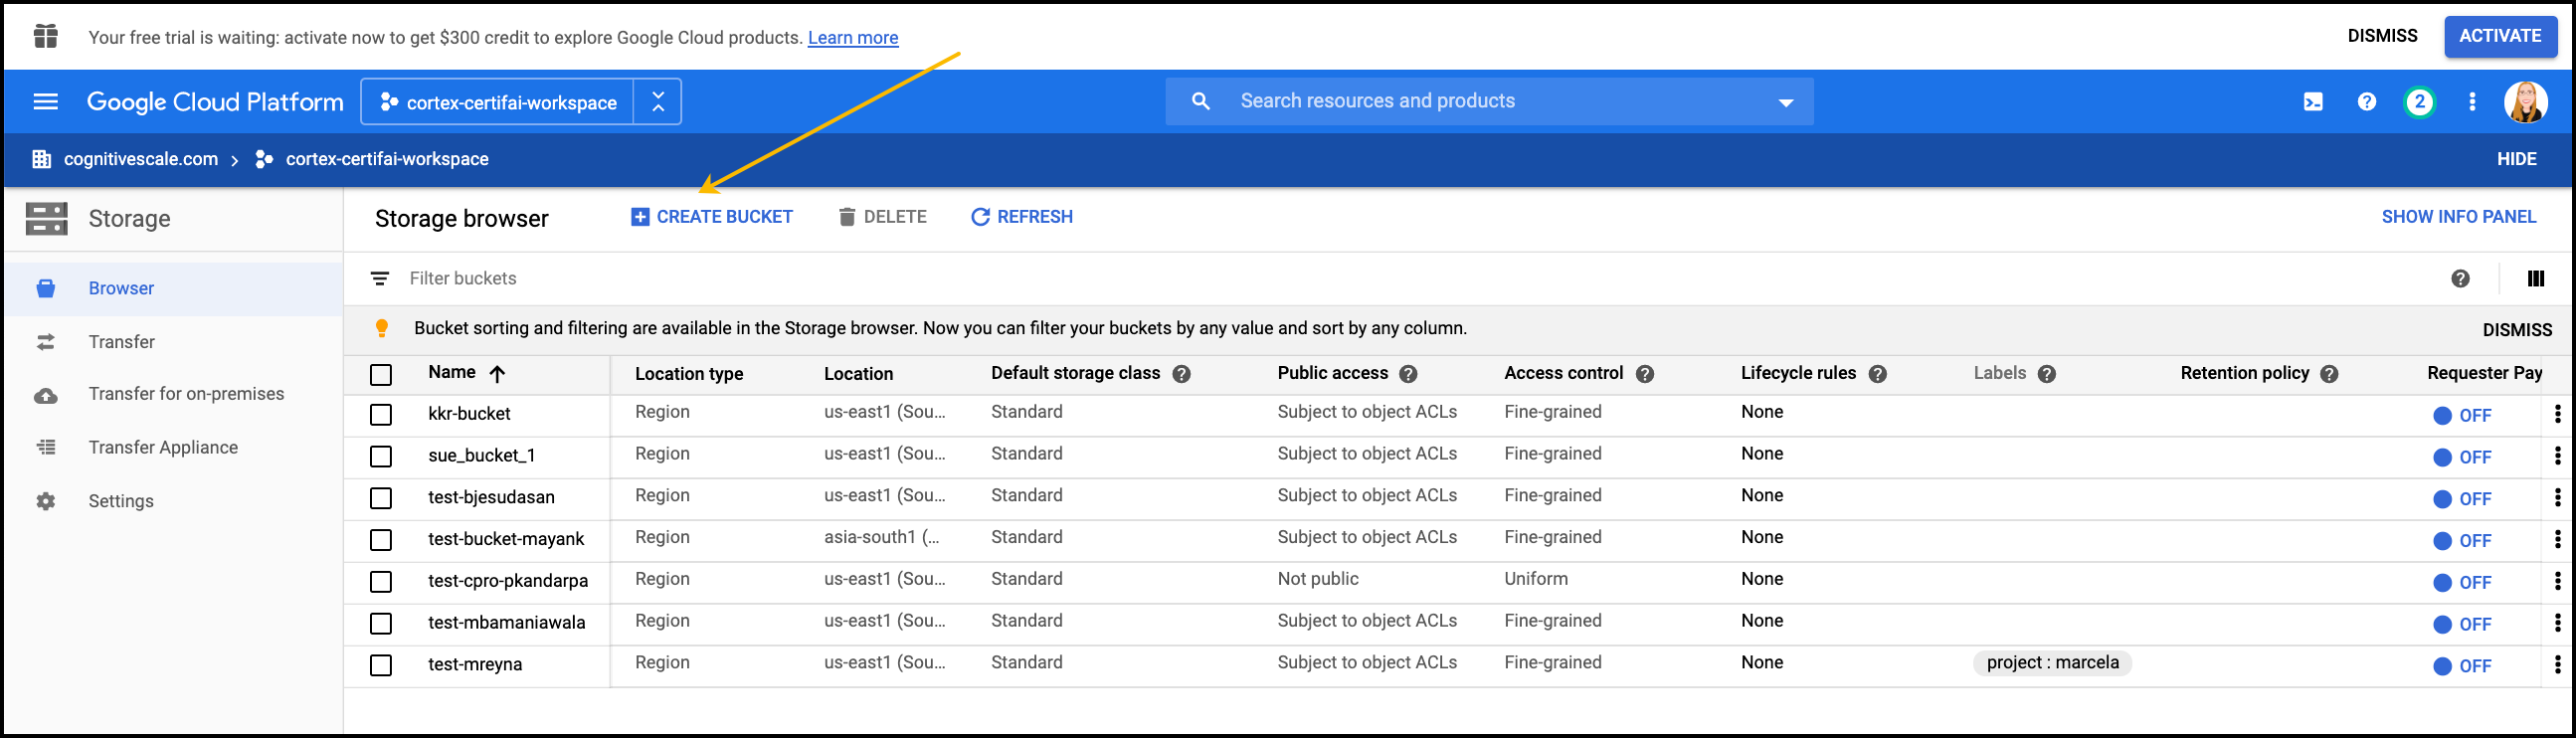
Login to your GCP account and in the left navigation panel scroll down to the STORAGE section and click Storage.
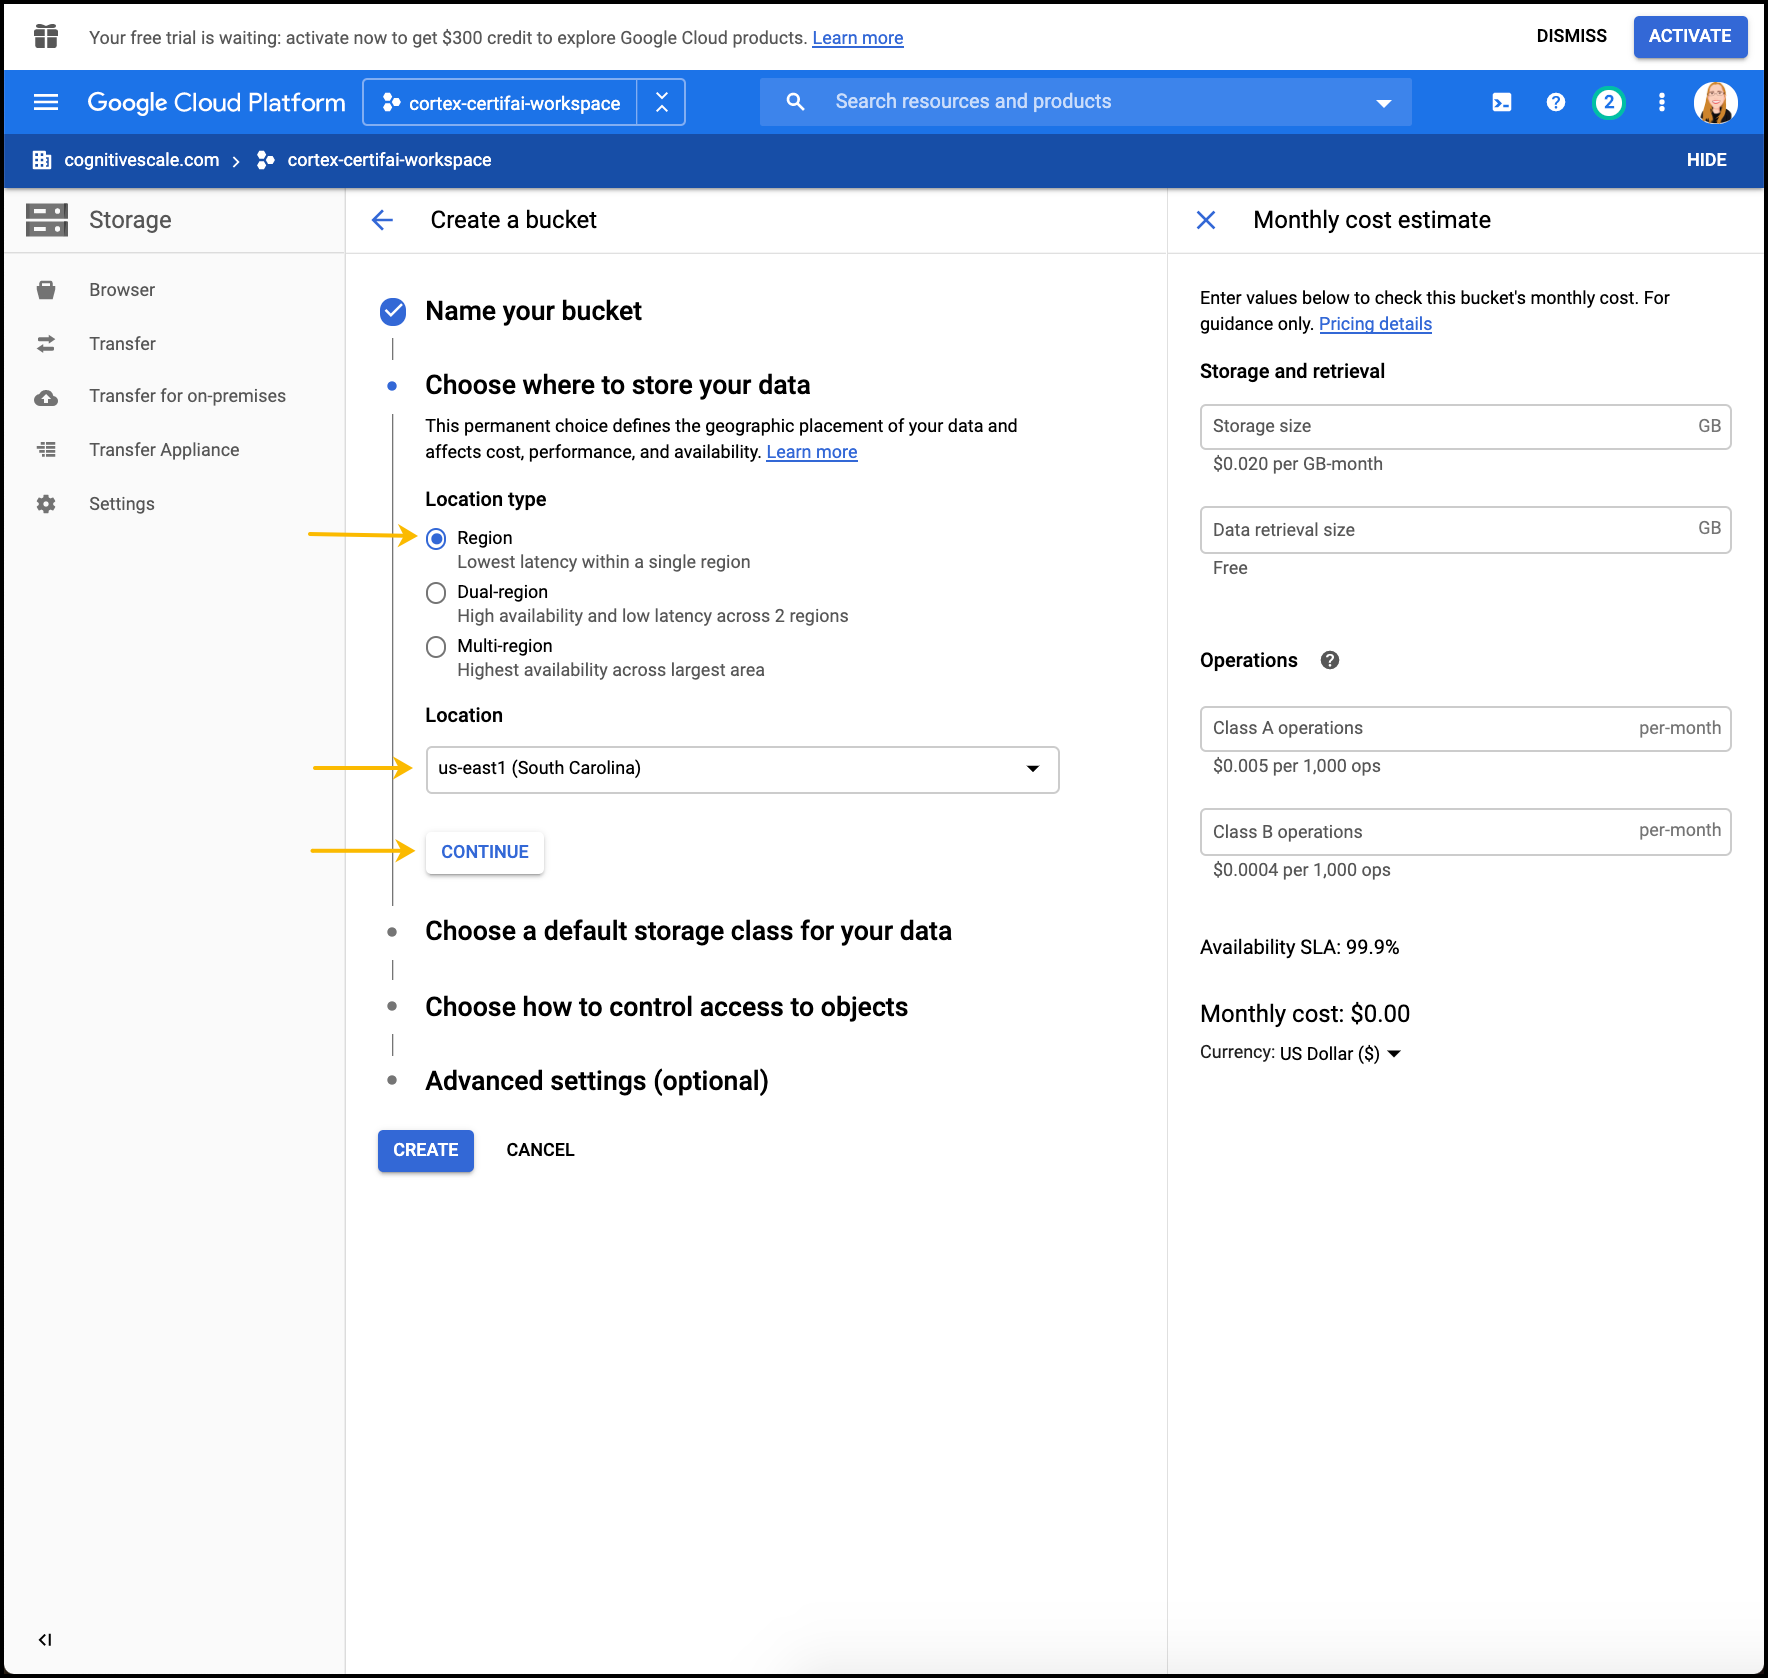
In the top bar click Create Bucket.
Enter a name for the Bucket and click Continue. (Make note of this Storage Bucket name; you need it to configure storage in the Certifai Console)
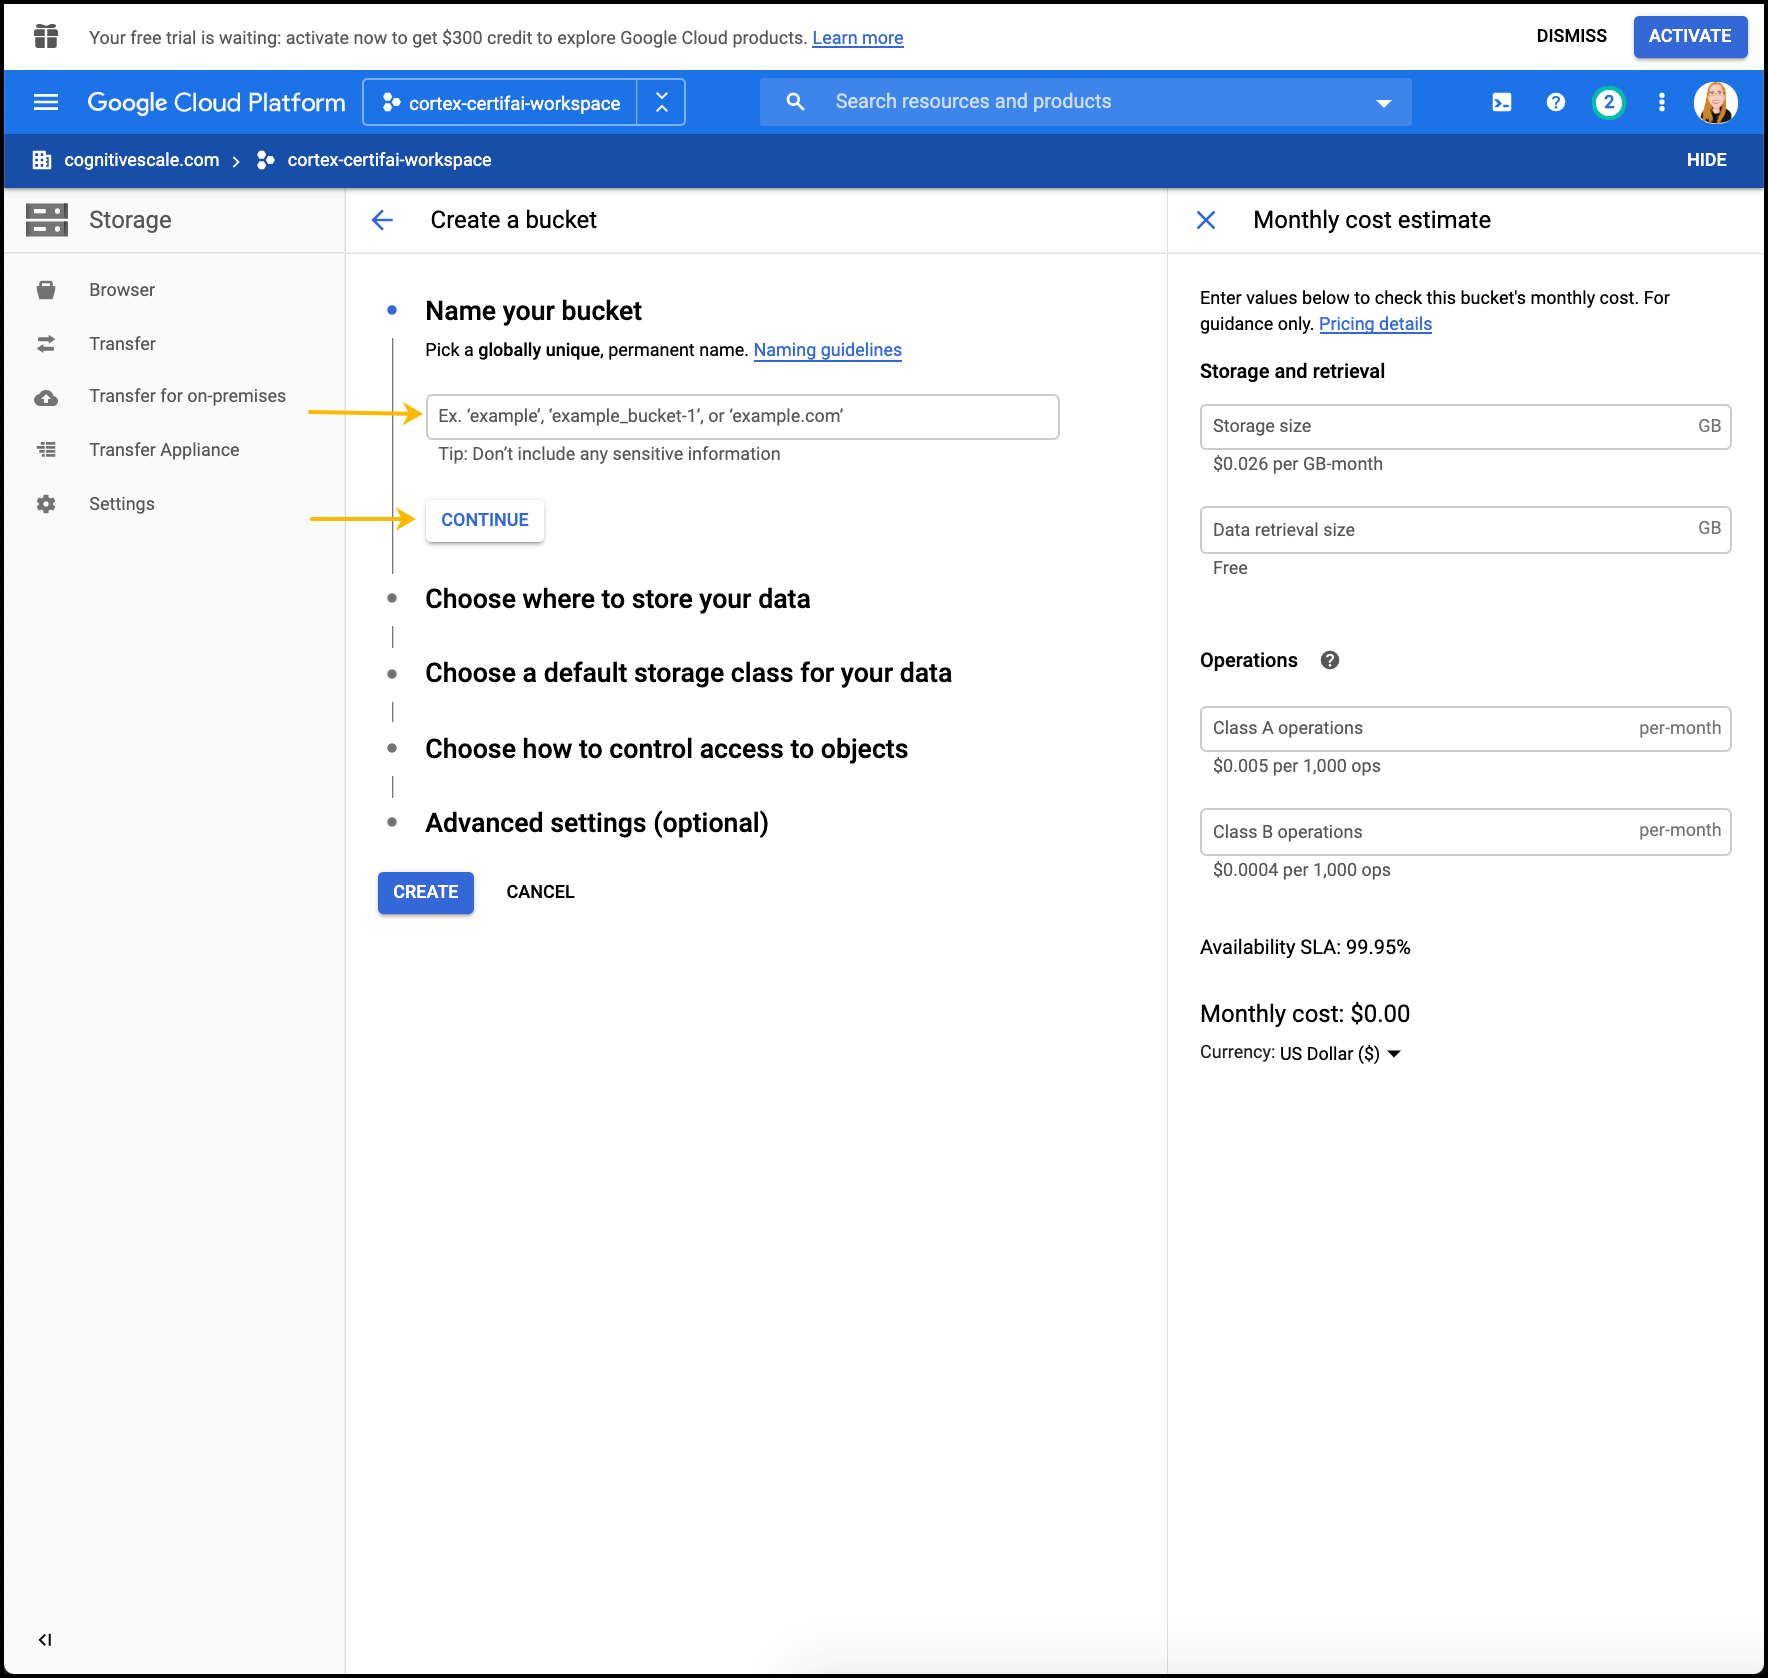
Select Location Type - Region and click Continue.
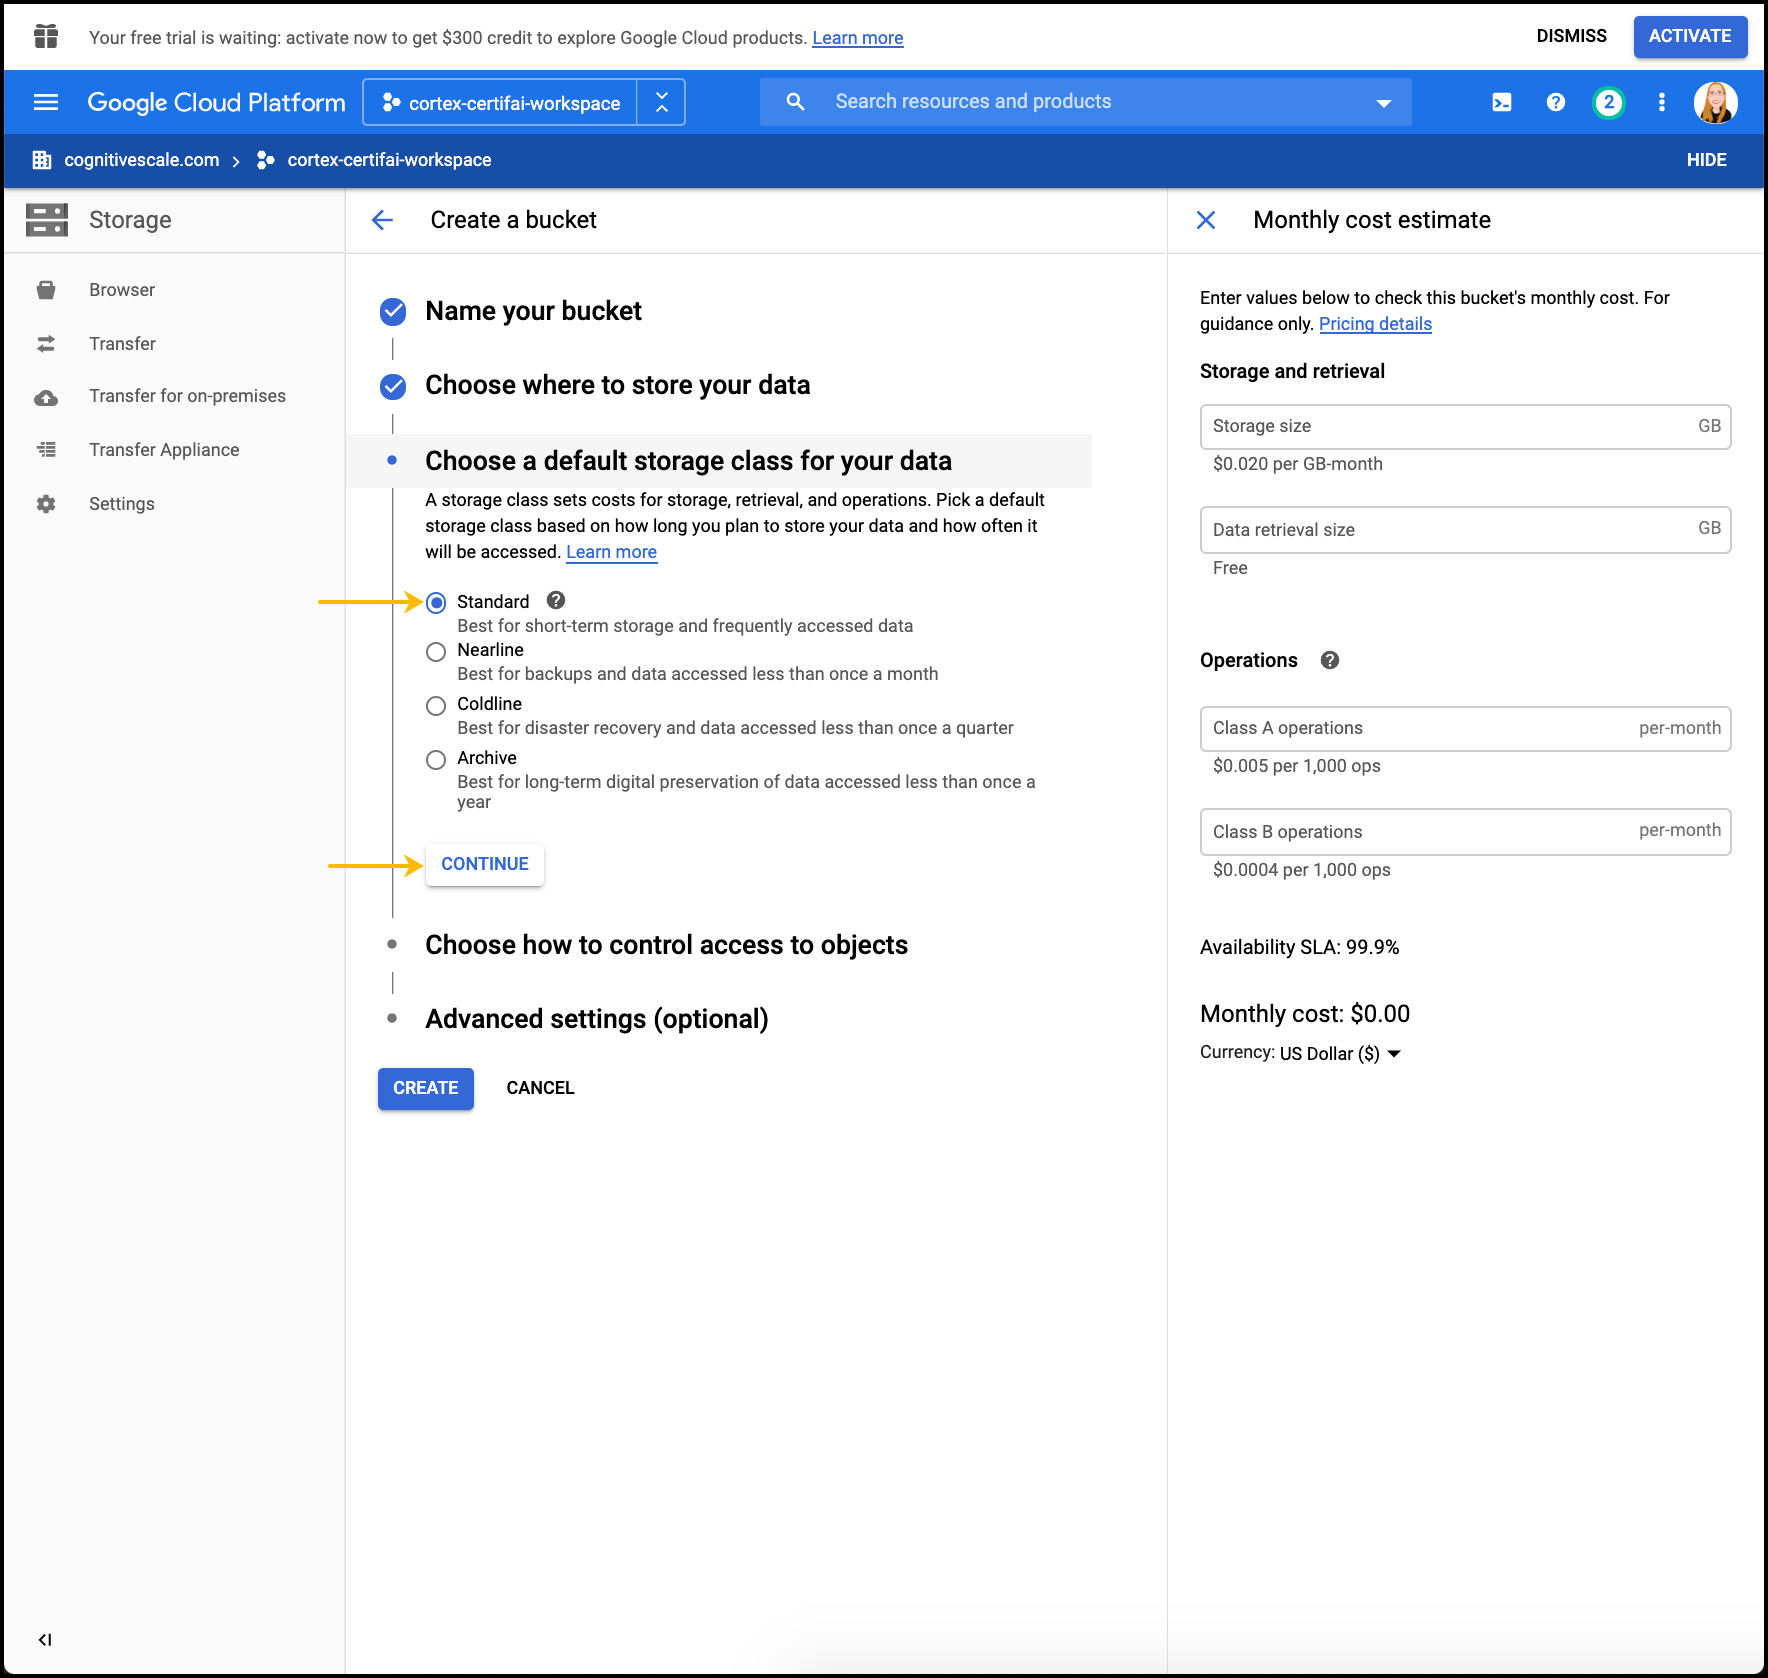
Select Storage Class - Standard and click Continue.
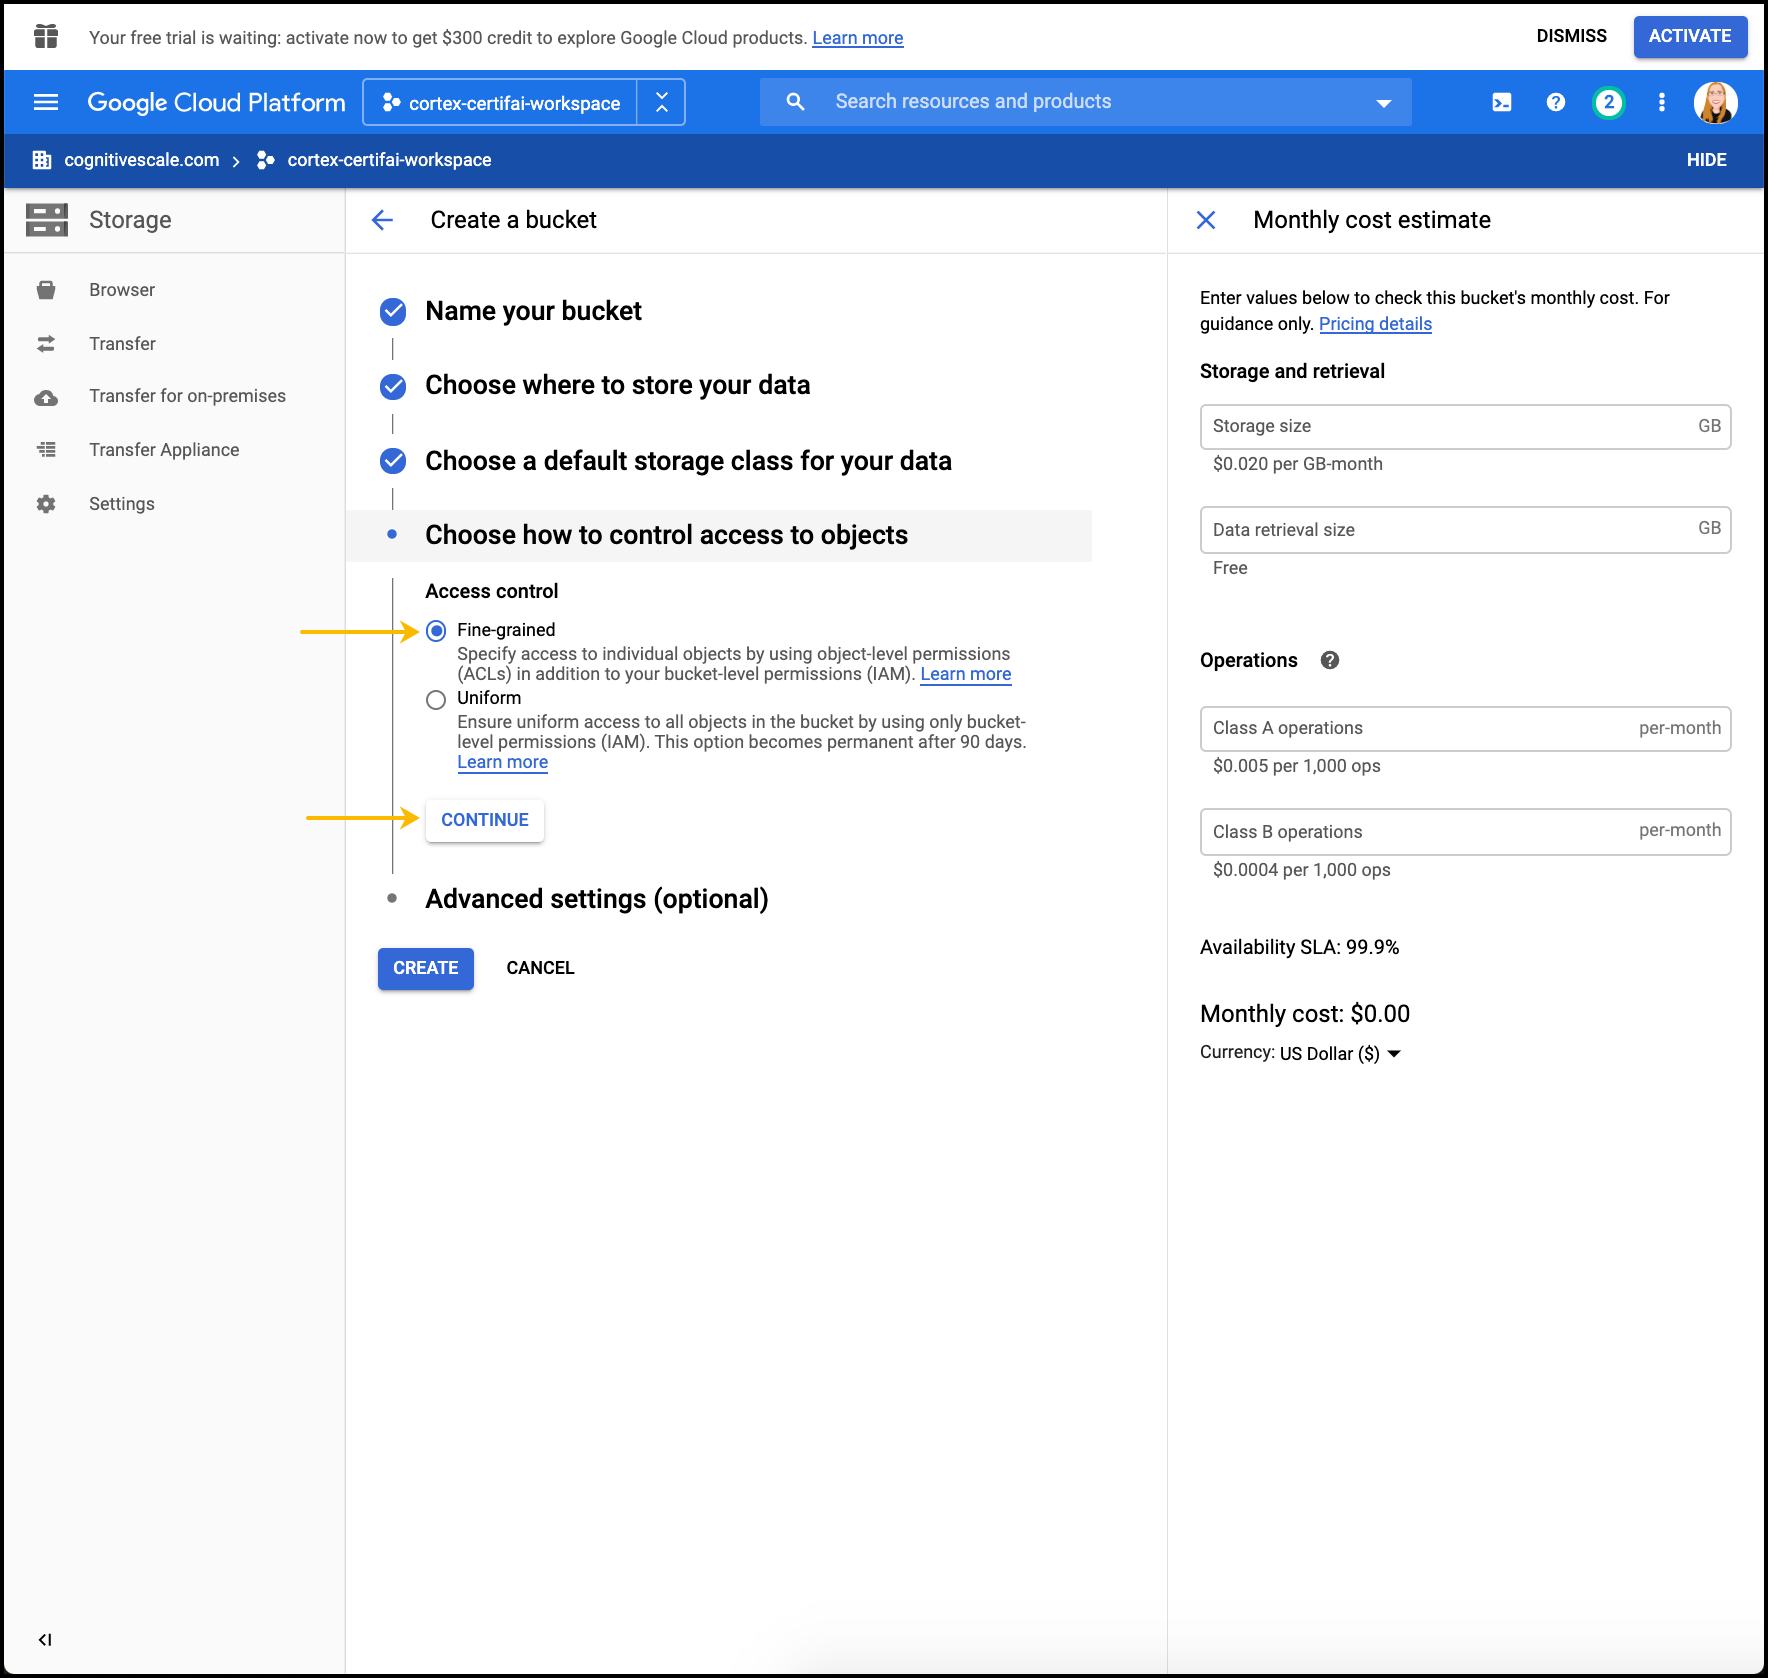
Select Access Control - Fine-grained and click Continue.
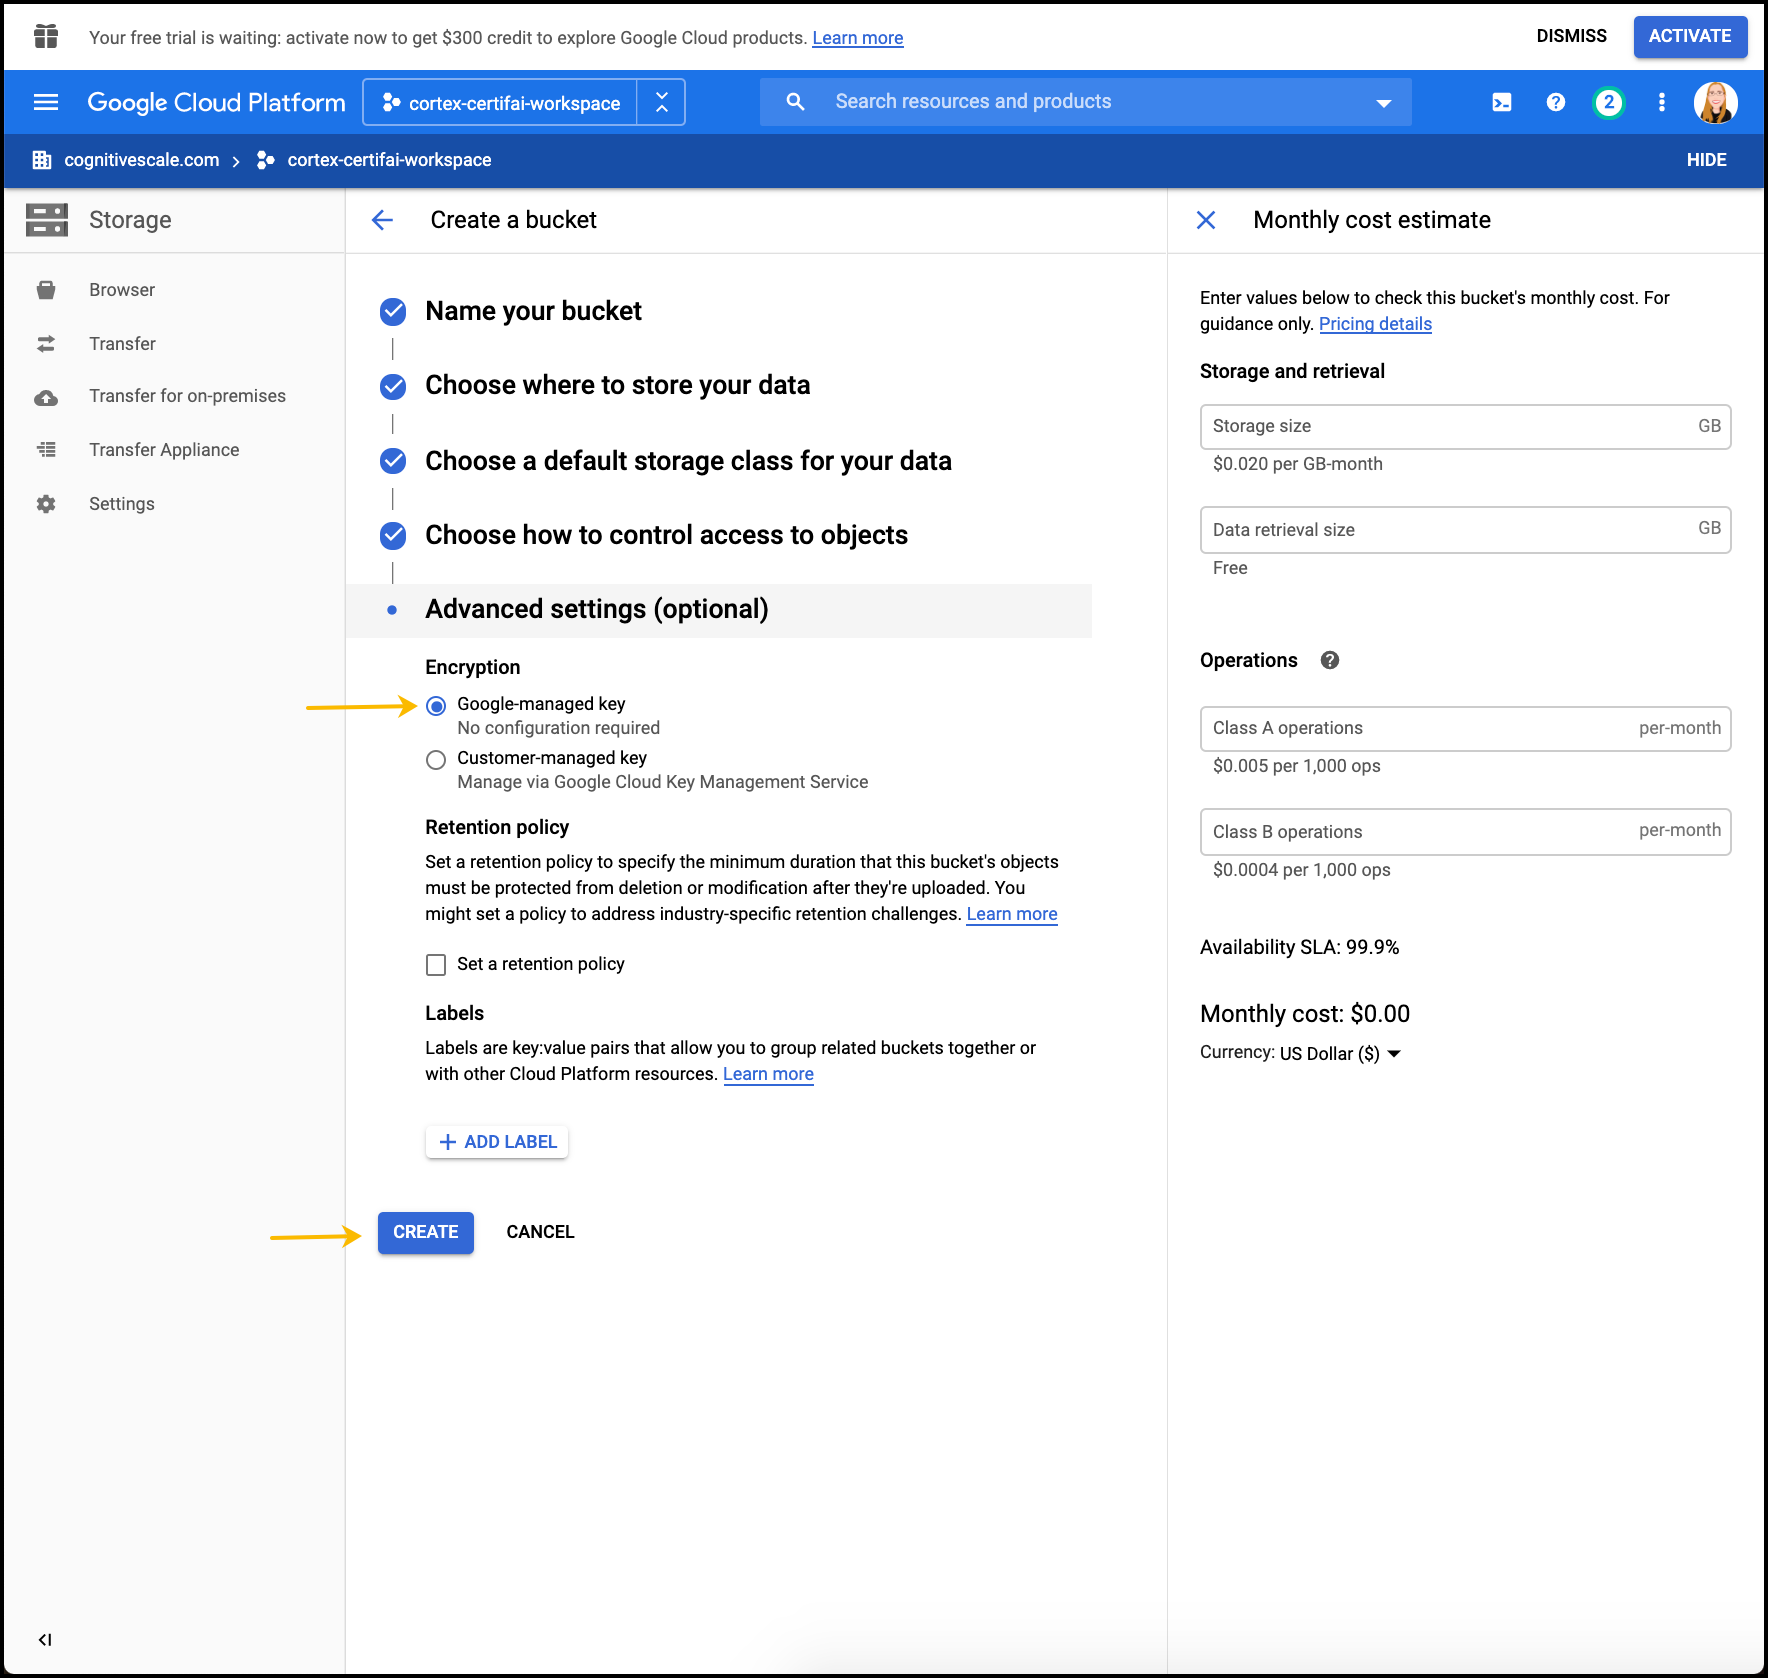
Select Encrypted - Google-managed key.
Click Create.
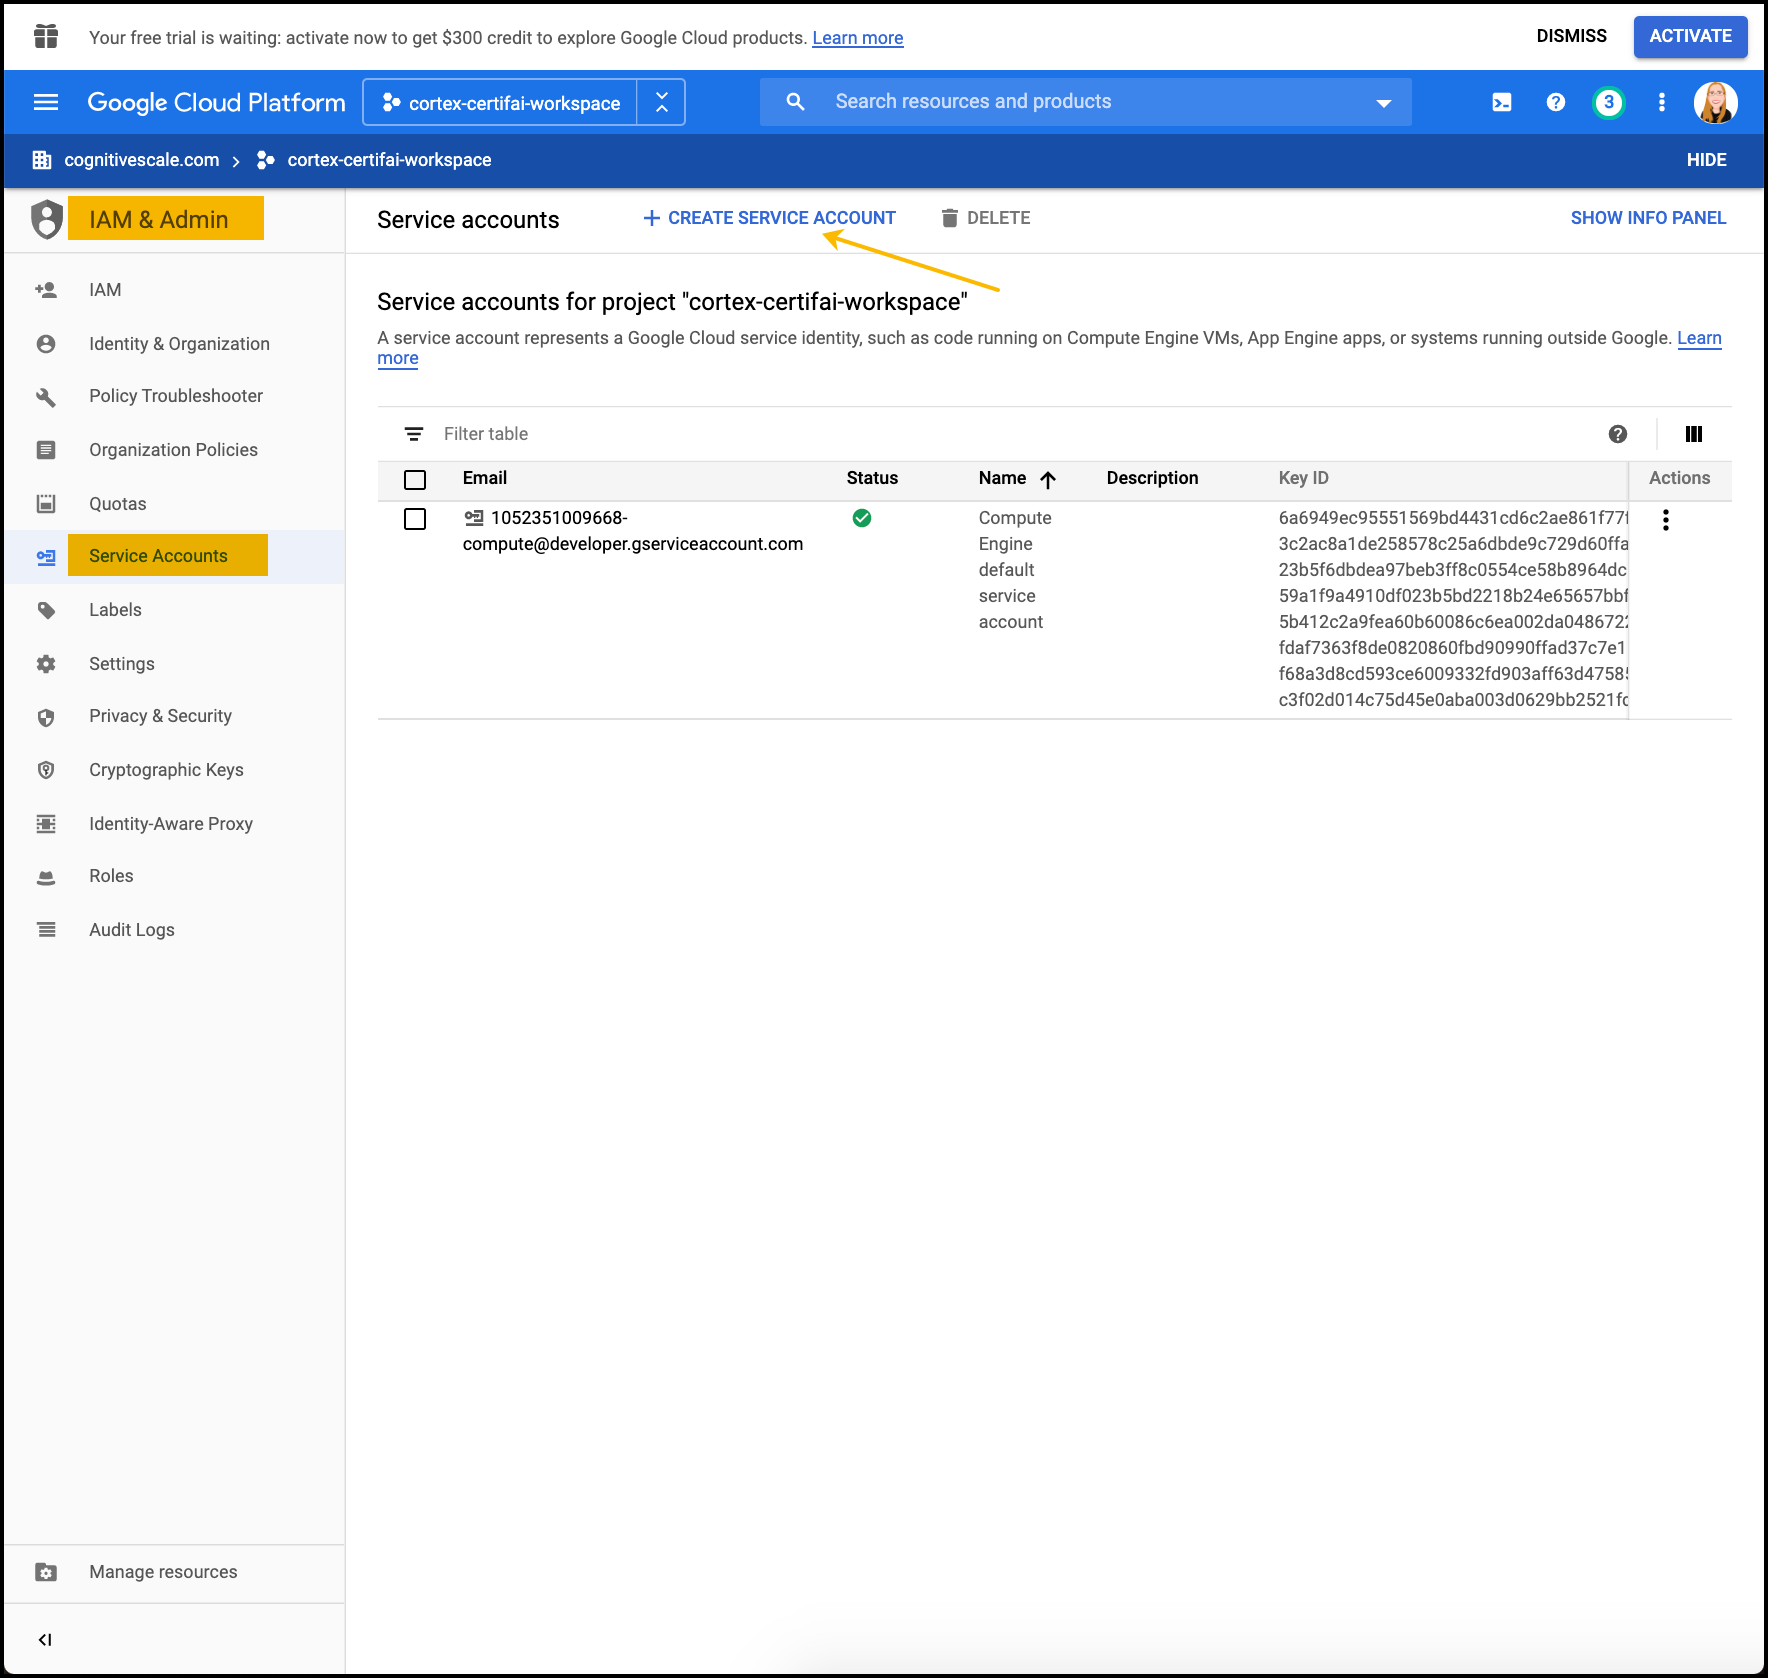
Create a Service Account Key
Click Google Cloud Platform at the top left to return to the main navigation panel.
Click IAM & Admin and then click Service Accounts.
In the top bar click Create Service Account if one has not been created and you have the necessary Admin privileges. (If one has been created go to step 4.)
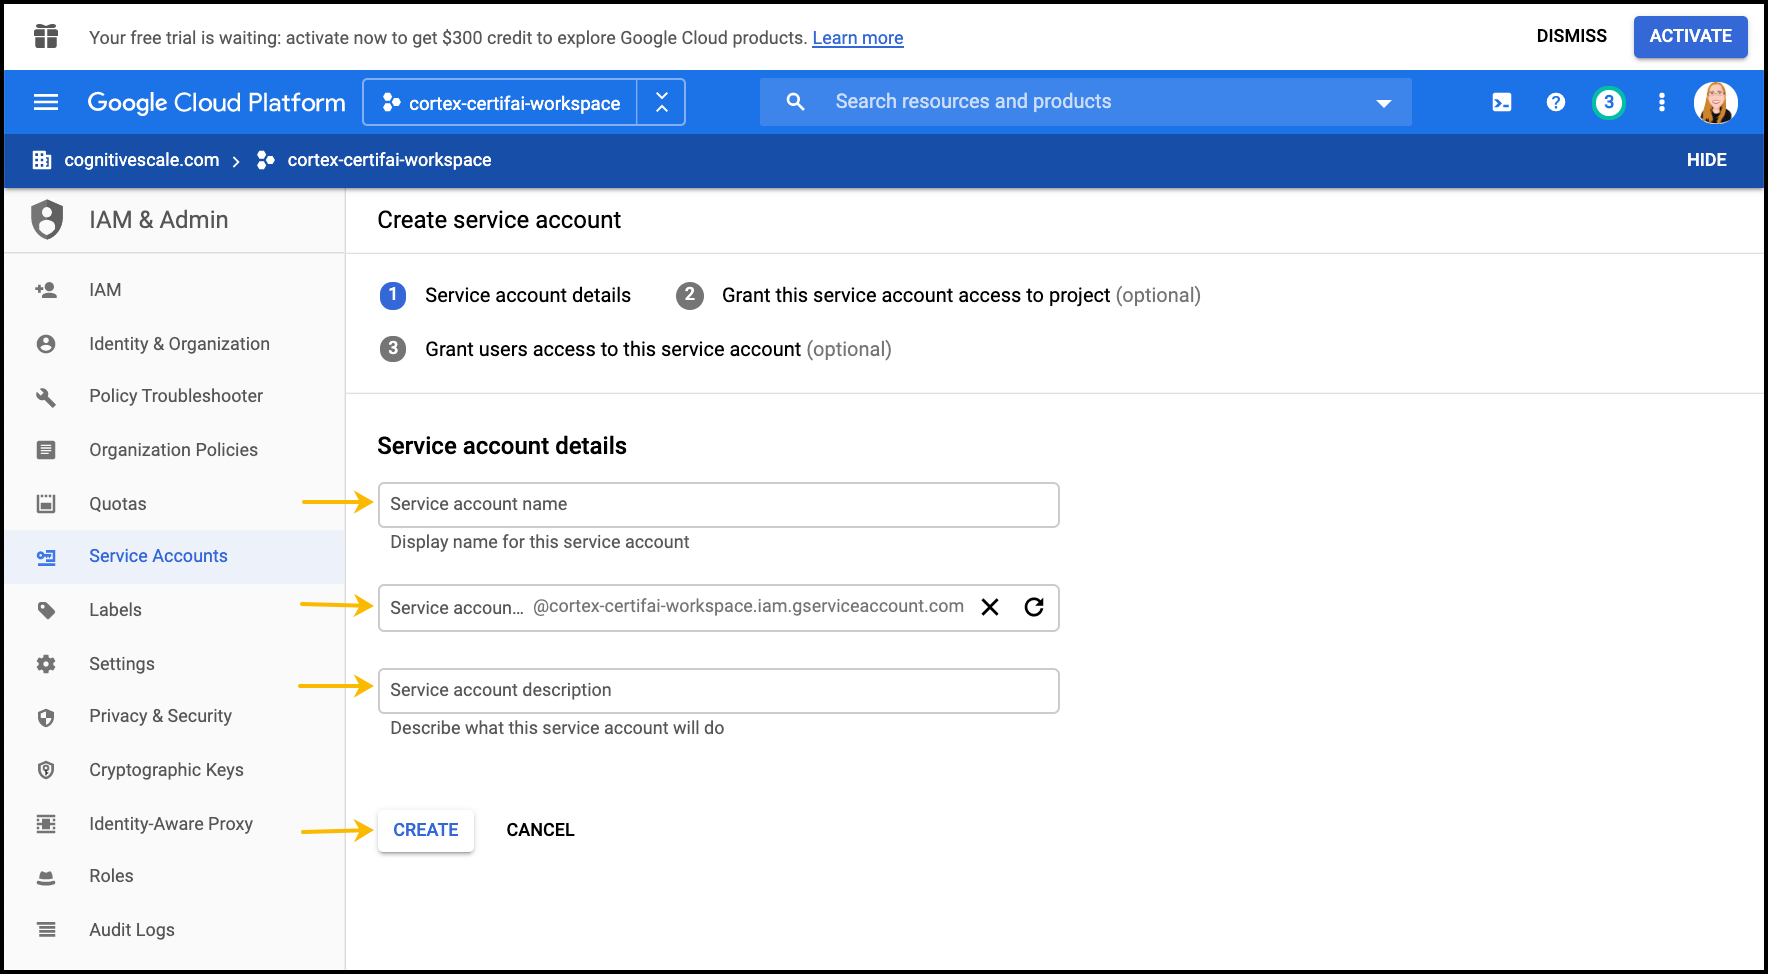
a. Enter the Service Account Name (Service Account ID is autogenerated to be unique in the system).
b. Enter the Service Account Description.
c. Click Create.
d. Grant the Service Account access to your Project and Storage Bucket by selecting from the drop-down options.
e. Click Continue
f. Click Create and follow the instruction in step 6.
From the Service Account list click the email of the Service Account to open a page where you configure details.
Click Edit in the top bar, scroll to the bottom, and click Create Key.
In the window that opens select JSON format for the key and click Create. The JSON file is automatically downloaded to your local drive. You need this key to configure storage in the Certifai Console.
Certifai Console Storage setup
Prerequisites
To complete the configuration and login to the Certifai Console you will need to obtain four pieces of information from the GCP portal.
From your GCP Compute Engine Console, you need the following:
- External IP: address of your Certifai VM
- VM Instance Name: assigned during provisioning.
From the GCP Storage (GCS) setup, you need the following:
- GCS Storage Bucket Name
- Service Account JSON Key
To obtain this information:
- Click Google Cloud Platform at the top left to return to the main navigation panel.
- In the left navigation panel under the COMPUTE heading click Compute Engine to display a list of configured VMs.
- Copy the VM Instance Name and External IP to a text editor.
- In the left navigation panel under the STORAGE heading click Storage to display a list of Storage Buckets.
- Copy the Storage Bucket name to a text editor.
Certifai Console Setup
Enter
https://<External IP>into a browser window to open the Certifai Console login page. (Chrome is the recommended browser)Info
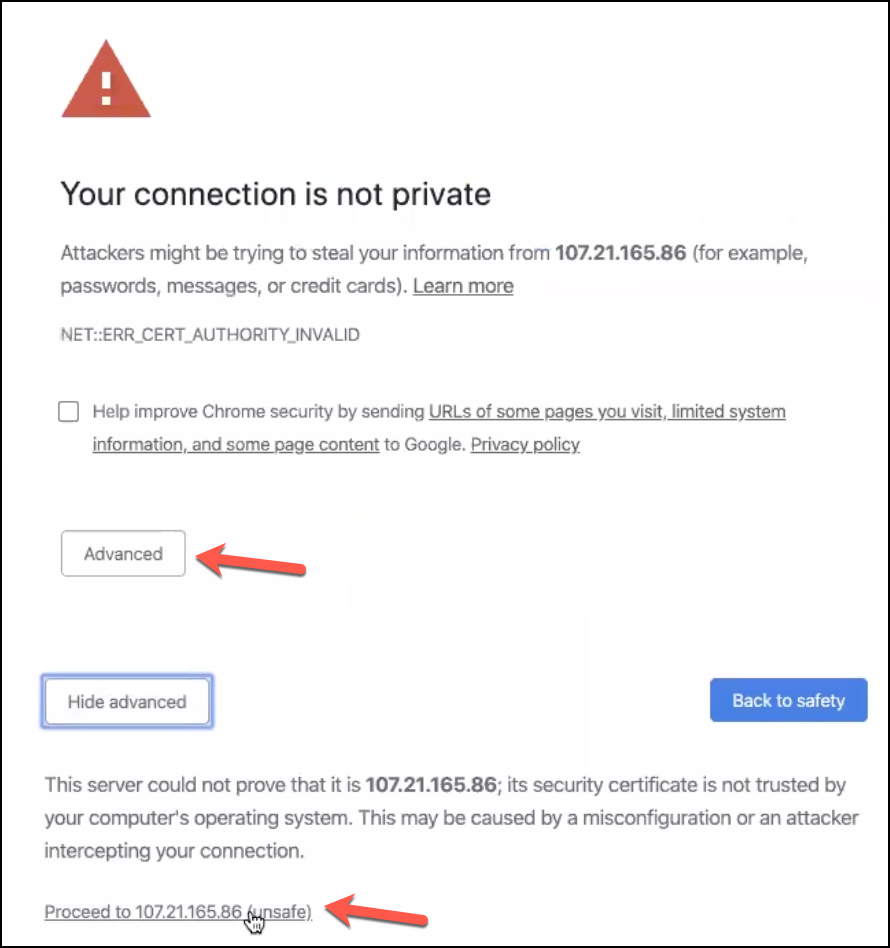
A warning message is display telling you that the connection is not private. Click on the link that exposes the Advanced settings. Click the link at the bottom that says "Proceed to <IP address>".
On the initial Certifai Console Login page enter your VM Instance Name and click SUBMIT..

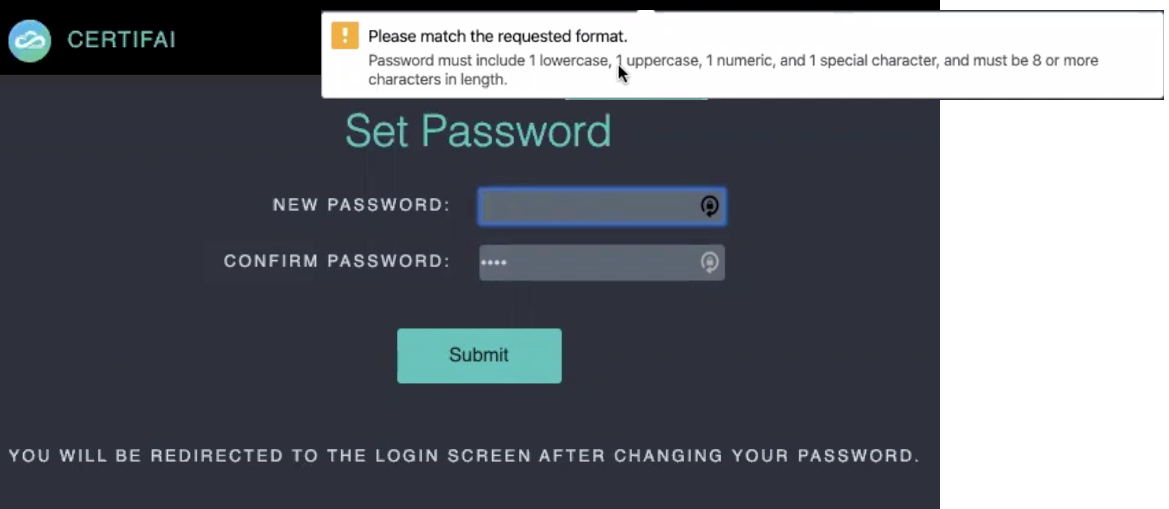
The "Set Password" page is displayed. You cannot proceed without setting a new password. Enter a strong password in the New Password field. Enter the same password into the Confirm Password field. Then click SUBMIT.
(We recommended 8 or more characters with one of each of the following: lowercase letter, uppercase letter, number, special character, no spaces)
You are redirected back to the login page where you must enter your new password for the "certifai" user and click SUBMIT. (NOTE: Do not change the username.)
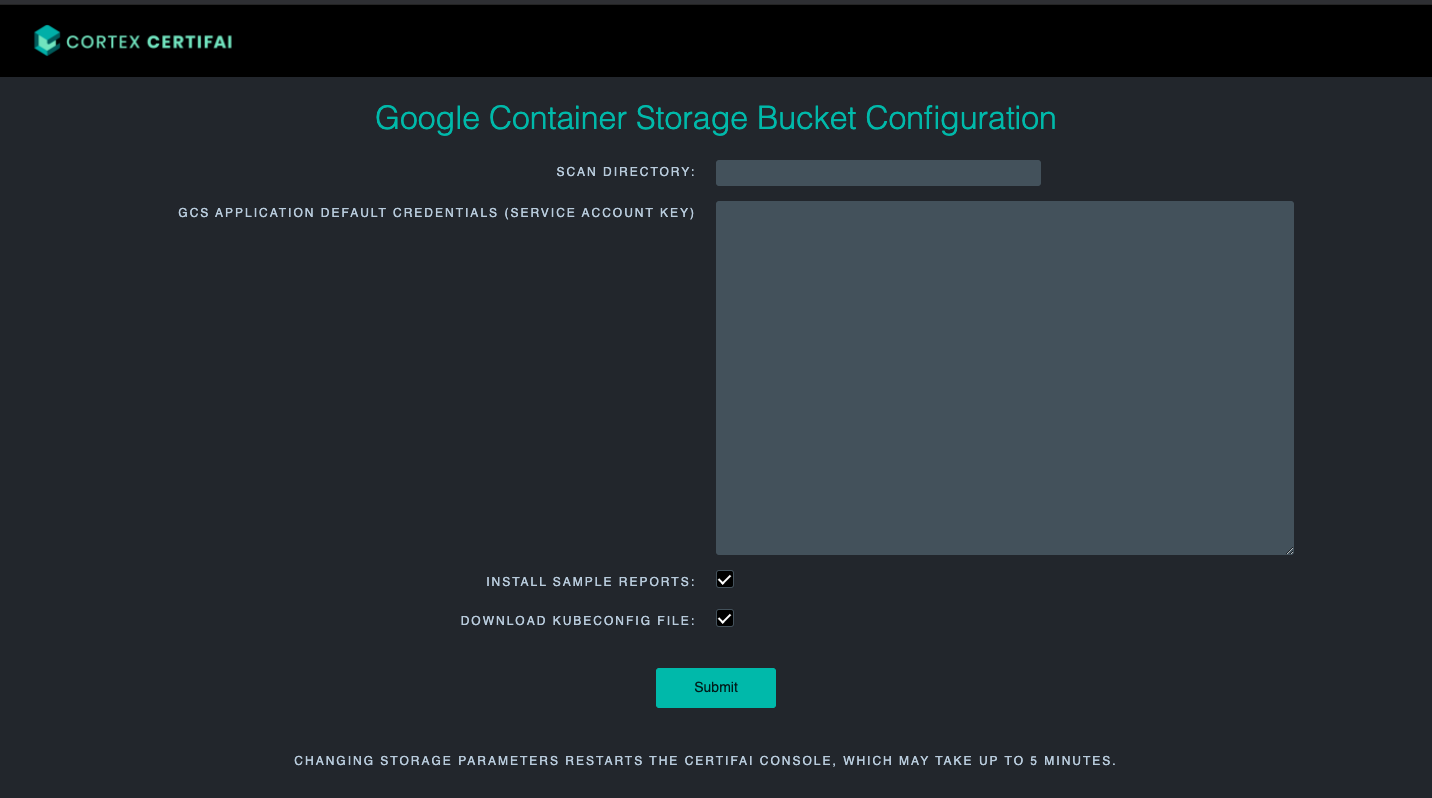
A Storage configuration page opens in Certifai Console.
- a. SCAN DIRECTORY: This is the name of the Storage bucket created earlier. If your bucket is named
certifai-pro-test-bucket, you can either entercertifai-pro-test-bucketOR use a subdirectory in the bucket likecertifai-pro-test-bucket/any_valid_name. We only support Unix style paths for this field - b. Google Application Credentials:
- Open the Service Account Key .json file that was download to your local drive in a text editor window.
- Copy the KEY content and paste it in the field.
- c. If you want to install the sample scan reports available by default with Certifai, leave Install Sample Reports checked. If you uncheck it the sample reports will not be installed.
- d. In order to run remote scan jobs using Kubernetes, check Download Kubernetes File. When this option is checked the
certifai.kubeconfig.jsonfile is automatically download to your local drive. - e. Click SUBMIT
- a. SCAN DIRECTORY: This is the name of the Storage bucket created earlier. If your bucket is named
Bookmark the IP address/URL. This will be where you access Certifai Console. Each time you return you must login to view sample scan reports or your own scan job results.
To learn more about navigating through the Console click here.
To learn more about the reports that are visualized in the Certifai Console click here.
Disable the "Forgot Password" link option
For improved security Certifai Pro users may want to disable the "Forgot Password" link on the Login page. This precaution prevents other people from your organization from using your account by changing the password.
- Go to the Login page.
- Check the DISABLE FORGOT PASSWORD checkbox.
- Accept the verification message.
- Click SUBMIT.
When you return to the Login page, the "Forgot Password" link is no longer displayed.
NOTE
If you forget your password, you will not be able to reset or recover this instance of Certifai Pro. You will need to setup a new Certifai Pro instance by following the setup instructions above.
Next steps
Click the help icon at the top right to expose the right menu.
Download and install the Toolkit.
Info
A local version of the Certifai Console is provisioned as a component of the Toolkit. It can be used only for viewing result of non-production scans that are run locally. You will not need to login to the local Console.
Run scan jobs on this Certifai Pro instance from your local machine and view result visualizations in the remote Console.