Cortex Charts
Google Cloud Provider GKE Prerequisites
This section provides instructions for preparing for Google Cloud Provider GKE Cortex Helm installation and configuration.
NOTE
The prerequisite instructions below provide the recommended setup where infrastructure dependencies are externalized. Your Cortex Chart configuration upon installation varies based on the setup of these dependencies.
GKE setup
- Create a GCP account. Follow the instructions on the GKE Quickstart Guide: Before you Begin.
- Create a Project in the Google Cloud Console.
- Enable billing for your GCC project.
- Enable the Artifact Registry and Google Kubernetes APIs.
- Set up a GKE cluster.
- Verify that you have the available quota in the Google Cloud Console.
- Launch the Cloud Shell and set defaults in the Google Cloud or configure the local
gcloudCLI by running:gcloud init - (Optional) Configure customer managed encryption keys (cmek).
- Create a GKE Cluster (v1.22 +). (See Sizing Guidelines)
- (Optional)Create a Bastion host and connect to the Bastion host.
- Create hosted externalized infrastructure dependencies.
- Memorystore for Redis
- If TLS is enabled for Redis apply the workaround detailed here.
- Mongo Atlas instance
- Memorystore for Redis
<Alert title="NOTE" color="primary">
Creating hosted-externalized infrastructure dependencies (especially Mongo and Redis is considered the best practice for both development and production environments of Cortex Fabric.
Customers who opt for this setup are responsible for creating accounts with the dependency providers, procuring the required licenses, implementing appropriate plans for their solutions, monitoring their usage, and managing those accounts.
For development/demo environments customers may opt to install Cortex with the internalized dependencies as directed in the [Installation Guide](/cortex-charts/docs/installation).
</Alert>Update the
kubeconfigfile with your credentials and endpoint information to pointkubectlat a specific cluster in GKE.gcloud container clusters get-credentials <GCP-project-name> -z <project-zone>Create certs for the domain name (options):
(Optional way to store images) Use GCR instead of the packaged Fabric private-registry (Docker):
IMPORTANT
If you use GCR, there is no need to configure Kubernetes Service Accounts with ImagePullSecrets.
Google Cloud Storage Setup
In addition to Minio/S3, Fabric can be configured to use Google Cloud Storage as Fabric's storage backend for Managed Content, Profiles, and Campaigns.
In Google Cloud Storage create 3 GCS buckets and an IAM Google service account or setup Workload Identity with permissions to access those buckets.
IAM Permissions for GCS
It is recommended to create a custom IAM role in GCP for managing permissions required by Fabric's storage backend and any solution specific access to Google Cloud Services. The following snippet shows the minimum IAM permissions required by Fabric for Google Cloud Storage:
CUSTOM_ROLE_NAME="CortexStorageAccess"PERMISSIONS_LIST="storage.buckets.get,storage.buckets.list,storage.multipartUploads.abort,storage.multipartUploads.create,storage.multipartUploads.list,storage.multipartUploads.listParts,storage.objects.create,storage.objects.delete,storage.objects.get,storage.objects.list,storage.objects.update"gcloud iam roles create ${CUSTOM_ROLE_NAME} \ --project=${PROJECT_ID} \ --title="cortex-storage-access" \ --description="Access related to Fabric services" \ --permissions=${PERMISSIONS_LIST} \ --stage="ALPHA"Once a custom role has been created with the permissions above, add a bucket level policy binding on each of the Fabric storage buckets (Managed Content, Profiles, Campaigns) granting custom roles access to the created IAM Google service account.
ROLE_FORMAT="projects/${PROJECT_ID}/roles/${CUSTOM_ROLE_NAME}"gsutil iam ch serviceAccount:${IAM_SERVICE_ACCOUNT}:${ROLE_FORMAT} gs://${AMP_BUCKET}gsutil iam ch serviceAccount:${IAM_SERVICE_ACCOUNT}:${ROLE_FORMAT} gs://${CONTENT_BUCKET}gsutil iam ch serviceAccount:${IAM_SERVICE_ACCOUNT}:${ROLE_FORMAT} gs://${PROFILES_BUCKET}Install Cortex Fabric
Install Cortex Fabric using the Helm Chart following the Fabric installation and post-installation instructions.
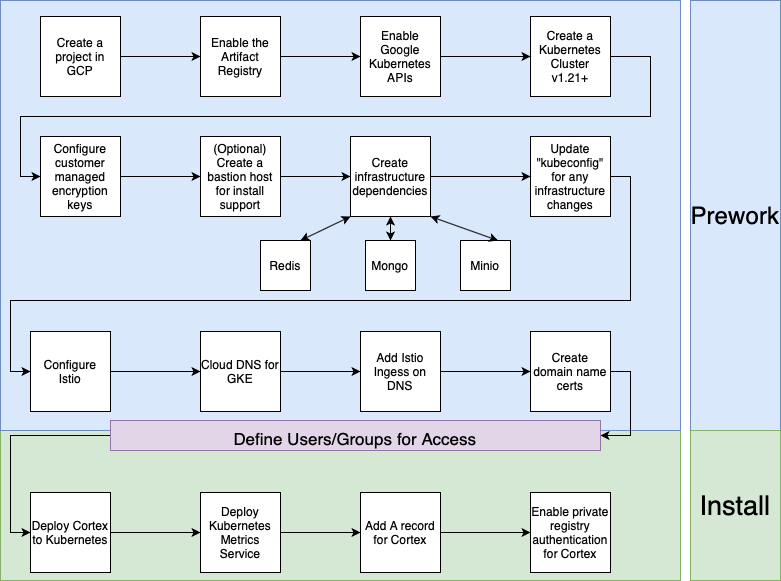
End-to-end Installation Flow for GCP
The diagram that follows is a summary of the prerequisite steps provided on this page and the general installation steps found here.