Build Profile Schemas
This is a guide to creating and managing Profile schemas.
Read Intro to Profiles to get more information about Profiles and schemas.
Prerequisites
The following activities must be completed before you begin building Profile Schemas.
Build Profile Schemas in Console
- Authenticate to the Fabric Console.
- Select the Project context for your Profile from a list of Projects that you have been granted access to.
- Click Profiles in the left navigation panel
- Click Add Profile Schema.
- Enter the metadata for the Profile including:
- Profile Title: Enter a descriptive title for the Profile
- Profile Name: Review the auto-generated Name. You may toggle the auto-generated switch to OFF and edit the name or enter a unique URL-friendly name. Profile names must be alphanumeric, beginning with a letter and ending with a letter or number. Underscores may be used, but no spaces or other special characters are allowed. (Names must be 20 characters or fewer unless otherwise configured in the Helm chart.)
- Description: Enter a short description of the Profile.
- Click NEXT at the bottom left.
- Primary Data Source: Select from the list of Data Sources that have been configured for the Project.
- Profile Key: Select the attribute that serves as the primary key for the data source from a list of attributes configured for that Data Source.
- Timestamp: Select how you want the timestamp for Profile creation derived. Options include:
- Auto: The system timestamp
- Select a Field: Select an attribute (field) and a timestamp format. Updates to the timestamp are based on changes to the selected attribute.
- Fixed Date: Enter a date that will serve as the timestamp.
- Attribute Group: Is set to "default" by default. You can optionally change it to be more descriptive. (e.g. demographics). Attribute groups are used to organize the way you view Profile content in the Profile Viewer.
- Click NEXT at the bottom left.
Add Additional Data Sources
Additional Data Sources may be added to the Profile configuration. Follow the process below if you want to build the Profile schema using more than one Data Source.
Complete the following steps.
- (Optional) Click Add Data Source. (You may add 1 or more additional Data Sources by clicking this button at the top of the page. A config section is added to the page each time you click the button.)
- Data Source: Select the added Data Source for the Profile from the list of Data Sources that have been configured for the Project.
- Join Specification: Primary Source Field: Select the attribute that is the primary key of the Primary data source.
- Join Specification: Join Source Field: Select the attribute that is foreign key of the additional data source as the second Join Specification key.
- Timestamp: Select how you want the timestamp for Profile creation derived. Options include:
- Auto: The system timestamp
- Select a Field: Select an attribute (field) and a timestamp format. Updates to the timestamp are based on changes to the selected attribute.
- Fixed Date: Enter a date that will serve as the timestamp.
- Attribute Group: Is set to "default" by default. You can optionally change it to be more descriptive. (e.g. demographics). Attribute groups are used to organize the way you view Profile content in the Profile Viewer.
- Click NEXT at the bottom left.
Chose Profile Attributes
Choose the Data Source attributes you want to join in the Profile. A list of all available attributes from all configured Data Sources is displayed. By default all attributes are selected.
To configure the attributes you want to include in the Profile Schema:
- Click a checkbox to the left of an attribute name to deselect it.
- Deselect all attributes by clicking the checkbox to the left of "Attribute" in the top row. Then click the checkboxes beside the attribute names of the attributes you wish to include.
Click NEXT at the bottom left.
Add Calculated Attributes
You can optionally add calculated attributes to the profile schema that compute new values using attributes from the selected data source. Follow the process below if you want to add build the profile schema using custom attributes.
Complete the following steps.
(Optional) Under "Add calculated attributes" click Add Attribute.
Enter an Attribute Name that is unique within the schema.
cautionAttribute names must be alphanumeric strings that begin with a letter and end with a letter or number. Underscores may be used, but no spaces or other special characters are allowed. (Names must be 20 characters or fewer)
Select a data source from the Data Sources that have been added to the Profile.
Select a Profile group that has been added to the profile. The calculated attribute is added to the profile group you select.
Select the Attribute type, Custom or Bucketed:
- Select Custom for attributes that are derived through a numerical calculation (e.g. sum, difference, average), then complete the following fields:
- Select the schedule window for how often you want this attribute calculated. (Options include: DAILY, WEEKLY, YEARLY, MONTHLY)
- Enter a logical expression for how the attribute is calculated. Start typing to see a list of available attributes you can use in the expression. The profile schema library is also displayed in a panel on the right. (EXAMPLE:
average_flu_risk = flu_risk_score.mean()) - Click SAVE (under the fields).
- Select Bucketed for attributes that require grouping (e.g. age groups, income brackets), then complete the following fields:
- Enter a Bucket name.
- Enter a logical filter expression for how the attribute is bucketed. Start typing to see a list of available attributes you can use in the expression. The profile schema library is also displayed in a panel on the right. (EXAMPLE:
age-group = Under 30, 30-45, 55+) - (Optional) Click Add Another Bucket
- Click SAVE (under the fields).
- Select Custom for attributes that are derived through a numerical calculation (e.g. sum, difference, average), then complete the following fields:
When you save a custom attribute, a table is created where the attributes are listed. From this table you can delete or edit your calculated attributes.
Click Add Attribute and follow the steps above to add another custom attribute.
Edit or Delete Calculated Attributes
To the right of each calculated attribute is a vertical ellipsis action menu that allows you to:
- Edit: Opens the configuration wizard, so you can make changes.
- Delete: Removes the attribute. Use this action with extreme care because removing an attribute may have downstream consequences if it is used in a campaign.
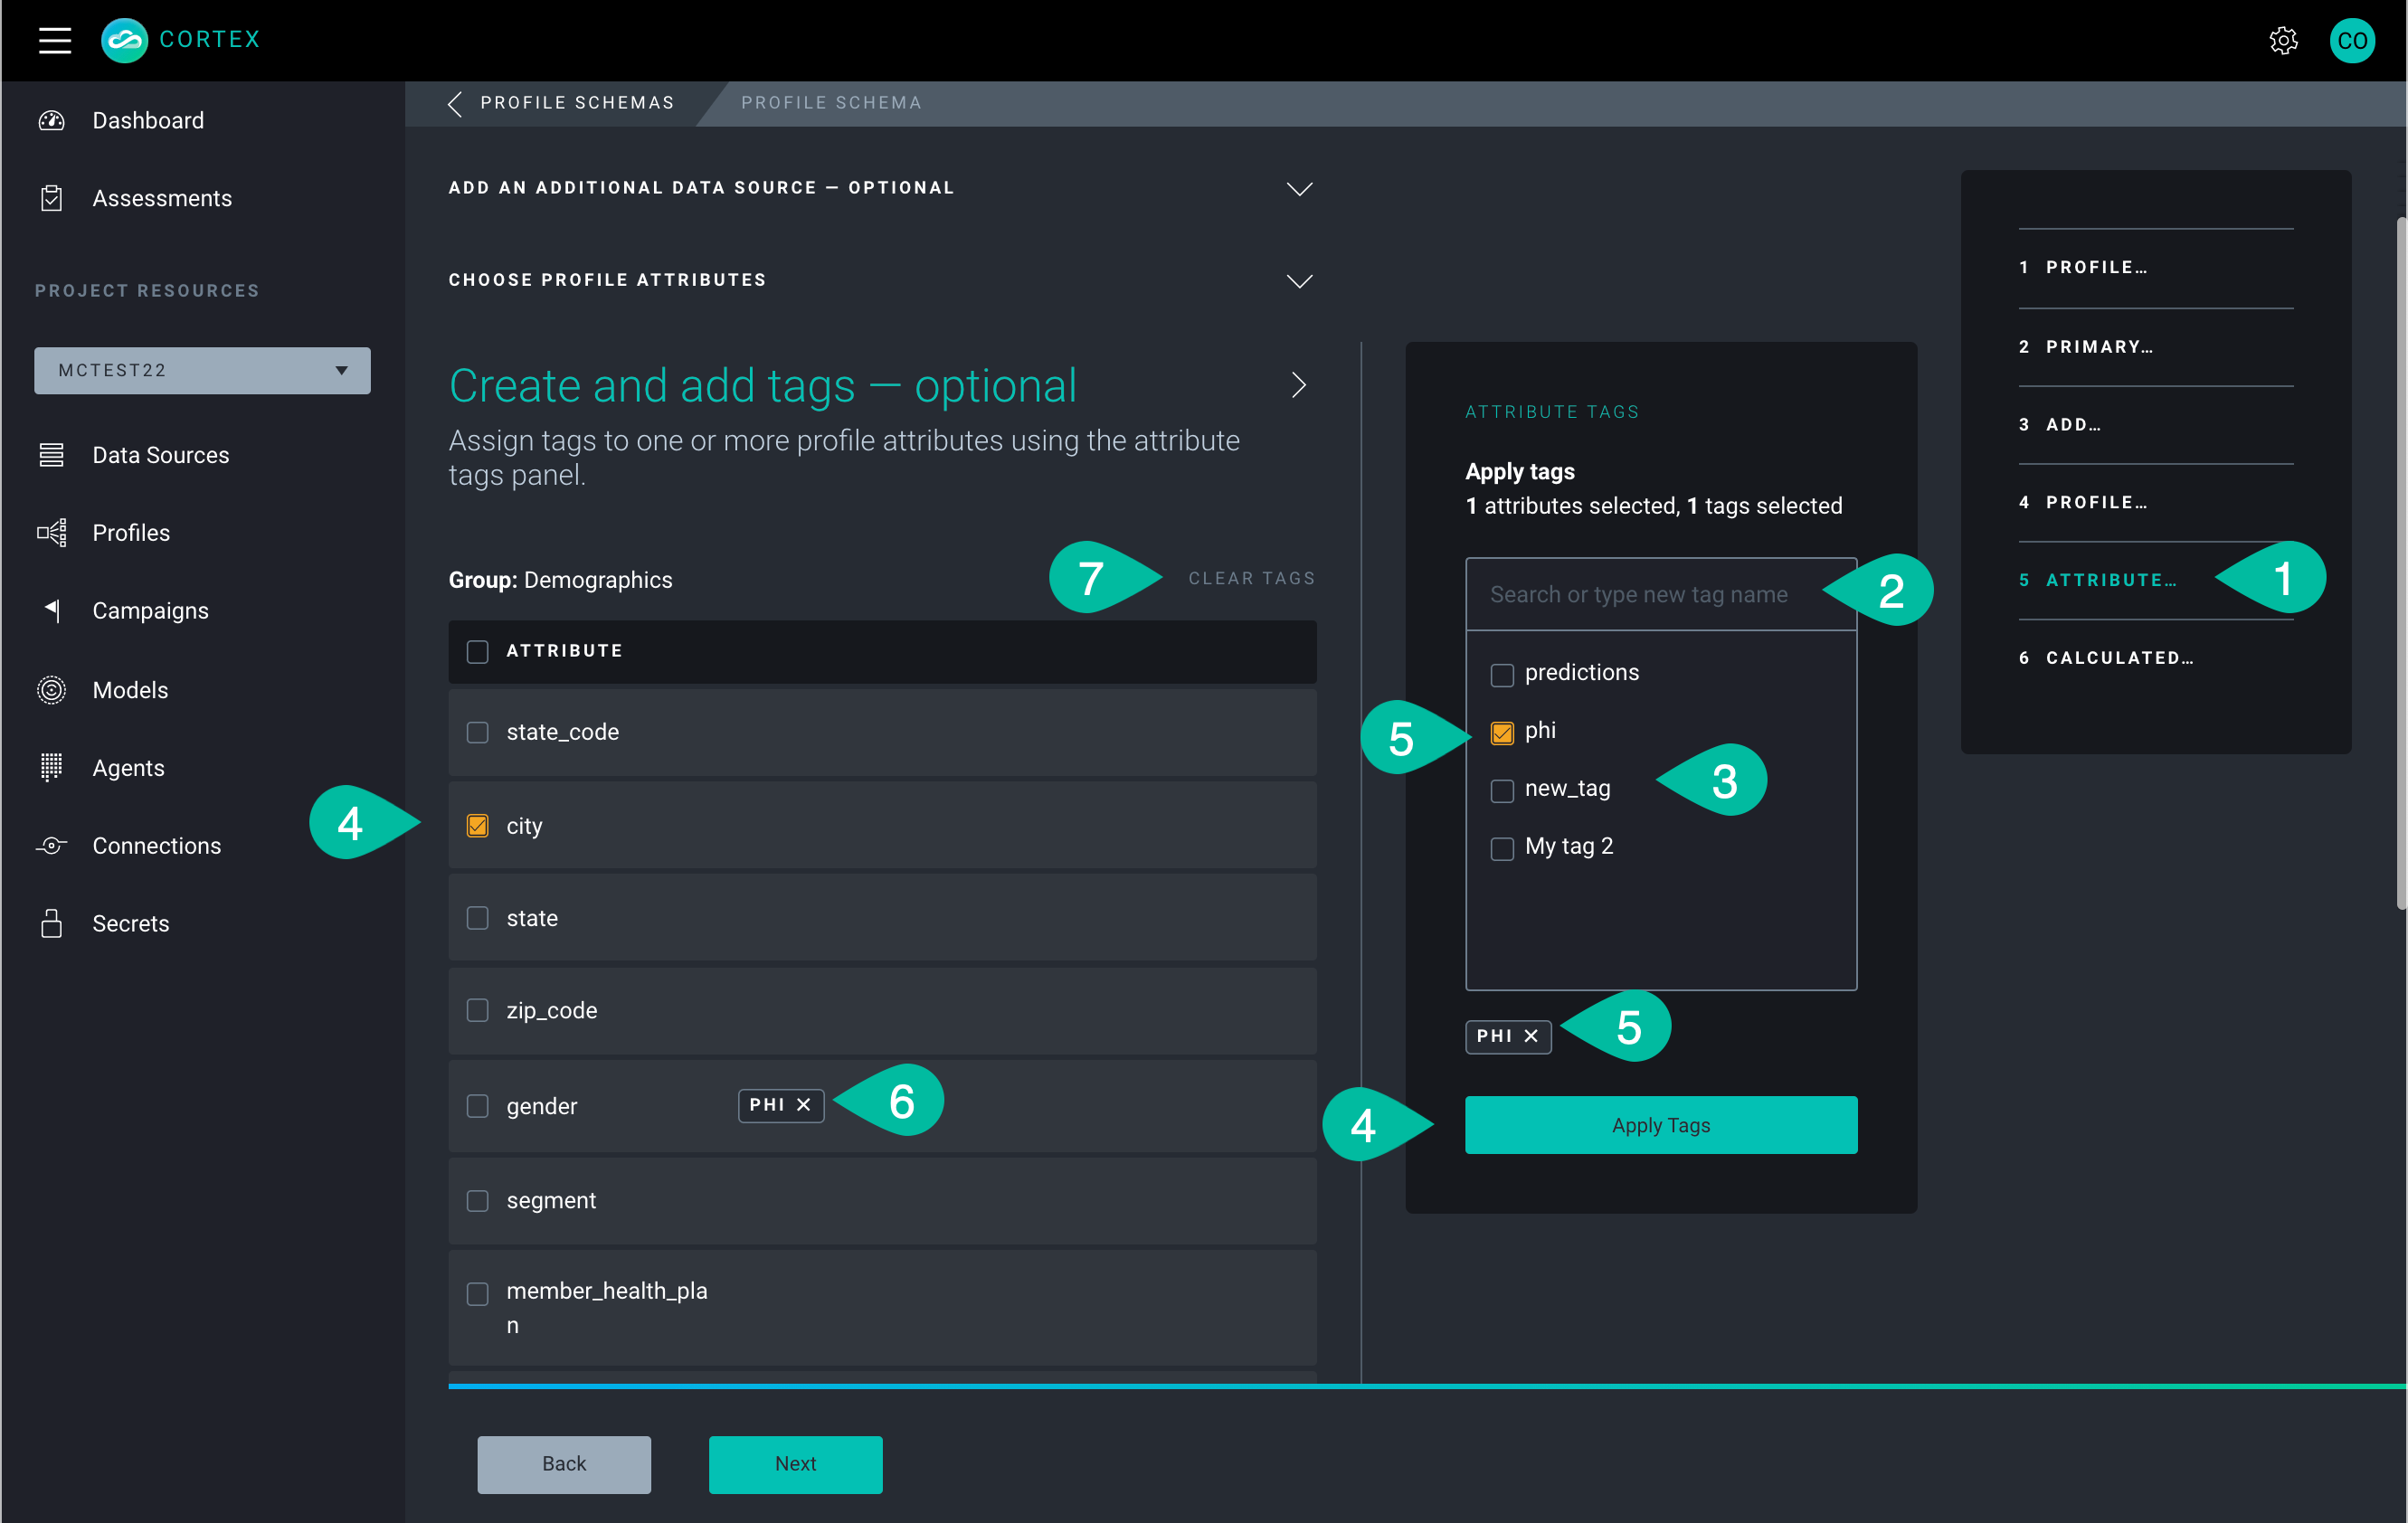
Add Attribute Tags
Attribute tags allow you to group attributes that may exist across Data Sources into categories that allow for program development. For example you might tag certain attributes as PII (Personally Identifiable Information), so they can be obfuscated or omitted in results or reports.
To add tags to Profile attributes:
From the edit or create Profile Schema flow as described above, after you have selected or created attributes click 5. Attribute Tags in the right panel (or click NEXT in the flow).
To create a tag: In the center panel in the text field above the tags list enter a tag name. If the tag does not already exist click Create:<tag name>.
Tags that have been created are listed in the center panel. Click a tag to select it.
To apply the tag to Profile Schema attributes: in the left panel click to select attributes from schema list. Then click Apply Tags below the tag list.
To deselect tags: Click the selection box again or click "x" beside the selected tag displayed below the tag list.
To remove individual tags from individual attributes: Click the "x" beside the tag displayed to the right of the attribute name in the attribute list panel.
To remove all tags from all attributes in the Profile Schema: Click CLEAR TAGS at the top right of the attribute list.
To save new tags, tag applications, and tag removals, you must click NEXT at the bottom of the page and navigate to the end of the Profile Schema wizard where you ultimately click SAVE.
NOTES:
- Profile tags cannot be deleted from the tags list.
- Profile tags are created for each specific Profile Schema.
Link Schema Attributes
When you set up Profiles, you have the option of linking attributes from different Profile Schemas, so you can query across the Schemas.
You must have at least 2 Profiles configured to use this feature. And the attributes you link should be unique in their own Profiles and related across Profiles.
A single attribute may be linked to more than one Profile.
For example: A project has 2 Profile schemas, one for member information and one for claims. The member_id from the first schema is linked to the claimant_id from the second schema. These attributes are primary keys that collect corresponding data that can connect the Profiles.
You can configure attribute links while creating a new Profile or by editing an existing Profile.
In the Fabric Console navigate to the Profiles list page and select the desired Profile (or create a new one).
In the Profiles configuration wizard navigate to the "Link profile attributes" section.
Click the radio button to select the schema attribute you wish to link to from a list of eligible attributes. (Calculated attributes cannot be linked.)
To search for an attribute enter a string. Attributes containing that string are returned.
A panel opens on the right. In that panel select a Profile schema.
Attributes from the selected schema that share the data type of the selected attribute in the left panel are loaded. Select the attribute you want to link to in the selected Profile in the left panel.
Click Create Link.
The link is added to the attribute table in the left panel. The number of links associated with a given attribute is displayed in the table.
At the bottom of the page click NEXT and move through the Profiles wizard.
On the final panel of the Profiles Wizard click SAVE to save the attribute links you created.
To remove a link
- Click the text in the "Link" column of the table in the left panel (e.g. 2 links).
- A window opens displaying the linked attributes and schemas.
- Click the box(es) of the attributes you want to unlink.
- Click SAVE.
COMING SOON:Linked attributes are displayed in the Profile Viewer with hyperlinks that open the schemas they are linked to.
Complete Schema and Ingest data
Click SAVE at the bottom left to save the Profile to the Project and make it active.
Clicking SAVE also starts an ingestion job that builds the profile schema. The status of the ingestion is shown on the schema card on the schema list page and on the schema detail page that is displayed when you select a card.
If the ingestion job fails the tail of the job log is displayed in a toast at the top of the page to provide insight into the root-cause of the failure.
When ingestion is “Complete”, a "list" card is created on the Profile (schema) page.
Schema Ingestion Statuses
There are 3 statuses associated with the schema ingestion job:
Active: The job has startedComplete: The job has completedError: A problem has occurred and the job did not complete successfully
Manage Profile Schemas
The cards on the Profile Schema list page have a vertical ellipsis action menu that allows you to:
Rebuild profiles: Reruns the save/ingest process to update profiles with any data changes that have been made to the Data Source.
noteProfiles must be rebuilt manually to ingest new data from Data Sources.
Edit: Opens the schema configuration wizard, so you can make changes. You can navigate through the wizard from the menu on the right that lists the wizard sections.
Delete: Removes the schema and all its associated profiles from your catalog. Use this action with extreme care because removing a Profile schema may have downstream consequences if it is used in campaigns or agents.
NOTE: This menu is also displayed at the top of each of the schema detail tab pages.
Best Practices for Configuring Profiles for Mission Runtime
To display KPI statistics prior to runtime you may want to create a static Profile that corresponds to a Data Source that contains previous feedback data and attributes.
For example:
As a best practice, an S3 file Connection named member_feedback was configured, a corresponding Data Source (Member Feedback Data Source) was created and configured with the feedback attributes prepended with the mission_name. Configure a Profile (Member Feedback) that references the Member Feedback Data Source and generate the Profile Schema.
Alternatively, the feedback attributes could be added to a Profile as Calculated Attributes. (Data types must be numeric, float, or integer to be used to calculate the KPI.)
Next, use this Profile to configure a Goal with a KPI expression that references one of the feedback attributes in the system-generated feedback Connection/Data Source/Profile for the Mission.
A system-generated Connection, corresponding Data Source, and corresponding Profile is added to your Project at Mission runtime to manage feedback and rewards. Runtime KPI data is collected in these components and displayed in the Campaign Dashboard regardless of whether or not you configure the static Connection, Data Source, and Profile described above. You cannot edit this Profile.
Next Steps
Click a Profile schema card to go to the schema details tabs. You can view:
- Schema Attributes list
- Profiles list (Click a list item to open the Profile Viewer)
- Changelog