Manage Connections
Cortex supports the following connection types:
After you have added connections to your project, you can configure Inputs to an agent or Data Sources for Profile of One and Campaigns.
Connection parameters
Go to Connection Types to view the YAML files and parameters specs for each Connection type.
The data stored in the Connection must contain column names that meet the following requirements:
- Alphanumeric
- Beginning with a letter
- Ending with a letter or number
- Underscores may be used
- No spaces
- No special characters
Connection prerequisites
- Configure connection secrets (administrator)
- For S3 and S3 File Stream add buckets in AWS Console and upload required files (objects) to that bucket.
- For GCS and GCS File Stream add buckets in your GCS console and and upload required files (objects) to that bucket.
Add a Connection: Console
You can configure a variety of connection types in Admin Console. All types of connection configurations begin by defining metadata and the connection type. Configuration of connection parameters, however, varies by connection type.
Define Connection Metadata
Log in to the SENSA Fabric Console and click Connections in the left menu. A list of connections saved in the account is displayed.
Click Add Connection at the top right.
Enter the connection metadata:
- Connection Title: Enter a human-readable display name for the connection.
- Connection Name: By default this is auto-generated. You may toggle the
auto-generatedswitch to off and edit the name or enter a unique URL-friendly name. Connection names must be alphanumeric, beginning with a letter and ending with a letter or number. In between dashes and underscores are allowed; no other special characters can be used.(Names must be 20 characters or fewer) - Description: (optional) Enter a description for the connection.
Click on your connection type selection. The parameters for each connection type differ and are described below.
You can change the connection type by clicking
change connection type.
Configure Connection Parameters: Console
For details about parameters and expected values view Connection Types documentation
MongoDB
- Enter the URI of your Mongo database.
- Enter a name for the Mongo Collection to query in the database.
- Enter the name of the Mongo database to connect to.
- Check SSL Enabled if true.
- Click SAVE to add the connection to the Project.
S3 and S3 File Stream
Choose the connection type: S3, or S3 File Stream.
Select the Content Type: CSV, JSON, or Parquet (This field opens above the connection selection panel.)
Configure the connection parameters:
For S3 connections:
File URI - from the AWS Console For example:
s3a://path/to/file.txtNOTE: If data is stored in subfolders specify the URI and append with a wildcard. (e.g.
s3a://cogscale-qa/teststream/*)(AWS) Public Access Key with at least read access to the S3 Bucket. (Do NOT use your AWS admin key.)
Use IAM Role Service Account (IRSA) Authentication - Check the box if that form of authentication has been configured.
Public Access Key - If IRSA or Secret Access Key are NOT configured, enter an AWS public key with at least read access to the S3 Bucket. (Do NOT use your AWS admin key.)
Secret Access Key - If IRSA or Public Access Key are NOT configured, enter an AWS secret key with at least read access to the S3 Bucket. (Do NOT use your AWS admin key.)
S3 API endpoint (optional) - (The S3 http(s):// URL for Minio or other private hosted instances.)
If applicable check: Path Style Access (non-AWS)
If applicable check: SSL Enabled
For S3 File Stream connections:
- Bootstrap URI: The sample file uri that the connection uses to infer the schema.
- Stream Read Directory - Enter path the S3 bucket directory where the data content is stored.
- Use IAM Role Service Account (IRSA) Authentication - check the box if that form of authentication has been configured.
Configure the file parsing parameters (same options for S3 and S3 File Stream connections).
- Separator - a character used to delimit fields
- Line Separator - a character use to parse lines
- Encoding - the encoding type used to decode .csv files
- Comment Character - skip lines that begin with this character
- Quote Character - single or double quotes
- Escape Character - character used to escape values that contain delimiters
- Multiline of Line Separator - check this for multiline JSON
- First Line is Header Row
- Multiline of JSON Style
- JSON Style - Format style of the JSON style (lines, array, or object)
- Line Separator - character used to parse the lines
- Encoding - standard basic or extended encoding for the JSON files (For example UTF-16BE, UTF-32LE. If the encoding is not specified and multiLine is set to true, it will be detected automatically.)
Configure the trigger parameters for S3 File Stream (with Spark).
- Trigger manually using Data Source ingest - Check the box if you do NOT want to set an ingestion schedule for Data Sources that pull from this connection.
OR
- Max Files per Poll Interval - Set the number of files to process for each poll interval.
- Poll Interval - Set the schedule of how often the Data Sources poll the Connection and rebuild automatically in seconds.
GCS and GCS File Stream
Choose the connection type: GCS or GCS File Stream.
Select the Content Type: CSV, JSON, or Parquet (NOTE: This field opens above the connection selection panel.)
Configure the connection parameters:
For GCS connections
File URI (required)- Enter the GCS file URI (from the GCP Console). For example:
gs://path/to/file.txtUse Workload Identity Authentication - Check this option if this method has been configured for GCP.
- GCS API Root - When you enable Workload Identity for access you must provide the GCS HTTP(s):// URL to use,
https://storage.googleapis.com/. Typically this is only applicable when using a server like Minio and hosting a private instance.
- GCS API Root - When you enable Workload Identity for access you must provide the GCS HTTP(s):// URL to use,
GCS Service Path - Enter the GCS Service Path to use,
storage/v1/.
For GCS File Stream connections:
- Bootstrap URI (required) - Enter the sample file uri that the connection uses to infer the schema.
- Stream Read Directory (required) - Enter the GCS bucket directory where the data content is stored.
Configure the file parsing parameters (same options for GCS and GCS File Stream connections).
- Separator - a character used to delimit fields
- Line Separator - a character use to parse lines
- Encoding - the encoding type used to decode csv files
- Comment Character - skip lines that begin with this character
- Quote Character - single or double quotes
- Escape Character - character used to escape values that contain delimiters
- Multiline of Line Separator - check this for multiline JSON
- First Line is Header Row
- Multiline of JSON Style
- JSON Style - Format style of the JSON style (lines, array, or object)
- Line Separator - character used to parse the lines
- Encoding - standard basic or extended encoding for the JSON files (For example UTF-16BE, UTF-32LE. If the encoding is not specified and multiLine is set to true, it will be detected automatically.)
Configure the trigger parameters for S3 File Stream (with Spark).
- Trigger manually using Data Source ingest - Check the box if you do NOT want to set an ingestion schedule for Data Sources that pull from this connection.
OR
- Max Files per Poll Interval - Sets the number of files to process for each poll interval.
- Poll Interval - Sets the schedule of how often the Data Sources poll the Connection and rebuild automatically in seconds.
Hive
If applicable, check AutoCreate Schema
If applicable, check Spark Metastore Schema Verification
Enter the Spark Metastore Server URI.
Enter the Table Name to connect to.
Enter a Query to run.
Enter the JDBC compliant Hive URL. (formatted as:
jdbc:hive2://<host1>:<port1>,<host2>:<port2>/dbName;initFile=<file>;sess_var_list?hive_conf_list#hive_var_list).Enter the database authentication Username.
Enter the corresponding Password. (NOTE: Before continuing, you must configure a secret for this password if one has not yet been created.)
Enter the Hive Metastore Version to connect to.
Enter the Driver Class Name for the Hive client jar file.
Enter the jars to use when connecting to the Hive Metastore. (Dependent on version of Hive)
Enter the Spark Warehouse Dir location.
JDBC Generic
- Enter the URI fo the JDBC connection. (Example:
jdbc:mysql://sql10.freesqldatabase.com:3306/sql10439690) - Enter the Username required to authenticate to that connection (if one is needed). (Example:
sql10439690) - Enter the Password required to authenticate to that connection (if one is needed). (Example:
1qr23SV5-cg84) - Enter the Driver Location (managed content key where the driver is stored). (Example:
mysql.jar) - Enter the Driver Class Name.(Example:
com.mysql.jdbc.Driver)
JDBC CData
CData Connections are configured to use a universal OEM key for driver authentication. License keys are injected by a cortex-cdata-plugin that is provided in jdbc-example, so external secrets and keys are not required.
Prerequisites for configuring CData Connections
Prerequisites for configuring CData connections are found here.
The Driver jar-file information required to configure a JDBC CData Connection is found on the CData Website.
- Download driver jar file](http://cdatabuilds.s3.amazonaws.com/support/JDBC_JARS_21.0.8059.zip)
- Upload the driver to Managed Content, and make note of the URI.
- Go to the CData help website to view the online documentation for your driver.
CData Configuration in the Fabric Console
- Enter Plugin Properties (secure JSON-formatted configuration data provided in this field as a secret that is passed to the plugin at startup). The file is stored in Managed Content and the available properties are in the CData documentation. (Example:
sf1_plugin_properties) - Enter the Driver Class Name (e.g.
cdata.jdbc.salesforce.SalesforceDriver): You can find this in the online documentation for your specific driver (under "Getting Started") on the CData help website.
Add custom connection parameters
- You may enter custom connection parameters for any connection type.
- Custom parameters are entered as key-value pairs.
- There are two ways to add custom connection parameters:
- Selecting secrets:
- Click
+ Add custom parameter by selecting secret.
- Click
- In the row that is added enter a name for the parameter.
- Select a secret from a list of secrets that have been configured for Fabric previously.
- Entering text:
- Click
+ Add custom parameter by selecting secret.
- Click
- In the row that is added enter a name for the parameter.
- Enter a value for the parameter.
- There is no limit to the number of custom parameters you may add.
- To remove a custom parameter click the trashcan icon to the right of the row.
- Click
Createto complete your connection configuration.
- Selecting secrets:
Custom parameters must have unique names.
Create the connection: Console
Click Create to add the configured connection to the Project.
A success or error message is displayed at the top right. If an error message is displayed, review your connection parameters.
Edit connection details: Console
Select Connections in the left menu.
The table lists connections that have been added using both CLI and Console.
To view or edit the details of a connection, click its title in the list.
You may make changes to the following connection details:
- Connection Title
- Description
- Parameters for the connection type
Change the Connection Type by clicking CHANGE TYPE on the right above the field that shows the Connection Type.
Change the Connection Type configuration field values.
Click Update.
Connection in the CLI
Using the Fabric CLI you can create (save), list, list-types, and delete connections.
As always, in the command you can provide your Project context using --project projectName or a configured CLI Profile context using --profile profileName.
List Connection Types
The Connection Type Name is needed to create (save) a new Connection using the CLI.
Run the following command to list the Connection Types supported in Fabric.
cortex configure connections list-type
The Connection Types are detailed here.
Save Connections using the CLI
You can define a Connection using the connection type reference files (json or yaml).
Create secrets required for your connection.
Copy the connections resource file for your connection type from the connections type reference.
Replace parameter values with the values for your connection.
Save the file locally.
Run the following command for the format you saved the connection as:
JSON file:
cortex connections save <connectionDefinition/file/path> --project projectNameYAML file:
cortex connections save <connectionDefinition/file/path> --project projectName --yamlVerify that the connection was added to the Project using the CLI:
cortex connections list --project projectNameVerify the connection is configured correctly using the CLI:
cortex connections describe <connectionName> --project projectName
OR verify the connection in Console:
- Login to Fabric Console
- Select the Project you saved the connection to.
- Click Connections.
- Verify that the connection was successfully added to the Project.
- Click the Connection Name to view the details.
List Connections using the CLI
Using the Fabric CLI you can query a list of Connections configured for your Project. This list can be helpful to find the ID of a Connection that you want to use to create a Data Source for, view details for, or delete.
You can filter your list of Connections using a JMESPath or Mongo-style filter.
See the examples on the Use CLI page.
Delete Connections
Deleting Connections is a protected action in Cortex. When you run the delete command an Impact Assessment is run, and if downstream dependencies are found, the deletion is not allowed, and the resources using that Connection are listed. You must remove dependencies to unblock the delete action.
Delete Connections via the CLI
cortex connections delete connectionName
Delete Connection via console
Authenticate to the Fabric Console and select your Project.
Click Connections in the left navigation panel.
Find the Connection you wish to delete in the Connections List.
Open the menu at the end of the row and click Delete Connection.
A verification message is displayed; click Delete or Cancel.
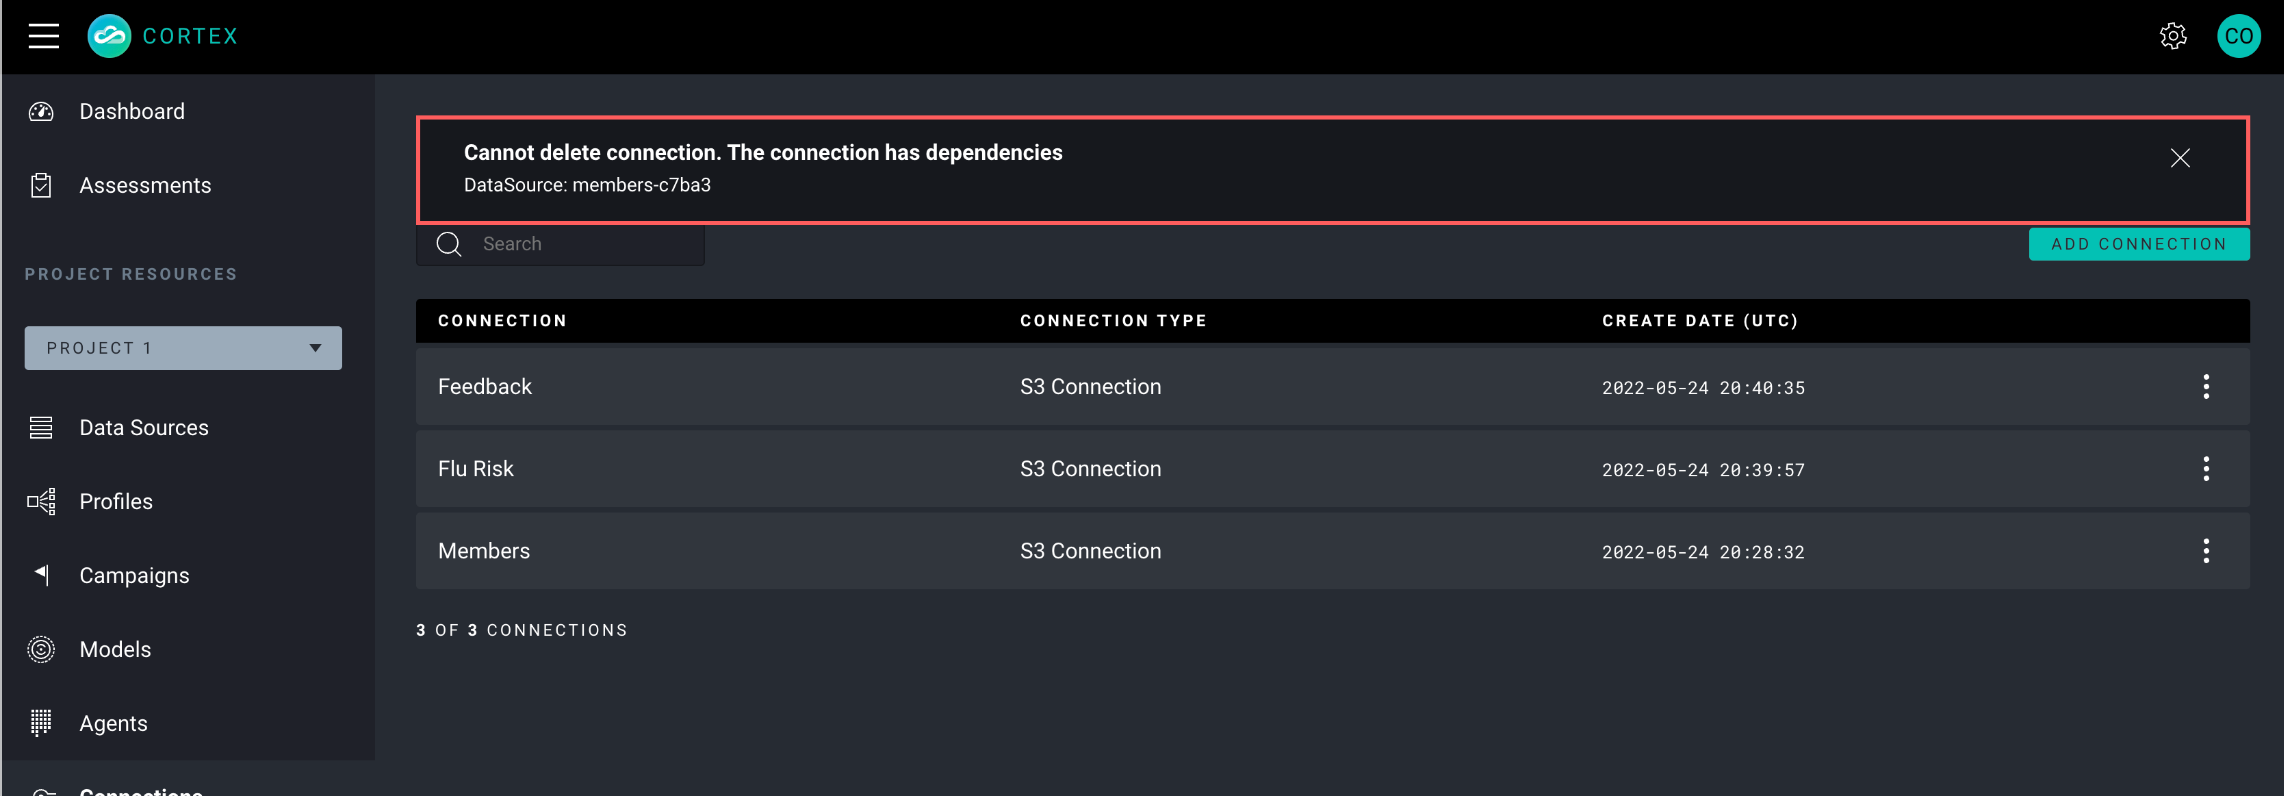
If downstream dependencies are found the deletion is prevented and a message is displayed.
 c
c
Connection secrets
Secrets must be created prior to creating connections, either using the CLI or the Console. If the secret is NOT created before the connection, you will not be able to save the connection successfully.
Using Connections
Connections are used to provide data to Skills through the Service Messages. You can build Skills using one of the two methods:
- Authenticate to the CLI and generate the Skill scaffolding in your local drive using the
cortex generate skillcommand - Build Skills in the Fabric Console
To reference the Connection if you are using the CLI method follow the steps below:
In the Console create a connection as instructed above.
Generate the Skill scaffolding in your local drive using the
cortex generate skillcommand.Within the context of the Skill repo Authenticate to the Python Lib.
NOTE: The steps below are executed from a Jupyter Notebook (or other python IDE)
Fetch the connection.
conn = client.get_connection('default/connectionName')Example Output:
{'allowRead': True,
 'allowWrite': False,
 'name': 'default/connectionName',
 'title': 'Connection Title',
 'description': 'test0',
 'connectionType': 'mongo',
 'tags': [],
 'params': [{'name': 'username', 'value': '<username>'},
  {'name': 'password', 'value': '#SECURE.test5552234'},
  {'name': 'uri',
   'value': 'mongodb+srv:<host>?retryWrites=true'},
  {'name': 'collection', 'value': 'collection'},
  {'name': 'database', 'value': 'admin'},
  {'name': 'sslEnabled', 'value': 'true'}],
 'createdAt': '2020-11-25T00:05:06.360Z',
 '_version': 2}
Parse Secrets.
secret_dest = [c['value'] for c in conn['params'] if c['name']=='password'].pop().split('#SECURE.')[1]Fetch secrets using the get_secrets method in python client.
secrets = client.get_secret(secret_dest)Apply secrets variables.
host = [c['value'] for c in conn['params'] if c['name']=='uri'].pop()
username = [c['value'] for c in conn['params'] if c['name']=='username'].pop()
password = secrets['value']
database =  [c['value'] for c in conn['params'] if c['name']=='database'].pop()
Using parameters returned construct the connection uri according to the connection type.
uri = host.replace('//', f'//{username}:{password}@')Using the the client driver (e.g pymongo, spark.jar) for the intended connection, instantiate the connection using the URI and parameters returned from fetching the connection.
- a.
!pip install pymongo[srv] - b.
c = MongoClient(uri) - c.
db = c['test'] - d.
collection = db['cs_qa'] - e.
import pandas as pd - f.
mentions = pd.DataFrame(collection.find({})) - g.
mentions.to_json()
Example Output:
{"_id":{"0":{"binary":"\\\\\\u57c1\\u0010\\u001f\\u0019\\ub9ee]\\"","generation_time":1558552449000},"1":{"binary":"\\\\\\u5bdd\\u0010\\u001f\\u0019\\ub9ee]#","generation_time":1558556637000}},"test_data":{"0":"sample value1","1":null},"test":{"0":null,"1":"test_this"}}- a.
Use JDBC Connections in Agents
The cortex-cdata-plugin cannot be used to create JDBC Connections with the Profiles SDK because Spark SQL has specific requirements for JDBC connections.
A JDBC Generic or JDBC CData Connection used in conjunction with the Profiles SDK must be configured such that the driver JAR file is included in the Skill image.
Follow this method to use JDBC-generic and JDBC-cdata connections in Agents.
- Configure a Skill for the JDBC Connection; select the jdbc_generic Skill Template.
- Build an Agent in Agent Composer; select the Skill you published using the template.
- Click the Skill to expose the Properties Panel on the far right.
- In the Properties panel under Connection Type select
jdbc_cdataorjdbc_generic. - In the Properties panel under Connection Name select the name of the connection you configured.
Corresponding Service Messages may also be available for selection when working with JDBC connection types.
S3 and GCS File Stream
S3 and GCS File Stream works with Spark to provide streaming updates to Data Sources. It works as follows:
Set up the S3 or GCS File Stream connection type.
When the Connection is established the bootstrap file is read and the schema for the connection is inferred from the contents of that file.
If you want to update the schema, you must load a new bootstrap file with the new schema to your S3 or GCS bucket and create a new connection that uses the new file as the bootstrap URI.
The Connection is updated anytime a new file is loaded to the Stream Read directory. The Connection updates data using the most recent file. Only the attribute values that have changed are updated.
If no value is present, the previous value is persisted.
The Connection update ignores any attributes that were not expressed in the bootstrap file when the schema was established.
If you want to update an attribute value to a null, it must be expressed as
null.Additional records (rows) are pulled in during the streaming updates.
When the Connection is updated, the Data Source is updated automatically based on the trigger configuration to pull in the new values. (NOTE: You may choose to manually poll the connection.)
You must manually rebuild the Profiles that use Data Sources pointing to these Connections. Changes to Profile attribute values are NOT made automatically.
Configure Connections using Python Library
Some examples of Connection creation using the Python Library can be found in the public CognitiveScale/cortex-fabric-examples repo.
Best Practices for Configuring Connections for Mission Runtime
Prior to Mission runtime you may want to display a static KPI value which is based on a set of predefined attributes that are used by the runtime cycle to collect feedback. These attributes may be added to a base feedback file that you configure a Connection for.
This feedback file may contain other attributes in addition to the ones listed below. The feedback attributes are specific to the use case. Your feedback collection attributes may differ.
EXAMPLE:
Feedback attributes included in the member-feedback s3 Connection:
mission-name_feedback_call_mademission-name_feedback_call_ignoredmission-name_feedback_comm_mademission-name_feedback_comm_ignored
After these feedback attributes exist in the member-feedback Connection, they may be selected to form the Data Source (Member Feedback). These attributes are then used to generate a Profile schema.
When you configure the Mission Cohort, select the Profile Schema with the feedback attributes. When you configure the Mission Goal KPI, use the attribute that collects the feedback you want to measure in the KPI expression.
A system-generated Connection and corresponding Data Source is added to your Project at Mission runtime to manage feedback and rewards. Runtime KPI data is collected in these components and displayed in the Campaign Dashboard, regardless of whether or not you configure the static Connection described above. You cannot edit this streaming Connection.