Agents Overview
This is a guide to creating and managing Agents in SENSA Fabric. Before you begin working with Agents, review the Introduction to Agents page.
Agent Components
Agents are authored in SENSA Fabric.
Agents are composed of several elements, including:
- Skills and Actions
- Service Messages - inputs and outputs
- Message Flows that map data from the messages to through the Skills.
Agent List View
When you select Agents from the left menu in the Fabric Console, a list of Agents that have been created by project collaborators is displayed. On this page you may:
- Search for an existing agent
- Open an existing agent in the composer interface
- View Agent metadata
- Delete Agents
The Agent Composer
When you create a new agent or when you click the link on the Agent name in the list view, the Agent Composer is displayed. This is where you can see all components and properties of an Agent and where you can add and modify Agent components. In addition, you can test an Agent's execution and view the output and debug data.

Agent Composer is divided into six sections:
Action Menu: Displays global notifications and provides the menu header where you can access options for several Agent creation tasks.
Inputs and Outputs Panel: Lists all of the currently configured Service inputs and outputs
Authoring Grid: Displays an Agent's Skills, quality indicators, and service message paths.
Orchestration Panel: Displays the orchestration of the Agent's Skills/actions.
- Synapses: Automatically lists Skill outputs when you add Skills to the grid. From the synapse panel these outputs may be added to the Messages flows as inputs to other skills.
Properties Panel: Displays the properties of the currently selected component. If no component is selected, the agent's properties are displayed. Some properties are editable in this panel, while others are read-only. Click the wrench icon to expand or collapse the panel.
Developer Tray: (Resizable from tab at the center) Consists of a menu ribbon that provides the Run command button and development tools:
Run (Play Icon): Click to invoke the Skill that is selected in the grid above. A JSON dialog opens where you enter the required payload to run the Agent or Skill.
Replay (Tab): Displays a line graph of the time the run takes to execute each Skill in the top section. The line graph can be expanded and contracted using the slider provided on the bottom right of the panel.
Debug(Tab): Displays the input and output messages from the test run.
Trace Output is displayed in the bottom section, where you can inspect the input data received by the Agent's Skills and the output data produced.
Known Issue and WorkaroundIf you pull the Developer Tray tab past the top of the page, you may not be able to pull it back down. To reset the page to the default setting and regain access to the agent configuration section: (for MacOS)
- Open the developer tools panel (Right click in the UI and select Inspect.).
- In the top menu bar open the Application Tab.
- In the Left Menu in the Local Storage section expand Local Storage and all sub-sections until the console URI is exposed.
- Click the URI to open a list in the right panel.
- Delete the item labelled Layout.
- Refresh the page.
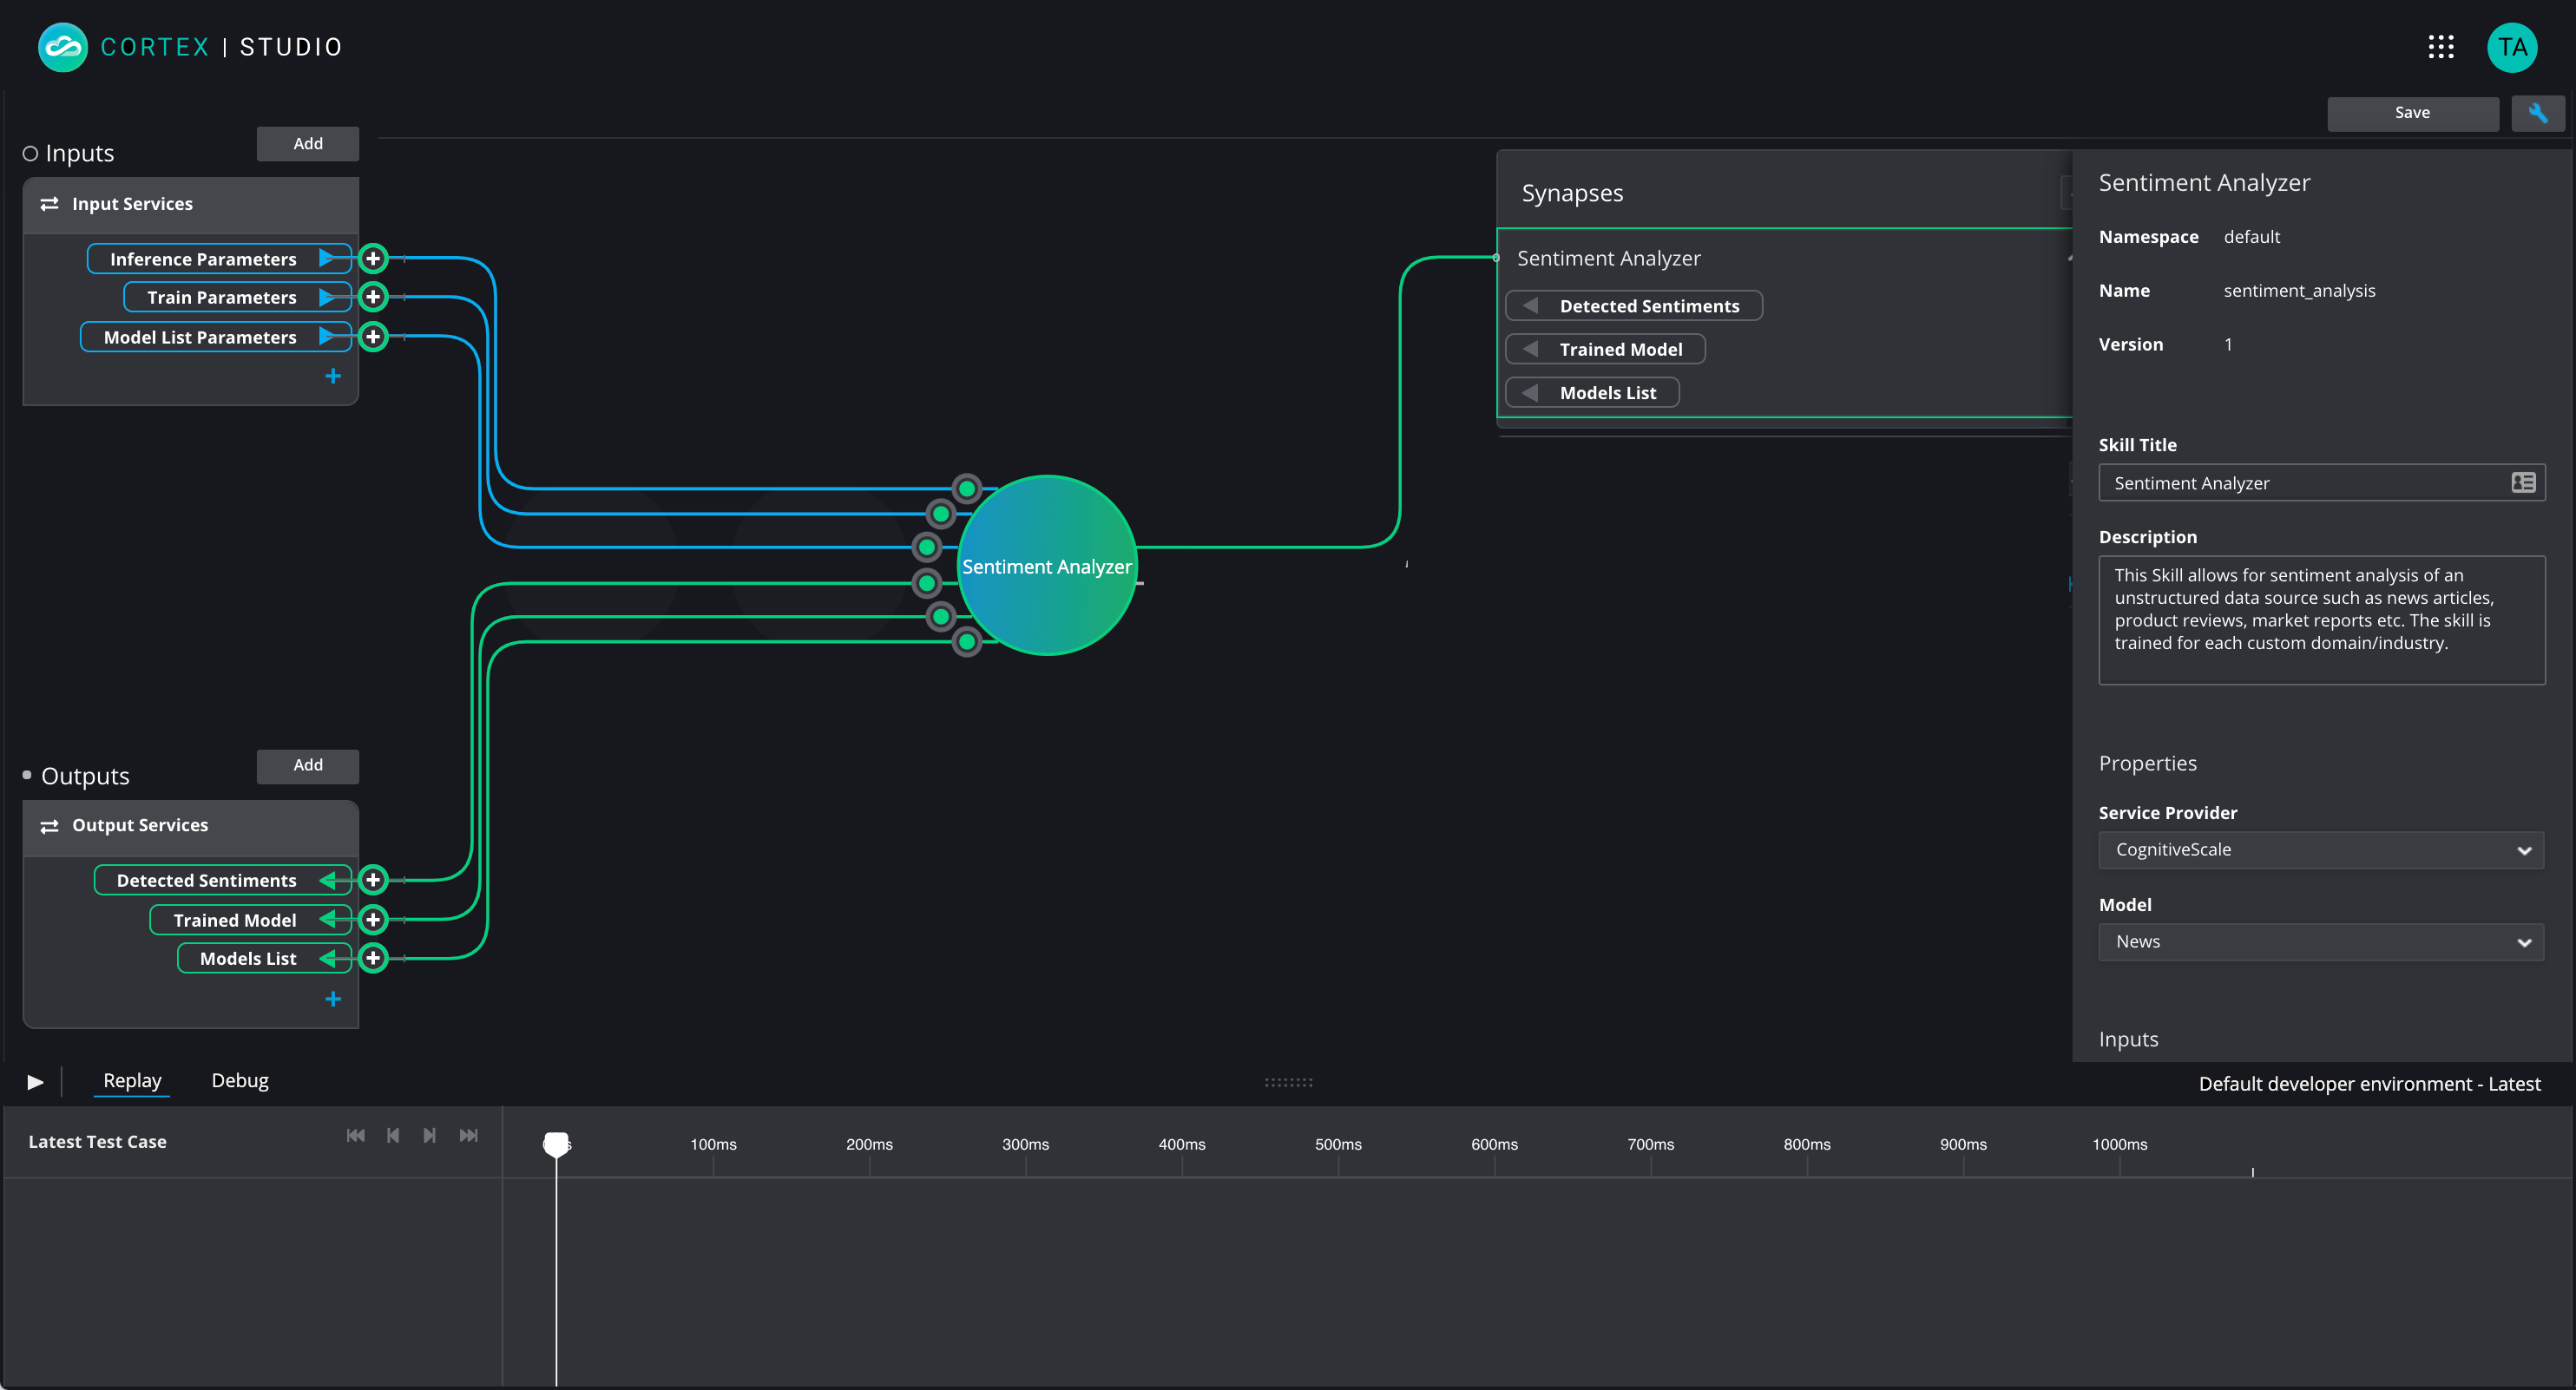
Example Agent Configuration
The example below shows a Sentiment Analyzer Agent that has one Skill with multiple inputs and outputs to orchestrate message flow and processing.
Agent metadata
- Agent Name: A URL-friendly identifier that is used in service calls to the Agent in other areas of Cortex. It must be unique within a Project.
- Version: Automatically incremented
- Agent Title: A human-readable name for the Agent that is displayed in the Agent list.
- Tags: Categories that can be applied to an Agent so it can be more easily searched.
- Description: (Optional) A description of the Agent's purpose.
Agent Authoring Preparation
Pre-authoring configuration processes provides the backend setup you need to build Agents, including:
- Use Cases have been defined.
- Models have been developed. (Use any IDE)
- Skills (Actions) have been built and invoked. (Use Fabric CLI)
- Secrets have been configured. (Use Console or CLI)
- Data has been curated and is available to your Cortex cluster. (Use Python Libraries, PyMongo, S3, etc.)
- (Optionally) Cortex Connections, Data Sources, and Profiles have been configured. (Use Fabric Console)
Create an Agent record
Before you begin authoring Agents be sure that all the component parts have been configured as described above in the section "Agent Authoring Preparation".
The steps below create an Agent record that users can collaborate to author.
- Login to Fabric Console and select a Project context.
- Select Agents from the left menu.
- From the Agent list view click Add Agent at the top right.
- Enter an Agent Title, a human-readable identifier.
- Verify or enter an Agent Name. By default this is auto-generated. You may toggle the
Auto-generatedswitch to off and edit the name or enter a unique URL-friendly name. Agent names must be alphanumeric, beginning with a letter and ending with a letter or number. In between dashes and underscores are allowed; no other special characters can be used. (Names must be 20 characters or fewer) - (Optionally) Enter a Description that assists collaborators identify Agents.
- Click Save to save the Agent metadata.
Agents are automatically available to all user with access to the project upon creation.
Configure Agent Tags
Agent tags are displayed in the Agents Properties panel in the design view. You can filter the search for Agents by entering a tag value.
- Login to Fabric Console and select a Project context.
- Select Agents from the left menu.
- Click the link on the Agent name in the Agent list to open it in the design view.
- The Properties panel for the Agent is open on the far right. If you click on any element of the Agent, the properties for that element are exposed in the panel. To show the Agent properties click in an empty cell on the grid.
- Under "Tags" in the Agent properties, click the dropdown to view the available tags
- Select as many tags as you want.
- Click the checkmark below the field to save the tag selections.
Remove Agent tags
- In the properties panel for the Agent, click the
xbeside a tag you want to remove. - Click the checkmark below the field to save the changes.
Agent authoring and collaboration rules
- When you open an Agent, it is locked to prevent other users from editing it at the same time or the same user from opening it in another tab and editing it.
- A username and a lock icon are displayed next to locked Agents.
- While you are editing the Agent, other users may open that locked Agent in read-only mode.
- Locks are renewed every 20 seconds.
- When you return to the Agent list, open another app, or switch another Agent, the lock is released.
- If you close your browser or your standalone instance the lock simply expires and is released during the next renewal cycle.
- Changes are saved automatically every 60 seconds.
- To manually save your changes, click Save.
- Skills must be connected to inputs, outputs, and optionally to other Skills (via synapses).
- Input services are represented by blue lines.
- Output services are represented by green lines.
- To connect services to Skills, their message type (schema) must match or must be mapped.
- In the Skills properties panel select a secret key if one is required.
- Agent Properties and Headers are retained from Skill to Skill during runtime.
Delete Agents components
There are two ways to delete Agent components while authoring.
- Click the component you want to delete to select it.
- Click delete on your keyboard. (NOTE: The item is removed immediately from the Agent without a validation message.)
Components that are deleted from an Agent are NOT deleted from your account. They may be added back to the Agent or to other Agents.
Delete Agents
- Open the vertical ellipsis menu at the far right in the Agent row of the Agent list.
- Click Delete.
- Click Confirm in the verification message.
You can delete Agents from the Agent list, but keep in mind that when you delete an Agent, it is removed from the project, and it cannot be retrieved.
Locked Agents cannot be deleted.
Use the CLI to manage Agents
Using the CLI you can:
- List Agents
- List services
- List snapshots
- List activations
- Save Agent definitions
- Invoke services
- Create a snapshot (with
snapshotDefinition) - Get activation details (with the
activationId) - Describe the bill-of-materials of an Agent snapshot (with the
snapshotId) - Describe Agent details (with the
agentName) - Delete Agents When Agents are deleted via the CLI an Impact Assessment is run that returns a list of artifacts that are affected by the deletion.
You can view CLI options in the CLI Reference Guide.
Saving Agents best practice
Agents are created and saved in SENSA Fabric.
In addition, you should always save your Agent component definitions (.yaml or .json file) in a version controlled repository separate from Cortex. Skills and Agents can be imported to the Cortex catalog.
Cortex component definition files include:
- Skill definitions
- Type definitions
Next steps
After an Agent has been authored and saved: